• Steel Soldiers now has a few new forums, read more about it at: New Munitions Forums!

  • Microsoft MSN, Live, Hotmail, Outlook email users may not be receiving emails. We are working to resolve this issue. Please add support@steelsoldiers.com to your trusted contacts.


Inner Hub Seal on rear axle

fpchief

Well-known member
1,041
218
63
Location
South Alabama
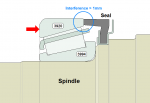
If the inner hub seal looks fine (meaning that rubber piece that wraps around the seal looks intact) do most just leave them alone? I have asked this question before and did not get much response. What is a good way to get the new hub seal started on the spindle? i took the front ones to a shop with a press but now i am working on the rear axles.
 

Karl kostman

Well-known member
Steel Soldiers Supporter
2,286
840
113
Location
Fargo ND
I look at this from a couple different stand points, the first is since your looking at the seal you are already IN THERE and everything is already removed and its ready to replace. OK then I would think about when was the last time it was replaced, you might or might not know this answer, If I was already in there and did not know when it was replaced I would be doing the replacement, in this way YOU know exactly what your driving. To me thats worth a lot!
Karl
 

sandcobra164

Well-known member
2,999
287
83
Location
Leesburg, GA
I agree with Karl Kostman, the seals are only about $10 each and it's quite a bit of work to get to it. If in doubt I'd change it while I was in there.
 

Keith_J

Well-known member
3,657
1,314
113
Location
Schertz TX
This seal keeps dirt out of the bearings. Bearings are lubricated with GAA, the problems start with the axle shaft seal and GO leaking into the bearings, causing the inner seal to be overloaded.

Check diameter and if good, it should be fine. Put a thin layer of GAA on the seal area to prevent burn. It will be fine.

Double down on the cork seal for the key way and the outer seal. This is what causes migration of GO which overloads and leaks. I will use silicone sealant on this joint to make certain.
 

fpchief

Well-known member
1,041
218
63
Location
South Alabama
10-4 on all. yea it is tore apart, seal looks just fine and contemplating replacing it. I do have new ones. also, reading the TM shows the hub removal, etc but i do NOT see where it talks about the cork wedge in the re-assembly. when exactly does it get inserted? I assume after the bearings and before the outer seal? First time doing this...I know i am just missing it in the TM.

Keith, you said you use silicon sealant on the joint. Where exactly are you talking about?

Thank y'all for the help.
 

gringeltaube

Staff Member
Super Moderator
Moderator
Steel Soldiers Supporter
6,886
2,269
113
Location
Montevideo/Uruguay
1) Back in the old days they had no RTV-sealants, so cork was the best solution...
Read this thread, down to post #13: https://www.steelsoldiers.com/showthread.php?94195-Rear-Hub-Removed-A-Few-Questions

2) If you had a #3920 bearing cup, loose, place it on your inner bearing cone (well seated on the spindle) and check that there is at least 1 mm interference between the cup and the seal lip. Replace seal, if you found less than that - or if there was any evident deformation of the seal and /or its lip.
 

Attachments

sandcobra164

Well-known member
2,999
287
83
Location
Leesburg, GA
fpchief,
The RTV gasket sealant goes on during the last part of re-assembly. You have a keyway on the axle at the top. Install the brake drum / hub and the outer bearing, clean the keyway with a rag sprayed with brake cleaner. Place a thin layer of RTV Sealant in the keyway and install the outer seal. Lay a thicker bead that slightly goes out of the keyway and install your inner nut. Torque down to 50 foot pounds while an assistant rotates the drum to load the bearings and ensure you got them tight. Your assistant should have difficulty spinning the drum once you reach 50 foot pounds. Back the inner nut off 1/2 a turn. Install the lock washer, install the outer nut and torque it to 150 foot pounds. Dab another spot of RTV Sealant at the end of the keyway and push it in with your finger. Bend over the locking tabs on the washer and call it good. Install your axle shaft and torque the 8 bolts to 70 or 80 foot pounds.

Disclaimer, the TM says to back 1/8 to 1/4 turn off the inner nut when loading the bearings. I've adopted the 1/2 turn from a few members and have had good results. Tight bearings run hotter and I tried the TM method with poor results. Maybe I'm wrong or perhaps my truck was worn out but I tried both ways and 1/2 a turn to the loose side made my hub temps drop into an acceptable range.
 

Keith_J

Well-known member
3,657
1,314
113
Location
Schertz TX
The cork wedge prevents migration of GO to GAA through the key cut. It never worked in my experience. GO worked fine on the wheel bearings with the GAA. It was something we all had to do on annual services.

Gringletaube introduces a great image of why this joint leaks, it has a dynamic surface on the bearing plus the notch of the seal key slot.

The problem is when the lube heats and expands into the brake system.
 

Floridianson

Well-known member
Steel Soldiers Supporter
7,391
2,440
113
Location
Interlachen Fl.
Before I got some cork I just crammed some pieces of bounty paper towel in the key way under the bearing real tight and never had a problem. I don't believe if your sliding on a greasy bearing the key way stays clean and silicone likes clean and dry.
The industry standard for most bearings preload is taking the bearing /hub to 100/150 spinning then back off and back to 50flbs. The back off as said calls for 1/4 turn. I like to go 1/8 because the outer seal if to loose can leak GO into the bearings. Anything other than this military stuff with the outside seal goes 1/4 turn off 50flbs pre load. If you grease slinger is cleaned any grease the does get by the inner seal comes out on the outside drum. If the wheel cylinder leaks that put brake fluid on the inside of the drum.
 

fpchief

Well-known member
1,041
218
63
Location
South Alabama
Thank all of you for the replies. Used the 3" PVC to drive the seals on and it worked like a dream. Another job on a deuce I am not hesitant to do anymore. The second axle will be a piece of cake....maybe.
 
Top
AdBlock Detected

We get it, advertisements are annoying!

Sure, ad-blocking software does a great job at blocking ads, but it also blocks useful features of our website like our supporting vendors. Their ads help keep Steel Soldiers going. Please consider disabling your ad blockers for the site. Thanks!

I've Disabled AdBlock
No Thanks