

1stSarge
Member
- 428
- 5
- 18
- Location
- Mount Vernon, Ohio
**** Warning - Disconnect the batteries before starting. ****
**** There are live 24v contacts that can short out when removing the dash cover and instrument cluster ****
In troubleshooting many of the electrical gremlins in your CUCV, especially the charging system, many of the problems can be isolated to the instrument cluster. Often, members will tell you to remove, check bulbs, and clean up the cluster.
This is a small write up on how I did it.
As per the manuals; Remove all dash components, and the instrument cluster. Remove all bulb holders or sockets from the cluster.
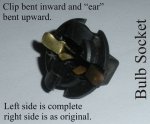
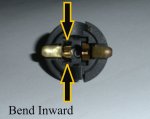
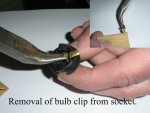
Within each socket is two “clips”. They can be removed by gently squeezing the top of the clip with a small pair of needle nose pliers. And rocking it out. Once out. You can clean it using a jewelers file, fine sandpaper or emery cloth. More cautious people use a pencil eraser or cleaning chemicals. Whatever method you use, with the clip out, you now have complete access to it for cleanup, and complete access to the socket for cleanup.
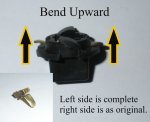
When you are done cleaning each “clip”, reassemble each socket and then bend the ear that makes contact with the circuit film outwards or upwards to make a strong contact to the circuit film. Squeeze each clip together to make a strong contact to the bulb. (see photos)
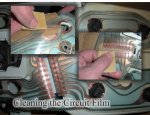
Turning your attention to the circuit film. GENTLY clean up the traces where a socket or connector makes contact, the same way as before. They should be bright shiny metal.
You can use a dielectric grease to coat the contacts to help prevent further corrosion. Also use caution using emery cloth to clean with, as it contains metal particles that can short out components.
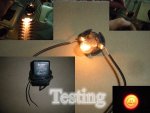
Testing.
Using an old 12DC adapter I had laying around, I cut the ends off, and used it to test all of my connections every step of the way. First, the bulbs, then the sockets with the bulbs in them, then the circuit traces on the film with the socket installed, then finally at the connector on the instrument cluster to verify all traces were making good contact.
Before reassembly, take the time to give the wiring harness connector the same treatment. (might want to disconnect the batteries first).
I only focused on lighting in this write-up, I felt the fuel gauge, speedometer, and voltmeter are deserving of their own section. I hope this is helpful to someone who has never seen what these look like, or wanted to know what it should look like.
*** edit ***
All of the bulbs are 168s except for the GEN2 and the bulb between the speedo and the fuel gauge. They are 194s
---John
-Right Click Thumbnails and choose “Open link in new tab” or “Open link in new window” (Thanks Warthog)
**** There are live 24v contacts that can short out when removing the dash cover and instrument cluster ****
In troubleshooting many of the electrical gremlins in your CUCV, especially the charging system, many of the problems can be isolated to the instrument cluster. Often, members will tell you to remove, check bulbs, and clean up the cluster.
This is a small write up on how I did it.
As per the manuals; Remove all dash components, and the instrument cluster. Remove all bulb holders or sockets from the cluster.
Within each socket is two “clips”. They can be removed by gently squeezing the top of the clip with a small pair of needle nose pliers. And rocking it out. Once out. You can clean it using a jewelers file, fine sandpaper or emery cloth. More cautious people use a pencil eraser or cleaning chemicals. Whatever method you use, with the clip out, you now have complete access to it for cleanup, and complete access to the socket for cleanup.
When you are done cleaning each “clip”, reassemble each socket and then bend the ear that makes contact with the circuit film outwards or upwards to make a strong contact to the circuit film. Squeeze each clip together to make a strong contact to the bulb. (see photos)
Turning your attention to the circuit film. GENTLY clean up the traces where a socket or connector makes contact, the same way as before. They should be bright shiny metal.
You can use a dielectric grease to coat the contacts to help prevent further corrosion. Also use caution using emery cloth to clean with, as it contains metal particles that can short out components.
Testing.
Using an old 12DC adapter I had laying around, I cut the ends off, and used it to test all of my connections every step of the way. First, the bulbs, then the sockets with the bulbs in them, then the circuit traces on the film with the socket installed, then finally at the connector on the instrument cluster to verify all traces were making good contact.
Before reassembly, take the time to give the wiring harness connector the same treatment. (might want to disconnect the batteries first).
I only focused on lighting in this write-up, I felt the fuel gauge, speedometer, and voltmeter are deserving of their own section. I hope this is helpful to someone who has never seen what these look like, or wanted to know what it should look like.
*** edit ***
All of the bulbs are 168s except for the GEN2 and the bulb between the speedo and the fuel gauge. They are 194s
---John
-Right Click Thumbnails and choose “Open link in new tab” or “Open link in new window” (Thanks Warthog)
Attachments
-
 67 KB Views: 460
 -
 42.4 KB Views: 431
 -
 57.3 KB Views: 431
 -
 52.3 KB Views: 429
 -
 85 KB Views: 532
 -
 67.4 KB Views: 528
Last edited by a moderator:
