• Steel Soldiers now has a few new forums, read more about it at: New Munitions Forums!

  • Microsoft MSN, Live, Hotmail, Outlook email users may not be receiving emails. We are working to resolve this issue. Please add support@steelsoldiers.com to your trusted contacts.


ISSPRO Turbocator Pyro / Boost Gauge

JDToumanian

Active member
1,655
14
38
Location
Phelan, CA
Hi Group,
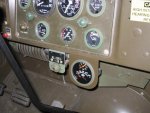
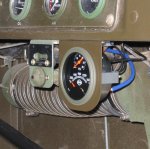
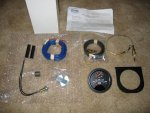
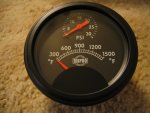
I searched the archives and was surprised not to find someone else who has installed an ISSPRO Turbocator, a really cool 3" combined pyrometer and boost gauge. It requires no electricity except for the bulb to light it at night, and uses a standard K-type thermocouple. I paid just under $300 for the complete kit shown, including the mounting bracket (not included in the kit, you have to order it separately) and shipping.

I like to modify my deuce as little as possible, and the few mods I do make, I like to make look as though the military did them. I've resisted adding a pyrometer, because I felt my deuce was plenty powerful and had no intentions of turning up the fuel, but come to find out - the fuel has already been turned up! Someone in the Army must have done it, but there can be little doubt..... I can pull hills in high gear, and running light I can hold 55 over almost any terrain. Pulling another truck with my towbar is a breeze. I had always thought it was because the truck was geared so low! It's time to monitor what is going on, as I like the power my truck has but I don't want to melt the engine's guts out.

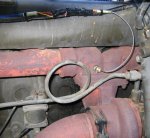
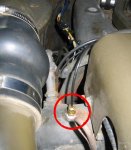
Anyway, I just wanted to show off my cool new gauge. I'll update this with pics of my installation...

Regards,
Jon
 

Attachments

cranetruck

Moderator
Super Moderator
Steel Soldiers Supporter
10,350
74
48
Location
Meadows of Dan, Virginia
Looking good Jon, now let's see it installed. :)
As you know, the exhaust manifold is divided into a front and a rear section. Based on my yet limited experience with the dual probe set-up (one thermocouple in each), the rear runs a little hotter than the front, so if I may suggest, install the single probe in the rear section.
 

nk14zp

Active member
2,636
17
38
Location
Columbia Falls Maine
Looking good Jon, now let's see it installed. :)
As you know, the exhaust manifold is divided into a front and a rear section. Based on my yet limited experience with the dual probe set-up (one thermocouple in each), the rear runs a little hotter than the front, so if I may suggest, install the single probe in the rear section.
Yea put the probe in the back part of exh manifold.
 

nosliw

New member
52
0
0
Location
Rural Ky
i had the isspro turbocator gauge setup in my old F-250. the gauge was included with a hypermax turbo kit. it never once gave me a problem!
 

Condec

Member
57
0
6
Location
Port Alberni BC Canada
Isspro also makes a nice 2 1/8 Digital Pyrometer--12V but not a problem Just buy the 24 to 12 volt resistor for the power wire and its done--Looks really cool because the digital readout is in red--sure blends in nice with the dash lites
 

JDToumanian

Active member
1,655
14
38
Location
Phelan, CA
Based on my yet limited experience with the dual probe set-up (one thermocouple in each), the rear runs a little hotter than the front, so if I may suggest, install the single probe in the rear section.
Will do, Bjorn... Thanks for the tip! I hope to install it tomorrow...

What company sold you the kit and mounting bracket please?
I got both from http://www.powertown.com/Scripts/default.asp

They were the cheapest place I found on the net. Their website shows everything "in stock", but when the package arrived, it had been drop-shipped directly from ISSPRO.

The part numbers are R609-10 for the kit and R7608 for the bracket.

The only other thing I had to buy was a 24v bulb to replace the 12v one included in the kit... Either ISSPRO or Powertown can sell you one... I got mine at NAPA, #356 (miniature bayonet, 24v, 3.5cp) for $2.99.

Regards,
Jon
 

JDToumanian

Active member
1,655
14
38
Location
Phelan, CA
I finished installing the Turbocator gauge today, but didn't have time to drive the truck with it in yet.... Tomorrow! Yesterday, I painted the mounting bracket and the gauge bezel green to match the truck.

Installation was a breeze... I drilled and tapped the exhaust manifold with the engine running - I used a 5/32" bit and drilled it about 1/8" deep, then started the engine and drilled through... swapped right to the 7/16" bit (tap-drill size for 1/4" NPT) and drilled it. I don't even think any cast iron dust went inside the turbo, but if any did it blew right out. I stopped the engine to start the tap... Too hard to do with the engine vibrating, and then started it back up to drive the tap in.

The boost gauge hose fitting replaces the little pipe plug on the intake manifold.... Screwed the thermocouple in, connected the wiring and the boost gauge hose... Used Vise-Grip pliers to hold the bracket to the bottom of the dash while I drilled the holes... For the light bulb I crimped a ring terminal for the ground and connected it to the back of the instrument panel, and the other wire I put on a rubber mil-type fitting and used a Y-connector to hook it into the dash light wiring.

I think the whole installation took less than 2 hours.

The bulb is a bit bright, I'm going to dip it in a little jar of green lamp paint I have (same paint that semi-transparent Christmas lights are painted with, it will match as my dash lights are green).

Regards,
Jon
 

Attachments

Last edited:

cranetruck

Moderator
Super Moderator
Steel Soldiers Supporter
10,350
74
48
Location
Meadows of Dan, Virginia
Nice!
You may want to remind others that holes for pipe thread tapping should be tapered using a pipe thread tapered reamer. Alternately, a smaller size bit can be used, but for best result use a reaming tool. (Pipe threads are tapered)
Also, I have noticed that when driving, I glance at the EGT more often than any other instrument and like mine up front of the steering wheel where it is easy to read without having to turn my head...no criticism just my humble opinion....
 

JDToumanian

Active member
1,655
14
38
Location
Phelan, CA
You may want to remind others that holes for pipe thread tapping should be tapered using a pipe thread tapered reamer.
Fascinating... I actually didn't know that! :oops:

I don't use pipe taps very often, I just looked at the laser engraving on the tap that said "use 7/16" drill" ......I drilled the hole, and drove that sucker through. I didn't have any problem and it made nice clean threads (drilled/tapped dry... cast iron should not be lubricated when machined). It took more force than an equivalent sized regular tap, but well within the tap's ability - It wasn't going to break.

Huh. learn sumpin' new every day!

Jon
 

Jake0147

Member
782
18
18
Location
Panton, VT
I've done pipe threads both ways many times. Using the recommended drill works just fine. Using the "Other" recommended drill plus the tapered reamer makes a much, much "prettier" threaded hole. I'm quite sure that this makes a better fit. For most applications (such as this) the tapered tap has never failed to get enough "perfect" threads to make the seal, and the remaining ones, even if not "pretty", do provide the mechanical strength exceeding any pipe fitting I've ever tried to use.
Given the choice, I'd use a reamer every time. Given practical applications, time constraints (I'm usually at work if I'm tapping pipe threads), and the fact that I don't do enough to justify owning a set of reamers for this- I use a straight drill most always.
 

rmgill

Active member
2,479
14
38
Location
Decatur, Ga
I need to add a pyro, but I want one with the green/yellow/red zone's for FAST determinations of temperature at a glance vs having to stare and focus on the gauge. The gauges on a duece are hard to see at night. I wish the panel was angled up towards the driver a bit more than it is.
 

JDToumanian

Active member
1,655
14
38
Location
Phelan, CA
Hi Group,
I've finally had a chance to drive my deuce since the Turbocator gauge was installed, and I'm sure glad I added it! For the test run, I drove as though it wasn't there... I drove like I always have ...to see what kind of temps I've probably generated in the past.

Typical around-town driving, with stop lights and traffic, saw temps between 600-1000, and around 5-8 psi.

Freeway driving was the surprise for me.... The backside of Cajon Pass, a steady ~3 percent grade which I had always taken at 55 in 5th gear with no problem, generated around 1300 degrees and 14 psi. Wow! That's the upper end of what I'd like to see...

Makes me wonder what was going on when I pulled my V-18A/MTQ pole setting truck for 350 miles with my tow bar, pedal to the metal for nearly the whole trip. Poor pistons, I'm sorry! ...It won't happen again.

Regards,
Jon
 
Last edited:

cranetruck

Moderator
Super Moderator
Steel Soldiers Supporter
10,350
74
48
Location
Meadows of Dan, Virginia
I have a feeling that you'll soon move the gauge to a location where it's easier to read while driving....
How is your fuel delivery setting? How much of the threaded rod is showing?
 

JDToumanian

Active member
1,655
14
38
Location
Phelan, CA
I have a feeling that you'll soon move the gauge to a location where it's easier to read while driving....
How is your fuel delivery setting? How much of the threaded rod is showing?
You could be right... It may get moved to the steering column soon! :-D

I never thought to look at the rod as a measure of how high the fuel is turned up... I'll get back on that as soon as I get a chance to look...
 
Top
AdBlock Detected

We get it, advertisements are annoying!

Sure, ad-blocking software does a great job at blocking ads, but it also blocks useful features of our website like our supporting vendors. Their ads help keep Steel Soldiers going. Please consider disabling your ad blockers for the site. Thanks!

I've Disabled AdBlock
No Thanks