• Steel Soldiers now has a few new forums, read more about it at: New Munitions Forums!

  • Microsoft MSN, Live, Hotmail, Outlook email users may not be receiving emails. We are working to resolve this issue. Please add support@steelsoldiers.com to your trusted contacts.

Just got home with my M116A3

number9

Member
455
0
18
Location
Lexington, KY
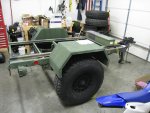
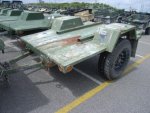
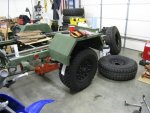
Won it out of Richmond, VA. They looked good in the pictures but I had no idea what I would find when I got there. Was VERY pleased to find it is in brand new condition. Tires still have the tits on them, all grease zerks have little plastic caps on them, the tool box had all the accessories in it including the TM manual in a plastic baggie.

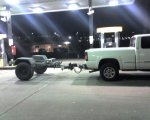
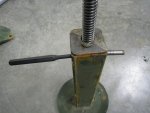
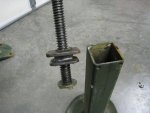
These things are nice.... and heavy. Took 3 of us to pick it up off the ground and hook it to the pickup. The landing gear works but was folded up. GREAT thanks to all those on the forum who have posted great info. I was able to have the 12v bulbs with me and also pre made a pigtail out of a 7-pin plug, 4-wire trailer wire kit and some 5/8" plastic wire sheath. Connected it up according to the wire diagrams on this site and confirmed the lights worked. No issues.

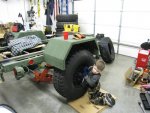
This thing is so nice I almost hate to cut and weld on it. I plan to cut the fenders down narrower to gain more room between them, weld some square tubing on the trailer to make it into a "utility trailer" and put a wood floor on it and use it to haul my dirtbikes. I'll probably move the tool box up on the tongue and add some jerry can mounts on the front or side of it to haul the fuel for the bikes.

I'll post up some pics tomorrow when it gets daylight.

...........
 

popacom

Member
Steel Soldiers Supporter
564
9
18
Location
winchester,ky
R e: M-116

Sure ya would't rather trade it to me for real good 116 chassis + boot rather than defacing crisp mil example :drool:


popacom
Bill Kagin III (tbanks partner)
Winchester,Ky
859-808-0836 :mrgreen:
 

number9

Member
455
0
18
Location
Lexington, KY
Haven't got any good pics of it yet. Should have took some when I took it out to the car wash and washed it off real good a couple weeks ago when it was so nice out. Still has the road spray on it from dragging it home from Richmond in these pics.

I sure wish it sat level with my truck. I am thinking of probably putting some steel wheels on it - 16x8 or 17x8 - and painting them flat black to keep it close to looking right. 16's would be cheaper but my truck's got 17's on it and it would be nice to be able to rotate them back to the trailer or use the same spare for both. Tires on my truck are 285/70-17 which are about a 32.5 x 11, so using that size would lower the trailer down about 2.5".

I am going to have to shorten the landing gear a little too. If I am parked on flat ground it is fine, but anything other than that and it's a inch or two too long to lower into the locking position and crank the trailer off the truck.

Like I said, I hate to cut it, but I bought it to use as a dirtbike trailer and it just ain't wide enough between the fenders for two bikes as it is. Narrowing the fenders down will give me about an extra 10" between them and depending on what backspacing the wheels have that I put on it I may get an extra inch or two more.

I am thinking right now of using 2x4 square tubing for the job. Use it to weld to the sides of the frame and widen it out, then weld a runner all the way down the side to make the frame for the floor. Same 2x4 tube for the side posts. Haven't decided what to make the top rails out of. Angle iron is very handy for the intended use, just drill a 1/2" hole where ever you need to hook a tie-down, but I don't want it to look 'home made' and I think angle iron might do that. Haven't decided on keeping the floor width between the fenders or having the floor extend out wider to the middle or outter edge of the fenders like the flatbed gen trailers do. That would be handy for extra room on the trailer. Gonna add a couple jerry can mounts on it somewhere and use the plastic jerry gans for the dirtbike fuel. I'd like to have another one of those boxes that came on it but I bet they'd be hard to find.
 

Attachments

maplehillfrm

Member
112
0
16
Location
binghamton ny
nice looking trailer, what are the dimensions on the box? are they the same boxes that come on all teh genny trailers? If they are I may have one, pat,,
pm me with dimensions unless you know they are the same boxes, which I would think they were but,, mine came off a 103a genset trailer
 

moose53

New member
141
1
0
Location
Bordentown NJ
nice looking trailer, what are the dimensions on the box? are they the same boxes that come on all teh genny trailers? If they are I may have one, pat,,
pm me with dimensions unless you know they are the same boxes, which I would think they were but,, mine came off a 103a genset trailer
I'd be interested in the genny box, I have a M116A1 thats missing its box. I'm only about 30 miles from you as well.

Jim
 

Green_gator

New member
760
1
0
Location
Tampa, Fl
That is a very nice looking trailer. If you are going to switch out the tires and rims I am interested in the ones that you have on it for my flat deck version of the same trailer. I have one tire in need of replacement and would love to have a spare.
 

Attachments

number9

Member
455
0
18
Location
Lexington, KY
Well work on my trailer mods officially began today. I plan to add to this thread throughout the entire process. Its probably gonna take a while though.

I'd been kicking around the idea of putting 16x8 steel wheels and 33" tires on the trailer to lower the height down so it will sit level behind my truck - and make loading the dirtbikes a little easier. After pricing out the cheapest black steel wheels and tires I realized it would be cheaper to just get a set of 33 x 12/50 - 16.5 tires and put them on the trailer wheels. So I decided to go that route.

16.5 tires are getting hard to find. I got a set of BFG All Terrain and mounted them up tonight. My oldest boy is in the garage any time I am. Youngest one is sick with a fever, so he had to stay inside - that didn't go over good.

Got the wheels apart and the MT tires off easy enough. Those things are HEAVY. :shock: Got the new tires mounted on the wheels and that's where the trouble started. Getting those tires to take air enough to seat the bead was an absolute PITA. I worked for better than 30 min trying to get the first one to take air. Tried everything I could think of and nothing was working. By this time I had about half a mad-on and decided to go down to the truck stop and get a can of either. Had to get some kerosene for the heater anyway. I don't like the idea of using either but I was ready to try something else. Got the tire to pop on the bead 2 times but by the time I'd get the fire on the sidewall beat out with a rag it would pop right back off again. aua After several attempts with the either I gave up on that idea.

I finally ended up using a length of 1/2" air hose and jamming it down in the bead of the tire and soaking it down with soap / water mix. That worked pretty good with a clip-on air chuck continuously pumping air in the tire. The tire would swell up to the point it would smash the air hose against the wheel lip and then I used a #3 phillips screw driver to dig the end of the air hose out enough that I could get a hold of it and pull it out. If these things pop off the bead out on/off the road somewhere I am gonna have a BAD day. :?

I think the tires look pretty good on the trailer - still seem to retain the Mil-look. I took measurements before and after at several places and got a 2-inch lower height out of them. I may pull a spring or two out of the spring pack to get another inch but I'll wait and see before doing that. The dirtbikes ain't gonna max this trailer out if I did take a couple springs out though.

Next step will either be shortening the landing gear leg a little or cutting the fenders down narrower and remounting them. Cutting the fenders is the part I dred the most. That's gotta be done right or the trailer will look like crap.

.....
 

Attachments

Last edited:

number9

Member
455
0
18
Location
Lexington, KY
So I've been reading about paint and such. Seeing these concerns with working with CARC, should I take it that grinding, sanding, welding on this trailer inside my home garage would be a big NO-NO? Understanding I'd need to wear a respirator, but concerns over the dust getting on other things in the garage or possibly getting inside my house - someone opens the door and air gets sucked into the house.

......
 

number9

Member
455
0
18
Location
Lexington, KY
After thinking about it more and more, I've decided to stretch my trailer out to 10' long. Luckily there were some "unknown" trailer chassis this week at Richmond and I was able to win one today.

I plan to cut about 30" off the rear of the donor trailer. Grind the welds out on the rear most cross member of my project trailer and knock it out. Cut a cross member out of the donor trailer and cut it in half. Weld those cross member sections inside the main frame rails of my project trailer with 1/2 the length extending out. Slide the cut-off rear section of the donor trailer over the extensions and weld it up. This will take the trailer out to 10' long.

Then I plan to take the front spring hangers off the donor trailer and use to relocate the axle on the project trailer to the rear about 10-12" to keep the front/rear bias the same as it is now. May have to use the hand brake lines on the donor trailer to extend the lines on the project trailer after the axle move.

I'll post up picks of the donor when I go pick it up in a couple weeks when my EUC clears I guess.

............
 

frodobaggins

Active member
2,861
16
38
Location
Ruston, La
You're supposed to use a clip on air chuck when you use ether. That way, you don't have to wasted time trying to get the hose on there.
 

number9

Member
455
0
18
Location
Lexington, KY
Don't know. Mine had some black carc over spray on them, but I switched tires out anyway. I'd guess the carc would wear off over time maybe. Have you tried pressure washing it off?

.......
 

Recovry4x4

LLM/Member 785
Super Moderator
Steel Soldiers Supporter
34,013
1,814
113
Location
GA Mountains
DOT 3 Brake fluid and time may cut the CARC, it works on every other type of paint.
 

number9

Member
455
0
18
Location
Lexington, KY
As I stated before, I need to shorten the landing gear on the trailer because at the lowest height it is just right to get on/off my truck. On uneven ground off road with the dirt bikes it will present problems and be too heavy to lift on/off the truck. My wife's Yukon is even worse as it is lower to the ground than my truck.

I decided to tackle the job today and take pics of the process in case someone else out there with one of these trailers needs to shorten theirs too.

1) After removing the landing gear, pop the top cover off and expose the internals.

2) Use a punch and knock out one of the exterior roll pins.

3) The side gear has a roll pin in it. Rotate it so you can get at it at a 45 angle and knock it out as far as you can. The pin will bottom out against the inside corner of the housing. That's enough to get it all the way out of the crank shaft.

4) Now you can pull the crank shaft out. You may have to tap it a little with a hammer but you shouldn't have to beat on it to get it out.
 

Attachments

number9

Member
455
0
18
Location
Lexington, KY
5) After the shaft is removed you can lift out the side gear. I used an allen wrench.

6) This is what the back side of the side gear looks like. The lower gear looks just like it, but sits on a smaller pin that goes up in the narrow slot.

7) The lower gear can be lifted right off the shaft. It may be a little sticky from all the grease/paste on it, but there's nothing mechanical holding it. I just pried a little with an allen wrench and it popped right off.

8 ) With the lower gear out the cross pin is exposed.

9) You can just push it right out with the allen wrench. No force should be needed.
 

Attachments

number9

Member
455
0
18
Location
Lexington, KY
10) The outer leg just lifts right off the inner leg and exposes the lead screw that raises and lowers the landing gear.

11) There is 2 pins holding the screw assembly in the inner leg.

12) These pins will push right out with a punch by hand. I only had to tap on one to get it to move, then pulled it out by hand.

13) The lead screw is now free from the inner leg.
 

Attachments

Top