• Steel Soldiers now has a few new forums, read more about it at: New Munitions Forums!

  • Microsoft MSN, Live, Hotmail, Outlook email users may not be receiving emails. We are working to resolve this issue. Please add support@steelsoldiers.com to your trusted contacts.


LMC Truck Head light circuit mod

Status
Not open for further replies.

top_prop

Member
243
8
18
Location
Suffolk, VA
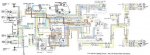
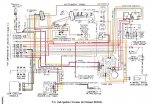
I took Warthog's advice and just bought the LMC 36-3580 head light wiring mod that powers the headlights from the battery and reduces the amps that are pulled through the crazy headlight circuits that Warthog explains here:

http://www.steelsoldiers.com/showthread.php?87544-CUCV-Headlight-Circuit

It was pretty simple... but it did require a few things that the kit didn't come with.

Notably the ring terminals the kit came with were to small to utilize the existing ground connection. I chose to cut the factory ones off and replace them with 5/16 12 gauge ring terminals so that the kit would get its ground from the two OEM ground lugs above the head lights. You could use smaller screws and screw them down to the cross member/frame, but why add another ground point that could fail? I like the OEM one.

You'll also want zip ties, electrical tape, and I'd suggest some wire loom too.

(note that I've done the REC 12V conversion on my M1009, but it essentially would be the same on a stock 24V truck)

here's what I found the best way to complete the mod:

Work from the passenger side first:

1. Remove both Batteries' positive terminal connections.

2. Remove front battery's ground terminal. Remove the battery and set aside

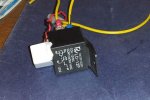
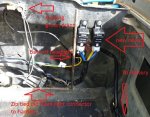
3. Mount the two relays to cross member in front of the battery (see picture)

4. Disconnect connector from back of the passenger head light and connect it to the connector on the harness. Zip tie them together to keep them from separating.

5. Lay out the wiring harness all the way to the other battery. Be cautious of the path the wires are taking... make sure you have a plan to strain relieve and zip/wire tie.

6. Connect the harness to the back of the head light.

7. Remove the ground screw, wire brush and clean the contacts.

8. Assuming you replaced the ring terminal, place the harness's ground terminal with the original grounded conectors on screw and snug up.

9. Connect harness to the two relays, guide the battery connectors around the battery tray along the fender wall.

10. Remove the original connector off the back of the driver side head light. Zip tie out of the way... this feeds the passenger side light so don' cut it off!

11 Connect the harness to the driver side head light.

12. Pull the driver side ground screw, clean connections, put the harness ground wire on screw and snug up.

13. Making sure the harness battery leads are clear of pinching and all leads are strain relieved and zip-tied then re install front battery.

14. Clean ground terminal of battery and re-install.

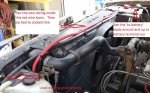
15. Clean front battery terminals. Remove the tightening lug off the front battery positive terminal, place the two 'battery' leads of the harness of the screw, and replace the nut. Re install the positive battery terminal.

16. Turn on lights and verify operation.

Hope this helps!

Tom
 

Attachments

Last edited:

top_prop

Member
243
8
18
Location
Suffolk, VA
I'm not sure if the relays are rated to switch 24v... but if they are, you'd only need to run a jumper from the 24v buss or rear battery to the two battery leads... I think the leads included are fusible links as they are smaller than the rest of the wires...
 

rsh4364

Active member
1,372
15
38
Location
greensprings ,ohio
Excellent write up of a great upgrade,I did this when I added Hella vision plus headlights. I didnt care for the red flex con so switched it to black.and hid the harness behind grill,above radiator.
 

top_prop

Member
243
8
18
Location
Suffolk, VA
Added a head light warning chime

I've left my lights on too much in this truck... so I built a head light warning chime.

Schematics below.

Materials:
1-SPDT 12v relay
1-12V buzzer (got it from radio shack)
18 Ga wire
two 18ga nylon wire taps
female spade connectors for 18 Ga wire

glued buzzer to relay with gorilla glue

1. Grounded 85 and 30 to chassis ground lug above driver side fresh air lower vent

2. tapped pink black wire of seat belt buzzer to pole 86 of SPDT

3 . tapped brown wire on back of light switch/dimmer knob (you could use yellow for headlight warning... brown does parking lights and head lights) to red lead of buzzer

4. mounted buzzer to side wall near the ground lug terminal.


Now I get an annoying buzzing sound if the ignition is not in run and the parking lights/head lights are on

Hope it helps...

Tom
 

Attachments

61sleepercab

New member
622
3
0
Location
Walton, West Virginia
Great idea and info........ But you should double check LMC REGULAR PARTS VS GENERAL MOTORS DEALER SOURCES as I checked some weatherstripping for a Chevy pick up door and the dealer price was 1/2 that of LMC. I know this relay set is a specialty part, but you can save money sometimes by shopping around before you click BUY. Mark
 

Skinny

Well-known member
2,130
486
83
Location
Portsmouth, NH
I'm sure the relays work fine switching a higher voltage, it is still the same amount of wattage. They are probably good up to 36 volts. Plus the switching side is still 12 volts. Will have to see what relays come with the kit and check the specs.

I'm not sure GM would carry this heavy duty harness kit unless it was an OEM recalled part. Either way I checked and it was $30 on LMC tonight. That is pretty cheap! Even if I used decent heat shrink butts, I'd still have to buy the H4 connectors and a pair of relays. I'm not sure I could do that all for under $30. Not to mention spend more time doing it. I typically would go out of my way to custom make something if I can save even a few pennies for that's a nice kit for the money...
 

61sleepercab

New member
622
3
0
Location
Walton, West Virginia
I was just giving a general HEADS UP that LMC may not be a good deal for standard parts when in my experience the were charging double the OEM price for a stock item. Just do not assume LMC is doing you a big favor without comparison shopping on the same item available elsewhere. On this relay set they may be OK .Mark
 

MarcusOReallyus

Well-known member
4,524
808
113
Location
Virginia
I'm sure the relays work fine switching a higher voltage, it is still the same amount of wattage. They are probably good up to 36 volts.
That's probably true, and for a part that is not critical to safety, probably a safe bet.

FWIW, the relay recommended for the Doghead conversion is a 12v relay, but runs 24v through it, and there are a ton of satisfied customers on that one.
 

Crash_AF

Active member
1,530
7
38
Location
Colorado Springs, CO
A relay is only really voltage sensitive on the coil (activation) side. The load side is just a pair of contacts that closes the circuit like a switch. So long as you're not crazy with it, it'll be fine. The standard Bosch relays (the black cube ones) will handle 24V on the load side with no problems. In fact, they'll probably last longer at 24V because the amperage is halved so there will be less arcing across the contacts as they close.

And $30 is a pittance. Even if you could buy all the stuff for less than $20 to make the same thing yourself, the time savings would make it worth it alone. I plan to use one of these kits to turn my quad headlight 'burb into a single so it can have the CUCV front end.
 

MtkNoob

New member
7
0
0
Location
Eastern LI, NY
Hello All,
As a new CUCV owner and not having much of a mechanical background, this Site, it's Creators, Moderators and Members, as well as the TMs have been incredibly helpful resources, as I try to get my 12V-converted M1008 up to snuff for NYS inspection and more dependable and safe use.

As my first real "upgrade", I installed the LMC Headlight Harness 36-3580. My headlights were shining very dimly, and this seemed like an obvious route to improvement. Warthog's original CUCV headlight circuit thread in the Stickies, and this current thread created by top_prop, especially his photos and detailed instructions, made this installation relatively easy even for a rank amateur like me. Following other members' suggestions in multiple other threads, I decided to slightly modify the LMC harness to increase it's utility and safety for me. Because I was excited to see the results and was burning daylight during the install (and because I am a dunce), I forgot to take a photo of my completed, modified harness, but here's what I did anyway. First, I cut the two red wires near where they emerged from the two relays, as shown in the photo below. Following top_prop's suggestion, I also cut and replaced the two ground ring terminals with larger rings, in order to use the original ground points for the headlights.

LMC Harness battery end.jpg

Next, I used a 3-way crimp connector similar to this one
3-way crimp.jpg

to attach the two red wires (one is red with white stripe, and I know that one is for low-beam and one is for high-beam, but since they are both being wired directly to a battery + terminal, I saw no need to keep them each as a separate run all the way to the battery) to a water resistant inline ATC fuse connector with 30A fuse, similar to this one
inline fuse holder.jpg
I then used a crimp butt connector to connect the inline fuse holder to a length of 10G insulated red wire and then an insulated ring terminal to reach the + terminal of my rear battery (12V system). I covered all of the connections that I made within the harness length with heat-shrink tubing. Since I now have the inline fuse in an accessible location, I did not think that I needed to retain the inline plastic plugs in the red wires from the original LMC configuration. I cleaned the existing ground points, followed top_prop's installation guide, and... SUCCESS! My headlights, both low and high beam, are now burning (or, rather, shining) brightly.

I realize this is all a bit long-winded for what is in fact a simple procedure for almost everyone here, but I had not seen an actual description of "adding a fuse" to the headlight harness upgrade, and I hope that what I've done is acceptable and safe.
 

cpf240

Active member
1,479
5
38
Location
Free in Northern Idaho
My only concern with joining the hot wires this way is that if the fuse blows, you lose both high and low beams. With separate, fused, runs to the battery, you would probably still have one or the other if there was a short somewhere.

...

Next, I used a 3-way crimp connector similar to this one
View attachment 503284

to attach the two red wires (one is red with white stripe, and I know that one is for low-beam and one is for high-beam, but since they are both being wired directly to a battery + terminal, I saw no need to keep them each as a separate run all the way to the battery) to a water resistant inline ATC fuse connector with 30A fuse, similar to this one
View attachment 503286
...
 

MtkNoob

New member
7
0
0
Location
Eastern LI, NY
My only concern with joining the hot wires this way is that if the fuse blows, you lose both high and low beams. With separate, fused, runs to the battery, you would probably still have one or the other if there was a short somewhere.
Well, of course, there IS that. Thanks, cpf... I told you I was a dunce! Back to the drawing board for Wile E. Coyote.
Am I correct that there is NO fuse protection in the "stock" LMC harness setup? The white plastic double-connectors are simply connectors, right? Is there some kind of fuse holder that perhaps is made to clip inline with those connectors?
 

cpf240

Active member
1,479
5
38
Location
Free in Northern Idaho
The one I have, and others I've seen in pictures don't seem to come with any standard fuses, though there is/was some speculation that the short wires that connect directly to the battery and then plug into the rest of the harness *may* be made of fusible links. I've not seen/heard of any verification of that though.

Well, of course, there IS that. Thanks, cpf... I told you I was a dunce! Back to the drawing board for Wile E. Coyote.
Am I correct that there is NO fuse protection in the "stock" LMC harness setup? The white plastic double-connectors are simply connectors, right? Is there some kind of fuse holder that perhaps is made to clip inline with those connectors?
 

top_prop

Member
243
8
18
Location
Suffolk, VA
I think the ends of the LMC rig are fusible links... Just like the ones used on the rest of the truck... They are thinner than the rest of the harness....
 
Last edited by a moderator:

MtkNoob

New member
7
0
0
Location
Eastern LI, NY
Thanks for the responses, and it makes sense that those harness ends with the terminal rings are fusible links, because otherwise the clip connectors inline in the red wires would serve no purpose. Well, I wasted a few bucks trying to Gild the Lily... not the first time, won't be the last. I wanted a longer run of wire to reach my rear battery (12V system) anyway. I think that I'll be OK with inline fuses instead of the fusible links (am I right?), even though I know that they don't perform in quite the same way. Overall I'm very happy with this upgrade.
 

MarcusOReallyus

Well-known member
4,524
808
113
Location
Virginia
I think that I'll be OK with inline fuses instead of the fusible links (am I right?), even though I know that they don't perform in quite the same way.
You'll be just fine with inline fuses. They accomplish the same mission. :beer:

In fact, building my own harness is on my to-do list, and I will be using inline fuses, not fusible links.
 

SRB1976

Member
317
9
18
Location
Hanna, Wyoming
I just finished doing this mod to my M1009. The only thing I did different is I removed the grill and ran the wires through the front of the radiator for a cleaner look. My headlights are way brighter and no more hot fuse.
 
Status
Not open for further replies.
Top
AdBlock Detected

We get it, advertisements are annoying!

Sure, ad-blocking software does a great job at blocking ads, but it also blocks useful features of our website like our supporting vendors. Their ads help keep Steel Soldiers going. Please consider disabling your ad blockers for the site. Thanks!

I've Disabled AdBlock
No Thanks