• Steel Soldiers now has a few new forums, read more about it at: New Munitions Forums!

  • Microsoft MSN, Live, Hotmail, Outlook email users may not be receiving emails. We are working to resolve this issue. Please add support@steelsoldiers.com to your trusted contacts.


LMTV shifting issue

Braymond1

New member
15
2
3
Location
Fort myers beach Fl
Hello everyone, I’m having a issue with my 1994 m1098. Was driving home last night and it was shifting through 1st to 3rd normally. However going into 4th and 5th was super difficult. when it finally did get into 5th. It wouldn’t shift to 6th. Then when stopping at red light it wouldn’t down shift. At a dead stop it jumped forward and went into neutral. i pulled over first chance I could get and checked fluids. Everything seemed on point. Even took dash apart. To try to do a “hard reset“ on the shifter box. But still same issue.
 

Ronmar

Well-known member
3,289
6,639
113
Location
Port angeles wa
Any codes stored? Press up and down arrow at the same time to enter diagnostic mode. The display will flash D1 then two sets of numbers(write these down) also note if the mode light is lit(indicates a current fault). There are 5 code storage locations(D1-D5). Press the mode button to step thru them and write them down and post them here…

This could be as simple as a bad TPS…
 

Braymond1

New member
15
2
3
Location
Fort myers beach Fl
Any codes stored? Press up and down arrow at the same time to enter diagnostic mode. The display will flash D1 then two sets of numbers(write these down) also note if the mode light is lit(indicates a current fault). There are 5 code storage locations(D1-D5). Press the mode button to step thru them and write them down and post them here…

This could be as simple as a bad TPS…
Ok so pushed up and down at same time. D1 came up. Then 1 3 and 1 2 displayed. As for Mode lite being lit. Yes however all the button are lit R,N,D,mode,^ and down. If I understanding you correctly. I then pushed mode again to D2. That had a 1 3, 1 3 code. D3 2 4,2 3. D4 3 3,2 3. D5 2 2,1 4. Hoping I did that correctly and thank you for your help with this. Don’t know if this info helps. But it’s a 1994 with 4323miles. Thanks again
 

Ronmar

Well-known member
3,289
6,639
113
Location
Port angeles wa
Ok so pushed up and down at same time. D1 came up. Then 1 3 and 1 2 displayed. As for Mode lite being lit. Yes however all the button are lit R,N,D,mode,^ and down. If I understanding you correctly. I then pushed mode again to D2. That had a 1 3, 1 3 code. D3 2 4,2 3. D4 3 3,2 3. D5 2 2,1 4. Hoping I did that correctly and thank you for your help with this. Don’t know if this info helps. But it’s a 1994 with 4323miles. Thanks again
Sounds like you did it just fine.

Well 1312 and 1313 are low voltage codes…

2423 is sump oil temp hot
3323 is sump oil temp sensor failed high

2214 is engine speed reasonableness test

so as mentioned, voltage issues will cause troubles and those first two codes indicate you have had that. How are the voltages? You should have 14.1 and 28.2 reaching the batteries with the engine running. You should see .3 or so volts less at the 12 and 24v test points to the left of the power dist/relay panel in the passenger dash.

Now that you know the codes you need to clear them. Press and hold the up and down arrows for approx 10 seconds. The controller will beep once at about 3 seconds. That is the system clearing any active faults. It will beep again at around 10 seconds indicating it has cleared any codes stored in memory.

Once you have good voltage re-read the codes and see if anything new is stored.
 

Braymond1

New member
15
2
3
Location
Fort myers beach Fl
With truck not running I have 11.1 on 12v side and 23.8 on 24v side.
with truck running I have 11.6 on 12v side and 27.1 on 24v side. The batteries are less then a yr old. But the LMTV isn’t a daily driver by anymeans. Also Im sure I’m doing something wrong. But can’t seem to reset the codes. As soon as I push the up and down arrows at same time. It just goes into the d1 part. No matter how long I hold them down.
 

BERZERKER888

Well-known member
Steel Soldiers Supporter
410
888
93
Location
Daytona, FL
yikes..low voltages...this is what I did under Ronmar's tutelage: step one, remove /disconnect batteries- test voltage of each using a multimeter....don't forget each cells fluid level as well. If the voltages are "low" ..throw each battery in a battery charger for "x" amount of time and re check the voltage readings...in my case 1 of the new 6TL batteries was at 9 Volts and would not take a charge...BUT there is much more to be done.. Now the time consuming part : clean clean clean... each terminal end from the battery cables to the polarity box ( behind the spare tires)...clean clean clean. Both the 14/24v cables at the alternator including the big ol ground that is on the frame....clean clean clean.
In my case both alternator belts were loose as a result of no, zero, nada , none alternator bolts were installed... the alternator was literally resting against the engine with only the belt tension holding it in place... dumbass army mechanics... did I mention clean clean clean ?
My net result was to eliminate 2 of the 4 6TL batteries for a "less taxing" 2 battery set up and change all 3 belts, 2 alternator 1 water pump... now I have the correct non fluctuating voltage reading at my gauge, alternator, batteries .. and my recently replaced $10k tranny is now singing away like Celine Dion !
 
Last edited:

Ronmar

Well-known member
3,289
6,639
113
Location
Port angeles wa
There is a vampire load on the 0-12v side of these trucks, so the 11.1v(25% charged?) there doesn’t surprise me. That leaves 12.7 on the 24v side which isn’t terrible(about 90% charged). 11.6Vrunning isn’t good on the 12v side but the total you gave indicates the 12-24 side is seeing 15.5V. This tells me your alt is probably OK, but the the 0-12v batts are either really discharged and overloading that side or you have a bad battery causing this.

Now run those same voltage checks at the large alternator output terminals. They should be the same there. If not, you may have a bad connection between alt and batts…

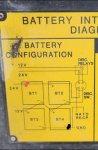
Same advice I gave Berzerker applies to all these trucks. Check and charge each battery individually, check all the connections at battery, polarity box and alt, check all grounds at battery, starter, alt and cab.

in the midst of milspec madness they specced a grossly oversized battery bank for the alternator they chose. They should have specced 2 batteries or the 200A alt should have been standard. They finally fixed this on the A1R.

like I recommend to everyone, you should drop to two batteries. It is more than enough power for the truck(bigger than Cat specs for these engines) and is a much better match for the alternator so will charge them better/faster. You can actually do this right now as your 12-24 batts measured 12.7v/90% charged, you could pull the two 0-12v batts(outside pair) and shift one of the 12-24 batts from it’s inside(close to frame) position to an outside position and re-attach the cables for that position. Tape over any unused battery connections.

With batteries at that state of charge in play, I would expect the alt to go right to it’s rated outputs(14.1/28.2) after startup…

Your alternator will thank you…

then you can work on the trans issue, which with good power applied may not really be a problem…
 

Braymond1

New member
15
2
3
Location
Fort myers beach Fl
Ok getting started on suggestions. 2 questions. 1. How do I go to just 2 batteries? Do I just pull the 2 on 12v side? Also what would I do with the cables. Sorry just dont want to jack the truck up more. Lastly, anyone have a idea why I can’t seem to clear the codes in the shifter box? I do have a spare. Because I bought 2 of these. Just to have 1 for parts. ”kinda sad I can buy a complete truck for the cost of replacing 1 or 2 parts” lol. So does anyone suggest I swap the shifter box to the other one I have?
 

Ronmar

Well-known member
3,289
6,639
113
Location
Port angeles wa
I wouldn’t swap anything yet. You need to check compatibility before you do that with trans parts anyway as Alison made continual upgrades and version changes, so you need to confirm the other controller will work with this trans. There is a whole table on compatibility in the manual…

The two batteries farthest away from the frame are the 0-12v batteries, they are wired in parallel with each other(same 12v, double the amp hour capacity). The 2 batteries closest to the frame are the 12-24v batteries. That pair are also wired in parallel with each other. The inner and outer pairs are wired in series with each other to make the total 24V.

leave one battery in a 0-12v outer position, and a second battery in the inner/12-24 position. Reconnect the connections to the 2 batteries that are there, and the connections where no batteries are present, just tape them over.
 

Ronmar

Well-known member
3,289
6,639
113
Location
Port angeles wa
So turning on the power and holding the up and down arrows till the controller beeps twice(10 seconds or so) doesn’t clear the codes?
 

BERZERKER888

Well-known member
Steel Soldiers Supporter
410
888
93
Location
Daytona, FL
Braymond....
I had a vampire draw that will drain the battery (ies.) to point of needed a jumper every 3-4 days.... I spent way to much time with my test light/multi meter trying to locate it... first install was 24v Battery Tender on the 4 6TL battery set up.. black- ground red-positve. I also removed the NATO plug. Net result was marginal at best...
 

Attachments

BERZERKER888

Well-known member
Steel Soldiers Supporter
410
888
93
Location
Daytona, FL
Step 2 was to install a battery disconnect
(Amazon @$10.00) on the main ground from BT4... just cut the ground , add 2 terminal lugs...

BT220211111_090850.jpg20211201_123103.jpg
 

BERZERKER888

Well-known member
Steel Soldiers Supporter
410
888
93
Location
Daytona, FL
Step 3.. now the batteries would flat in 4-5 days..... that's when Ronmar's well thought out diagnosis stepped in.... ultimately I went with the 2 battery setup ( I do have the Macdaddy 260 amp alternator) the truck sat for 3 weeks...and boom started right up using only 2 6TL batteries .. as mentioned one of the 6TL was toast and would not hold a charge..
should you opt for the 2 battery set up..after you reach the point after all else fails and I'll walk you through it..very easy using your existing cables and required fabbing only 1 jumper wire...cost @$10.00


20211130_201955.jpg
 
Last edited:

Braymond1

New member
15
2
3
Location
Fort myers beach Fl
Step 2 was to install a battery disconnect
(Amazon @$10.00) on the main ground from BT4... just cut the ground , add 2 terminal lugs...

BT2View attachment 854875View attachment 854876
I added the air conector as well. But to the tank. I like how u did that and the kill. I’ve been wanting to put a kill switch somewhere. Again thank you everyone for helping me with this. So hard to find anyone to work on these in my area. I have 3 Humvees and it took a lot of trial and error before I learned how to work on them. So again thank you everyone!
 

Braymond1

New member
15
2
3
Location
Fort myers beach Fl
Step 3.. now the batteries would flat in 4-5 days..... that's when Ronmar's well thought out diagnosis stepped in.... ultimately I went with the 2 battery setup ( I do have the Macdaddy 260 amp alternator) the truck sat for 3 weeks...and boom started right up using only 2 6TL batteries .. as mentioned one of the 6TL was toast and would not hold a charge..
should you opt for the 2 battery set up..after you reach the point after all else fails and I'll walk you through it..very easy using your existing cables and required fabbing only 1 jumper wire...cost @$10.00


View attachment 854878
Thank you got it.
 

Ronmar

Well-known member
3,289
6,639
113
Location
Port angeles wa
No as soon as I push up and down. No matter for how long. It just goes to D1 and the codes.
I apologize, I messed that up. To clear the codes, press both arrows to enter diagnostic mode. Then press and hold the MODE button. After 3 seconds the controller will beep once indicating the active faults have been cleared. If you continue to hold the button at about 10 seconds the controller will beep twice indicating that all the codes have been cleared…
 

Braymond1

New member
15
2
3
Location
Fort myers beach Fl
I apologize, I messed that up. To clear the codes, press both arrows to enter diagnostic mode. Then press and hold the MODE button. After 3 seconds the controller will beep once indicating the active faults have been cleared. If you continue to hold the button at about 10 seconds the controller will beep twice indicating that all the codes have been cleared…
Yes sir that cleared them. Thank you for the info.
 
Top
AdBlock Detected

We get it, advertisements are annoying!

Sure, ad-blocking software does a great job at blocking ads, but it also blocks useful features of our website like our supporting vendors. Their ads help keep Steel Soldiers going. Please consider disabling your ad blockers for the site. Thanks!

I've Disabled AdBlock
No Thanks