• Steel Soldiers now has a few new forums, read more about it at: New Munitions Forums!

  • Microsoft MSN, Live, Hotmail, Outlook email users may not be receiving emails. We are working to resolve this issue. Please add support@steelsoldiers.com to your trusted contacts.


Location for home made fuel sender access hatch?

kestrelnh

Member
76
0
6
Location
Etna, NH
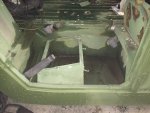
After some time on my back under the truck ( '92 M998 ) with a multimeter and the TMs, I've come to the conclusion my fuel sender is bad. That's unfortunate, as taking the fuel tank out looks like a small scale nightmare.

I've read about the fuel tank access cover kit, and ordered some dzus clips and backing plate to make my own. My intention is to carefully mark and cut out the tunnel floor above of the fuel sender, install the dzus clips and backing plates, and the end result is a flush fitting plate that lives under the plywood tunnel cover.

The dzus clips:

s-l500.jpg


For the experts, my first question is: if I'm careful, can I cut the access hatch with the tank in place?

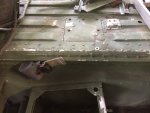
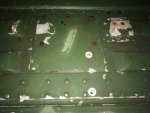
The second question is, how large to make the hatch. I'm limited front-back by the support rails. For width, I found the picture below (bottom towards the front of the truck, birds eye view), and labelled the raised ridges 1,2,3, and 4. I think I can only install the dzus backing plates under the raised ridges where I can slide them under. Should I make the cutout the same size as the picture, or extend it one ridge in either of both direction?

ftac1.jpg

Thanks much all!
 
Last edited:

dilvoy

Member
733
25
18
Location
San Francisco, Ca.
Just do it like the foto shows. No real advantage to make it wider and you know about the under cross braces so you will never be able to remove the fuel tank plate/cover so the standard hole gets the job done just fine. My opinion is that four screws are the best way to mount it, because to keep sound out, a bit of caulk around the perimeter is really nice and doesn't hamper removal. The original way is with some small rivnuts, but unless you get ones with a closed bottom, the screws can rust in then and you about that sort of mess. I would recommend using only the late style fuel level sender. The proper one has a red cover over the two wires that says "Military Only" or something like that. I find that the originals have a problem with the rear mounting of the wiring terminal where it passes through the metal plate of the sender. I think the movement of the fuel in the tank puts a load on the float and thusly it's hinge point and loosens up that area for a bad electrical connection. The late type is a tube with a circuit board and a float with magnets or just plain steel to make it work. Once you have that in, you will most likely never have to go back and mess with the sender.
 

dilvoy

Member
733
25
18
Location
San Francisco, Ca.
I forgot to mention that you can cut out the hole with a disk cutter and not damage the fuel tank parts that are below. There is not much air space there, but I did it with no problems.
 

kestrelnh

Member
76
0
6
Location
Etna, NH
Just do it like the foto shows. No real advantage to make it wider and you know about the under cross braces so you will never be able to remove the fuel tank plate/cover so the standard hole gets the job done just fine. My opinion is that four screws are the best way to mount it, because to keep sound out, a bit of caulk around the perimeter is really nice and doesn't hamper removal. The original way is with some small rivnuts, but unless you get ones with a closed bottom, the screws can rust in then and you about that sort of mess. I would recommend using only the late style fuel level sender. The proper one has a red cover over the two wires that says "Military Only" or something like that. I find that the originals have a problem with the rear mounting of the wiring terminal where it passes through the metal plate of the sender. I think the movement of the fuel in the tank puts a load on the float and thusly it's hinge point and loosens up that area for a bad electrical connection. The late type is a tube with a circuit board and a float with magnets or just plain steel to make it work. Once you have that in, you will most likely never have to go back and mess with the sender.
Dilvoy,

Thanks for the advice. The issue with the rivnuts, silcon, etc. is I don't have the kit, and can't seem to find one for small money, so I'm working with a plate that is at best the width of a cutting wheel smaller than the opening. I'll put a request out in the wanted section to see if anyone has one, or some extra tunnel material I could chop one out of.

That's good to know about the sender, thank you!
 

86humv

Well-known member
Steel Soldiers Supporter
1,694
489
83
Location
Texas
I have some spare metal I can trace a panel onto.
I also have late style sending units.
 

Retiredwarhorses

Well-known member
Steel Soldiers Supporter
4,261
3,874
113
Location
Brentwood, Calif
I install these all the time, I just use a piece of deck panel cut to fit.
if the tank is in the truck, just start with some cuts to get a good size piece out but error on the side of caution on where to start the cut. Once it's out, you can see better where to cut, go very very shallow or you will eff it up.
a riv nut kit it like 30.00, you need 10/24 riv nuts. Those use a 19/64 drill bit.
just look on sleeze bay.
all in all its a 30 min or so job....once you have everything.
On another note on riv nuts....they are invaluable for this truck, so 1/4-20 and 10/24 is used all the time when installing stuff...it's worth the investment.
 

kestrelnh

Member
76
0
6
Location
Etna, NH
I install these all the time, I just use a piece of deck panel cut to fit.
if the tank is in the truck, just start with some cuts to get a good size piece out but error on the side of caution on where to start the cut. Once it's out, you can see better where to cut, go very very shallow or you will eff it up.
a riv nut kit it like 30.00, you need 10/24 riv nuts. Those use a 19/64 drill bit.
just look on sleeze bay.
all in all its a 30 min or so job....once you have everything.
On another note on riv nuts....they are invaluable for this truck, so 1/4-20 and 10/24 is used all the time when installing stuff...it's worth the investment.
Thanks, I'll definitely get some rivnuts (and put them on the shifter as well so I don't have to struggle with those bolts anymore)!

I think I have all the info I need, except for one more question: I've seen debate on whether the fuel access panel should be installed as in the picture I posted, across two ridges, and one valley, or in two valleys and one ridge. Which one is right?
 
Last edited:

ohiohmmwv

Member
450
16
18
Location
Columbiana, Ohio
Tank really isn't that hard to remove either. If I can do it you can. I actually did it on my old civi hummer. Hardest part was removing the rubber tube off the plastic tank that sits between frame rail and body. Other than that not hard at all.
 

Retiredwarhorses

Well-known member
Steel Soldiers Supporter
4,261
3,874
113
Location
Brentwood, Calif
Thanks, I'll definitely get some rivnuts (and put them on the shifter as well so I don't have to struggle with those bolts anymore)!

I think I have all the info I need, except for one more question: I've seen debate on whether the fuel access panel should be installed as in the picture I posted, across two ridges, and one valley, or in two valleys and one ridge. Which one is right?

How often do you take your shifter out...
 

Retiredwarhorses

Well-known member
Steel Soldiers Supporter
4,261
3,874
113
Location
Brentwood, Calif
if you remove the cover from a factory job, there is about a 1/4in from the edges.
you cut the hole parallel to the valley just before it slopes up..per my MWO doc, the hole is 6.37in wide by 7.0in long.
you are literally cutting it along the deck cross member beam on the width side...
 
171
5
18
Location
Chaska, MN
So for Rivnut choices, do you use aluminum when in aluminum and steel with steel or just go with steel. There seems to be a mixed consensus when researching.
 

HUMVEE1

Member
76
5
8
Location
SC
My 1982 has an access over the sender from the factory and it has steel rivnuts and steel screws,
as a steel screw in an aluminum rivnuts might corrode.
 

86humv

Well-known member
Steel Soldiers Supporter
1,694
489
83
Location
Texas
My 1982 has an access over the sender from the factory and it has steel rivnuts and steel screws,
as a steel screw in an aluminum rivnuts might corrode.
1982 ?
No such Hmmwv.
That fuel panel is not factory.
Somebody in a factory might of did it.
Most rivnuts in the hmmwv are steel.
If installing new ones....after holes drilled, apply sealant around rivnut, put in hole then squeeze it in.
 

HUMVEE1

Member
76
5
8
Location
SC
Geez you guys are brutal !Like I said, it is slightly different ! They should have kept this feature on the trucks that followed. If you look closely at the photos you can see that under the original paint and white primer is aluminum, not bondo, and the corrugations, at least 3 of the 4, have the ends closed as part of the original panel fabrication. The rivets hold the flanges to which the cover is fastened.
 
Last edited:

kestrelnh

Member
76
0
6
Location
Etna, NH
So I got the plate installed (thank to 86humv for providing the material). I marked and cut out the hole very carefully, first small to see where I was, then the final size. I used a cutting wheel, and it seemed to be very controllable. I did it with the tank in. if I had to do it again, I might have shifted over one ridge closer to the center of the vehicle (the plate would then cover two ridges and one valley), or dropped the tank, since with the tank in the fuel pipes were HARD up against the valleys of the tunnel deck, and that would have avoided fixing the fuel supply line. Shifting the plate would have still provided plenty of access to the fuel sender. On the other hand, the insulation plywood fits better with the way the MWO specifies, so pick your poison.

I used steel 10-24 rivnuts, and they seem to work fine for this application.

The sender was the culprit, and once replaced, the fuel gauge is working.

Thanks everyone for the guidance!
 
Top
AdBlock Detected

We get it, advertisements are annoying!

Sure, ad-blocking software does a great job at blocking ads, but it also blocks useful features of our website like our supporting vendors. Their ads help keep Steel Soldiers going. Please consider disabling your ad blockers for the site. Thanks!

I've Disabled AdBlock
No Thanks