• Steel Soldiers now has a few new forums, read more about it at: New Munitions Forums!

  • Microsoft MSN, Live, Hotmail, Outlook email users may not be receiving emails. We are working to resolve this issue. Please add support@steelsoldiers.com to your trusted contacts.

LT. Dan M35a2 Modification Thread

skinnyR1

Member
423
16
18
Location
Burlington CT
I did get my cab visor mocked up and I think it looks pretty freaking awesome.
Looks good.

I'd be concerned about looking under it all the time though. The wiper motors personally piss me off as I have to look around them. This looks even lower than those, in the line of sight.

You are putting in lower seats, so I assume the seat height will clear you of this issue?
 

tobyS

Well-known member
4,830
823
113
Location
IN
Does that visor stop rain from going onto the piano hinge on the window? That's a major source of water.
 
862
6
18
Location
Reading Pa
Yeah seat height will be lower now I have to battle looking over the steering wheel. Let me tell you I can't wait to go for a drive in these new seats they are so comfortable I was sitting in my truck just brain storming the other night and I just worked 12 hrs I found I must have knodded off for about 20 minutes in the truck. No more springer for my truck.....

I'm going to caulked around the visor yeah so it should help seal that off big time.
 
862
6
18
Location
Reading Pa
Interior is painted and man does it look so awesome. Also got the airpack and master cylinder pulled and ready for rebuilding. New window seals going in tomorrow and also redoing the fuel system too.

Worked on my under dash panel too. Bent it at work with a 20 ton brake press. It will hold my switches indicator lights and stereo and the cb will mount under that yet too along with my control box for the light bar.
 

Attachments

862
6
18
Location
Reading Pa
Actually it is for under the dash. I have a over head built into the hard top for some reason. I didn't do it but it's from the factory.

So interior is all painted and dash tags put back on. And I got my 12v panel mounted now for the wiring. Also got the new window seals in and man what a PIA. Also didn't seal worth a crap so I took sticky back weather stripping and put it around the window and caulked the window hinge and all around the hard top. Hopefully that takes care of 80% of the leaking and now I just have to figure out the doors.
 

Attachments

gimpyrobb

dumpsterlandingfromorbit!
27,785
748
113
Location
Cincy Ohio
You know there is an "in" and an "out" for the gaskets to be installed? It looks like yours might be backward. I thought the diamond in the corner faces out.


P.S. They are not that great of a design either way.
 
862
6
18
Location
Reading Pa
I thought what I read on here that part goes in? Don't get me wrong they are much better then the old ones but you can still see light around them. I fixed that though
 
862
6
18
Location
Reading Pa
Sob I did put them in wrong...... Man the pictures I looked at where glass out of the truck sitting on a bench and they were inside facing down and I never realized it..... idk if I want to take them back out now...... **** it
 

RAYZER

Well-known member
3,380
58
48
Location
sanford/florida
Sob I did put them in wrong...... Man the pictures I looked at where glass out of the truck sitting on a bench and they were inside facing down and I never realized it..... idk if I want to take them back out now...... **** it
Live and learn! Those windshield seals are a pain in the Azz!
 

welldigger

Active member
2,602
15
38
Location
Benton LA
Looking good Dan! Don't sweat on the win sheild seals. I mean, yes they suck to install, but it's just a minor bump in the road.
 
862
6
18
Location
Reading Pa
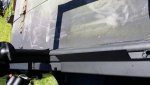
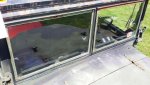
Yeah thanks guys..... been alot of bumps in my road but the truck is going good. I got the windshield seals flipped today and did it in 10 minutes using soap and a butter knife. They are sealed up tighter then a ticks butt now. I caulked the corners and with my seals there is no water coming in. They are very tight to close but I'm ok with that.

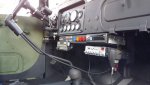
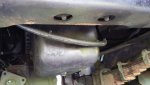
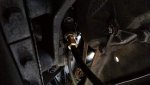
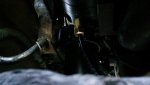
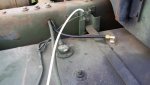
I got my fuel system redone today. I left the main copper line from the tank to the primary filter cause there was nothing wrong with it. Then I tool the stupid inverted flare fitting off and the jic fitting off the injection pump and used a 3/8 npt to 1/2" dot air line fitting on the primary filter and a 1/4 npt to 1/2" dot air line fitting on the injection pump. I then ran a 1/2" nylon dot line over to the injection pump and I covered it in rubber hose. I didn't get it hung yet but I'm going to use two large zip ties to mount it to the motor mount in the front. If I hit the hose tucked way up in there I'm going to have more problems then a broken fuel line..... I would have just invented a quick oil change pan for the deuce lol. Also ran the return line back too in dot air line. I removed the jic fitting there as well and used a 1/4 npt to 3/8 dot air line 90° fitting. So now I have a new fuel system with no special fittings and no rubber hoses to go bad. I'll keep extra line and fittings furrals and inserts in the truck for quick repairs. The fuel tank vent, axle vents, air pack vent, transfer case and transmission will all be vented with 1/4" and 3/8" dot air line to a central location on the air filter housing as well. The air pack will have a tee and a valve close to it so I can check for fluid.

Let me tell you it's a little strange to crack the drains in the fuel filters and watch black gold come out instead of green diesel lol.

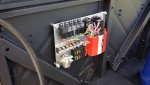
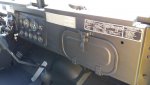
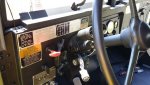
The interior is pretty much done and the main power cables to the 12v control panel is ran too. Here is a video of a make shift stereo for today that ran completely off the truck and a short tour of my cab.

http://youtu.be/ESE7J4IEHqA

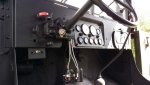
I also got my under dash panel done and it looks freaking awesome. Only problem is the cb is going to be in the way of my heater so I'll mount that on the roof. The truck is coming along great.

Next weekend will be finishing up the rear end. The u bolts should be here Tuesday. Then I'm going I rebuild the air pack and master cylinder and all the wheel cylinders. I ordered my new silicone boots and all new axle seals. Then I will run the rest of the vents and new brake lines. Then it will be time to mount the m105 bed and then paint. Going to be done soon hopefully. ... the plan is to have it driveable for the 4th of july. I can do paint after that.

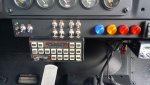
Switch panel from top left to right

Green indicator is for when the water injection is spraying the yellow is for when the pump is running and the red is for when the water tank is getting low. The two switches next to that is for the pump and the water solenoid. The pilot hole next to that will be a 150 psi gauge for water pressure. The first group of four switches is for my flasher controller. Two switches for two different patterns and two switches to turn off the front or rear. The next group of four switches is for front fog lights rear bed/cargo lights side work lights and a interior cab light. Then the blue light is for high beam the yellow is for 4x4 engagement and the first red is for low air pressure and the second red is the 12v alternator idiot charge light.
 

Attachments

Last edited:

gimpyrobb

dumpsterlandingfromorbit!
27,785
748
113
Location
Cincy Ohio
Come on, nothing like a crazy road trip to try her out! I had assembled my m35a2c and 2 weeks later, drove it to the Carolinas to pick up some 395s. WOW, what a trip THAT was.


I haven't, but I'd like to(get to Raush creek).
 
862
6
18
Location
Reading Pa
Idk we'll see but no promises. There is alot of local fairs and car shows I'd like to hit up this summer and my plan for next year is to convoy to aberdeen hopefully. I'm still hoping we do a summer rally at Rausch the end of July I want to make that hopefully
 
Top