• Steel Soldiers now has a few new forums, read more about it at: New Munitions Forums!

  • Microsoft MSN, Live, Hotmail, Outlook email users may not be receiving emails. We are working to resolve this issue. Please add support@steelsoldiers.com to your trusted contacts.


M1007 - CUCV Suburban Clone Build Thread

Mullaney

Well-known member
Steel Soldiers Supporter
Supporting Vendor
7,354
19,043
113
Location
Charlotte NC
I have the O’Reilly’s 1987 Suburban condenser. It is cross flow and fit. However, I have a CUCV front valence so I have to assume it is the same as the civilian truck for condenser mounts. I hate to assume though.

85° is the cut off for between super cold front and rear to around 50 in the front and still cold in the rear. above 95 and I am happy to get below 55 front and rear. I think my problem is caused by a compressor that is just a bit too small. It is a Sanden 508 which fit my serpentine mount. 8.4 cubic inches. The stock GM unit for the dual ac Suburban is over 10 cubic inches. My high side pressure has never been as high by a wide margin as what the book says it should be. Another option I have yet to explore is a possibly partially failed expansion valve at the rear. If it is not closing all the way it could keep the refrigerant flowing faster to the rear and not building psi at the front which is where the pressures are taken. It works good enough that I have put this issue on the back burner for now.

I did get to pretty much finish my passenger side swing away carrier in August.

View attachment 846299View attachment 846300
.
Really nice racks on the back for sure!!
 

Barrman

Well-known member
5,159
1,562
113
Location
Giddings, Texas
Yes it did lower my 70 mph 90° outside air temperature engine coolant temperature with the a/c running from 206°-208° to 201°-203°. That doesn't seem like much when I write it. However, since 203° is the temperature the 195° thermostat is fully open at. The 5 degree drop is really significant. The cooling system is now working within the design parameters instead of hanging on just above them. The biggest difference is when I get to hills. Climbing hills that require boost causes the engine coolant temperature to climb about 30 seconds behind. I used to hit 212° with regularity in hilly areas during summer empty driving. Now, it is very rare to even see 210° with a M101 trailer attached.

This radiator transfers the heat of the coolant away better than the old stock one. Allowing the coolant to get cooler when not in the boost so when I am in the boost, it has further to climb.

Pulling a car hauler with 5K-8K pounds on it above 68 mph puts me back around 210° though because I am using 2-3 psi of boost to maintain that speed with that load. Slowing down to 60-62 makes it like running empty at 70 again. I still need to play with the 4L80E in that situation. Leaving it locked in over drive causes lots of boost and temperature climbing. Running in 3rd and locked might be better but I haven't done it enough to see what the numbers really average out to. With this radiator I stopped worrying about coolant and have been trying to figure out the best boost/Exhaust Gas Temp when pulling heavy loads. So, yes it helps and I need to drive more to get more data.
 

Sharecropper

Well-known member
Steel Soldiers Supporter
1,816
944
113
Location
Paris KY
Yes it did lower my 70 mph 90° outside air temperature engine coolant temperature with the a/c running from 206°-208° to 201°-203°. That doesn't seem like much when I write it. However, since 203° is the temperature the 195° thermostat is fully open at. The 5 degree drop is really significant. The cooling system is now working within the design parameters instead of hanging on just above them. The biggest difference is when I get to hills. Climbing hills that require boost causes the engine coolant temperature to climb about 30 seconds behind. I used to hit 212° with regularity in hilly areas during summer empty driving. Now, it is very rare to even see 210° with a M101 trailer attached.

This radiator transfers the heat of the coolant away better than the old stock one. Allowing the coolant to get cooler when not in the boost so when I am in the boost, it has further to climb.

Pulling a car hauler with 5K-8K pounds on it above 68 mph puts me back around 210° though because I am using 2-3 psi of boost to maintain that speed with that load. Slowing down to 60-62 makes it like running empty at 70 again. I still need to play with the 4L80E in that situation. Leaving it locked in over drive causes lots of boost and temperature climbing. Running in 3rd and locked might be better but I haven't done it enough to see what the numbers really average out to. With this radiator I stopped worrying about coolant and have been trying to figure out the best boost/Exhaust Gas Temp when pulling heavy loads. So, yes it helps and I need to drive more to get more data.

Thanks Barrman for that excellent and very informative reply. I believe I will purchase one of those today. One other question - did you have any fitment issues? Did the oil cooler and transmission cooler lines all attach properly with the correct threading?
 

Barrman

Well-known member
5,159
1,562
113
Location
Giddings, Texas
The radiator fit in the truck perfect.

I am running AN hoses for my transmission cooling. The adaptors I used on the stock radiator screwed right into the aluminum unit.

I have a separate engine oil cooler in front of the radiator and don't use the in radiator one so I have no idea on that. Sorry.
 

Sharecropper

Well-known member
Steel Soldiers Supporter
1,816
944
113
Location
Paris KY
The radiator fit in the truck perfect.

I am running AN hoses for my transmission cooling. The adaptors I used on the stock radiator screwed right into the aluminum unit.

I have a separate engine oil cooler in front of the radiator and don't use the in radiator one so I have no idea on that. Sorry.
Thanks!
 

Barrman

Well-known member
5,159
1,562
113
Location
Giddings, Texas
Time for some more updates.

A year ago on a cross country trip I experienced some high Exhaust Gas Temperature readings at high speeds on steep grades. I wrote a lot about it in this thread and started with timing changes to make things better. Which they did. I have not messed with the IP timing since last March when I last wrote about it here.

I wanted lower EGT's though. Yes, the 8 psi boost and 1000° EGT the timing change got me to was good. Was there more out there to gain? I wanted to find out without doing an intercooler. Which led me down the Water Methanol Injection rabbit hole. Thankfully, Boxcar, has a turbo charged VW engine that I am building into a rail buggy in my class that he has intended all along to add WMI to. Allen also until a few months ago worked as a supplier to a company called Nitrous Express in north Texas. They own a subsidiary called Snow Performance. Snow makes Water Methanol Injection kits for just about every vehicle. I just looked up the kit we got for his car and my truck and got sticker shock! This is the kit:


But it was less than half the listed price a few months ago with the extra 10 gallon tank included. Wow, what a price jump.

The results were good. I have only run straight distilled water. No playing with methanol yet. The kit has a controller that can be set to start injecting a little progressing to all in based on a starting and final boost setting. I didn't want it coming on during normal flat land cruising so 4 psi was my start with a dribble and I had 9 psi as my all in setting. Except, I never got to 9 psi. I pushed the top down to 8, then 7 and finally 6 psi boost. All in on the WMI at 6-7 psi had my EGT very steady at 950° in full summer pulling a trailer up hill. Better.

The kit came with a #4 and a #6 nozzle. I started with the #4. I reset the all in boost setting so I would not wash out the flame and hurt the engine and did some miles in the summer heat with the #6 nozzle. I wasn't getting anymore boost or any lower EGT so I set it back to all in at 6psi and got the same basic results. I called Snow and they said to try a #8 nozzle and in their experience it wouldn't be too much. They were correct. #8 nozzle all in at 6 psi normally gave me 850° and it would stay between that and 900° no matter how long or steep the hill. Boost would still hit 7-8 psi. 200° drop in exhaust temperature is good.

Somewhere in all of that my 4th alternator in 4 years died. I have had a Delco CS130 alternator. Then an O'reilly's warranty replacement, and another and so on. Very frustrating. Much research led me to the AD244. Which is what the 2000-2012 Duramax trucks use. It seems the CS130 is rated at 105 amps but only makes around 50 at lower engine speeds. Me running front and rear a/c at high blower fan speeds was pushing them too hard. The AD244 I think is rated at 120 amps but that is at idle. It also has better cooling fans and airflow. I can have the lights on, front ac on full blast, rear ac on full blast and the radio rocking with 14.7 volts at idle now. We will see how long it last.

The AD244 is not a direct bolt on since I have 1995 serpentine brackets. I had to make a few things to make it fit. The 1998 and up 6.5 serpentine brackets have the alternator on the passenger side and the a/c on the drivers side opposite of mine. The AD244 is a direct fit to that set up which has the CS140 originally or the CS130D. Of course the pig tails are different too. I now have a AD244 to CS130 pigtail plugged into a CS130 to Si27 pigtail which plugs into the truck wiring. It also has a bigger pulley for the belt. Which I didn't even think about until cruising down the highway my rpm was way off since the alternator is the source for that signal. Thankfully the Dakota Digital tach box has an adjustment button. I just wish I had remembered I had put the box at the top of the brake pedal bracket so I could just reach up and adjust it without pulling the entire dash and gauges before I pulled the entire dash and gauges. Hopefully, I won't forget again if I ever have to adjust it again.
 

Sharecropper

Well-known member
Steel Soldiers Supporter
1,816
944
113
Location
Paris KY
Time for some more updates.

A year ago on a cross country trip I experienced some high Exhaust Gas Temperature readings at high speeds on steep grades. I wrote a lot about it in this thread and started with timing changes to make things better. Which they did. I have not messed with the IP timing since last March when I last wrote about it here.

I wanted lower EGT's though. Yes, the 8 psi boost and 1000° EGT the timing change got me to was good. Was there more out there to gain? I wanted to find out without doing an intercooler. Which led me down the Water Methanol Injection rabbit hole. Thankfully, Boxcar, has a turbo charged VW engine that I am building into a rail buggy in my class that he has intended all along to add WMI to. Allen also until a few months ago worked as a supplier to a company called Nitrous Express in north Texas. They own a subsidiary called Snow Performance. Snow makes Water Methanol Injection kits for just about every vehicle. I just looked up the kit we got for his car and my truck and got sticker shock! This is the kit:


But it was less than half the listed price a few months ago with the extra 10 gallon tank included. Wow, what a price jump.

The results were good. I have only run straight distilled water. No playing with methanol yet. The kit has a controller that can be set to start injecting a little progressing to all in based on a starting and final boost setting. I didn't want it coming on during normal flat land cruising so 4 psi was my start with a dribble and I had 9 psi as my all in setting. Except, I never got to 9 psi. I pushed the top down to 8, then 7 and finally 6 psi boost. All in on the WMI at 6-7 psi had my EGT very steady at 950° in full summer pulling a trailer up hill. Better.

The kit came with a #4 and a #6 nozzle. I started with the #4. I reset the all in boost setting so I would not wash out the flame and hurt the engine and did some miles in the summer heat with the #6 nozzle. I wasn't getting anymore boost or any lower EGT so I set it back to all in at 6psi and got the same basic results. I called Snow and they said to try a #8 nozzle and in their experience it wouldn't be too much. They were correct. #8 nozzle all in at 6 psi normally gave me 850° and it would stay between that and 900° no matter how long or steep the hill. Boost would still hit 7-8 psi. 200° drop in exhaust temperature is good.

Somewhere in all of that my 4th alternator in 4 years died. I have had a Delco CS130 alternator. Then an O'reilly's warranty replacement, and another and so on. Very frustrating. Much research led me to the AD244. Which is what the 2000-2012 Duramax trucks use. It seems the CS130 is rated at 105 amps but only makes around 50 at lower engine speeds. Me running front and rear a/c at high blower fan speeds was pushing them too hard. The AD244 I think is rated at 120 amps but that is at idle. It also has better cooling fans and airflow. I can have the lights on, front ac on full blast, rear ac on full blast and the radio rocking with 14.7 volts at idle now. We will see how long it last.

The AD244 is not a direct bolt on since I have 1995 serpentine brackets. I had to make a few things to make it fit. The 1998 and up 6.5 serpentine brackets have the alternator on the passenger side and the a/c on the drivers side opposite of mine. The AD244 is a direct fit to that set up which has the CS140 originally or the CS130D. Of course the pig tails are different too. I now have a AD244 to CS130 pigtail plugged into a CS130 to Si27 pigtail which plugs into the truck wiring. It also has a bigger pulley for the belt. Which I didn't even think about until cruising down the highway my rpm was way off since the alternator is the source for that signal. Thankfully the Dakota Digital tach box has an adjustment button. I just wish I had remembered I had put the box at the top of the brake pedal bracket so I could just reach up and adjust it without pulling the entire dash and gauges before I pulled the entire dash and gauges. Hopefully, I won't forget again if I ever have to adjust it again.

Mr. Barrman. Just a note to say thank you for the information on the radiator. Mine is on order and the folks sent me an email indicating that it would be shipped in a couple weeks. No problem, I replied, as I have been on this project for 12 years.

Reading your post above made me wax philosophical. It seems everybody with a turbo on a 6.2 is fighting the same old problem of high EGT. The truth of the matter is, the only way to create horsepower is to burn fuel, an eternal law of physics. To make the 6.2 produce enough horsepower to get up a hill with a load, one must burn fuel. That fuel produces heat which approaches a temperature that will melt the exhaust manifold. I myself have been guilty of chasing the same dream for over 35 years. I installed one of the first Banks kits on a brand-new 1985 GMC 6.2 diesel and instantly began fighting the heat demons. Since then I have lost track of how many turbo'd diesels I have owned and sold, with my last being a new 2008 Chevy with factory diesel. Heat. I hate heat in an engine. It is heat which breaks down oil and destroys engines. If someone were to figure out a way to burn fuel without producing heat, they would become rich.

That is why I was determined not to turbo the P400 going into my M1028. I originally decided to leave it NA to avoid the heat and all the problems associated with heat. But then I began to read about Bullet, a company in Australia which builds and races diesel trucks in that hostile environment. Bullet invested in the research and development of a special 6.5 cast aluminum intake with a built-in intercooler on which a supercharger can be mounted. After researching the Bullet product for several months, I bit the bullet (pardon the pun) and ordered one of the units. I haven't yet installed it but am planning to get started in the next few weeks.

If a person can step back for a moment and consider how a turbocharger works, it will be quite evident why excessive heat is produced by this method of compressing intake air. Another law of nature indicates that whenever air is compressed, it is heated. With a turbocharger, the power which compresses the intake air comes from hot intake gases. Consequently the turbine itself becomes heated via two methods by 1)- compressing the intake air and 2)- by using hot exhaust gases to spin the turbine. The turbo subsequently becomes a heat machine, heating not only the exhaust gases but also the exhaust manifold, head, and engine on the side which has the turbo mounted. The other side runs at much cooler temperatures. That is why GEP transitioned to a center-mount turbo on the later 6.5's in the HMMWVs, to share the heat to both sides of the engine. The 6.5 engines can produce more power than a 6.2 due to the inherent design. Trying to make a 6.2 deliver acceptable performance by adding a turbo (and then trying to keep the EGT down) is what dooms the 6.2 platform. That is why I decided to supercharge and intercool my P400. The Bullet unit does both in one neat package. The ceramic-coated headers from Stan's will take away the exhaust gases via the most efficient way possible. The coolant in the Bullet intercooler will be circulated by a 24-volt continuous duty pump through a radiator mounted in the grill, similar to an oil cooler. The pump moves 200 gallons per minute. I doubt I will need the pump running during the wintertime.

I apologize for ranting and raving but I just had to vent a little. I see so many younger guys on SS who think all they have to do is add a turbo on their 35-year old 6.2 and they will be able to tow 20,000 pounds up Rabbit Ear Pass. It just will not work. The 6.2 was not designed to be turbo'd. The bottom end just will not withstand (for long) the added stresses of higher cylinder pressures. I feel blessed to have been able to acquire one of the last P400's available, and I plan to do everything possible to keep engine and oil temperature in an acceptable range.

Sorry again if my words have offended anyone.
 

Curtisje

Well-known member
Steel Soldiers Supporter
581
667
93
Location
Okinawa, Japan
Time for some more updates.

A year ago on a cross country trip I experienced some high Exhaust Gas Temperature readings at high speeds on steep grades. I wrote a lot about it in this thread and started with timing changes to make things better. Which they did. I have not messed with the IP timing since last March when I last wrote about it here.

I wanted lower EGT's though. Yes, the 8 psi boost and 1000° EGT the timing change got me to was good. Was there more out there to gain? I wanted to find out without doing an intercooler. Which led me down the Water Methanol Injection rabbit hole. Thankfully, Boxcar, has a turbo charged VW engine that I am building into a rail buggy in my class that he has intended all along to add WMI to. Allen also until a few months ago worked as a supplier to a company called Nitrous Express in north Texas. They own a subsidiary called Snow Performance. Snow makes Water Methanol Injection kits for just about every vehicle. I just looked up the kit we got for his car and my truck and got sticker shock! This is the kit:


But it was less than half the listed price a few months ago with the extra 10 gallon tank included. Wow, what a price jump.

The results were good. I have only run straight distilled water. No playing with methanol yet. The kit has a controller that can be set to start injecting a little progressing to all in based on a starting and final boost setting. I didn't want it coming on during normal flat land cruising so 4 psi was my start with a dribble and I had 9 psi as my all in setting. Except, I never got to 9 psi. I pushed the top down to 8, then 7 and finally 6 psi boost. All in on the WMI at 6-7 psi had my EGT very steady at 950° in full summer pulling a trailer up hill. Better.

The kit came with a #4 and a #6 nozzle. I started with the #4. I reset the all in boost setting so I would not wash out the flame and hurt the engine and did some miles in the summer heat with the #6 nozzle. I wasn't getting anymore boost or any lower EGT so I set it back to all in at 6psi and got the same basic results. I called Snow and they said to try a #8 nozzle and in their experience it wouldn't be too much. They were correct. #8 nozzle all in at 6 psi normally gave me 850° and it would stay between that and 900° no matter how long or steep the hill. Boost would still hit 7-8 psi. 200° drop in exhaust temperature is good.

Somewhere in all of that my 4th alternator in 4 years died. I have had a Delco CS130 alternator. Then an O'reilly's warranty replacement, and another and so on. Very frustrating. Much research led me to the AD244. Which is what the 2000-2012 Duramax trucks use. It seems the CS130 is rated at 105 amps but only makes around 50 at lower engine speeds. Me running front and rear a/c at high blower fan speeds was pushing them too hard. The AD244 I think is rated at 120 amps but that is at idle. It also has better cooling fans and airflow. I can have the lights on, front ac on full blast, rear ac on full blast and the radio rocking with 14.7 volts at idle now. We will see how long it last.

The AD244 is not a direct bolt on since I have 1995 serpentine brackets. I had to make a few things to make it fit. The 1998 and up 6.5 serpentine brackets have the alternator on the passenger side and the a/c on the drivers side opposite of mine. The AD244 is a direct fit to that set up which has the CS140 originally or the CS130D. Of course the pig tails are different too. I now have a AD244 to CS130 pigtail plugged into a CS130 to Si27 pigtail which plugs into the truck wiring. It also has a bigger pulley for the belt. Which I didn't even think about until cruising down the highway my rpm was way off since the alternator is the source for that signal. Thankfully the Dakota Digital tach box has an adjustment button. I just wish I had remembered I had put the box at the top of the brake pedal bracket so I could just reach up and adjust it without pulling the entire dash and gauges before I pulled the entire dash and gauges. Hopefully, I won't forget again if I ever have to adjust it again.
Great info. Thank you for sharing.
 

Barrman

Well-known member
5,159
1,562
113
Location
Giddings, Texas
No problem. I share your aversion to heat. I spent most of my high school years trying to keep a 1967 Austin Cooper S alive. Heat, it always comes down to too much heat. The Mini is currently in pieces while I wait for the machine shop to do some work. Heat again a few years ago.

Which leads into the next part of my Cowdog tale....

My engine is a 6.5 GEP pull out. The tag said it was overheated. Some new still in the packing crate/tin foil GEP center mount turbo 60° intake bolt heads came with the engine. I really debated with myself about what to do. Refurbish the stock 6.5 NA heads that had I think the T pre cups and 90° intake bolts, set up a set of stock 6.2 heads or throw on the diamond pre cup 60° intake bolt heads? Heat was my main reason to do with the center mount turbo heads.


With these non direct injection engines the fire is started in the pre combustion chamber off to the side in the cylinder head. The fire then spreads through the throat to over the piston. The small throat 6.2 engine got great mpg's, were kind of quiet and responded well to a turbo with modest power gains. Try to get what is now considered normal power and the small throat heads get hot. Very, very hot real fast.


GEP reworked the coolant passages in the cylinder heads a little, used different metal and put bigger throat pre cups in the non turbo heads. They probably would have worked fine for my needs. But I figured if I am building an engine I might as well try to get the most out of it. On went the diamond pre cup heads with the biggest throats ever made for a 6.x. Except maybe the P400 engine.


The problem with using those heads is the intake manifold mounting. All of the 6.2 and 6.5 NA or turbo engines up until the 2000 center mount turbo engines had intake manifold bolts that were 90° to the intake face of the head. Which means when the intake was installed and the bolts were in. They were angled into the heads. To make it so an intake manifold could be pushed straight down onto a turbo charger the bolts had to also be vertical or 60° to the intake face of the heads.


Way back in 2016 I couldn't find any of the P van engine or HMMWV engine 3 piece intake manifolds that are supposed to go on the 60° heads. When one did come up it was usually missing one of the 3 pieces or was so expensive I didn't even give it serious thought. So I modified a CUCV 6.2 intake to work with the center mount turbo heads. Post #88 of this thread shows that process.

While doing my research about boost, fuel rates, EGT and their relations I stumbled across the world of boost leaks and boost leak test. So I collected what I needed to do a boost leak test. Here is what I found:


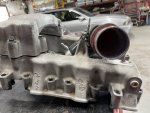
I started looking for the 3 piece center mount turbo intake set up. I finally found a complete set up back in October that was priced at $100 because someone had tapped and plugged a sensor hole in a not visually pleasing way. I could care less about those looks. Once it made it to my door I had to figure out how to make it work with my turbo.

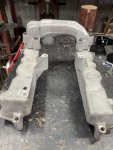
Here is what the assembly looks like:
58705ABE-7516-4202-AFE7-AFE2AADC085B.jpeg1AE0F6A3-7C5A-42E1-9B75-DE63236A8563.jpeg

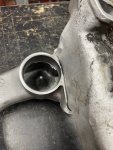
That hole in the cross over piece is 2.87 inches diameter. It is supposed to just slip over the output nozzle of the center mount turbo. My turbo sits outside the passenger side head down even with the exhaust ports. 2.87 doesn’t match up to any piping I could find. Something had to be made. The Banks turbo outlet pipe is 2.5 inches outside diameter.

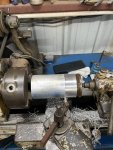
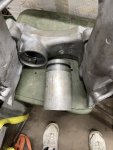
I found a 2 foot section of .50 wall 3 inch OD 2.5 inch ID aluminum pipe. I have a 1927 South Bend lathe that collects dirt and dust most of the time. But, I cleaned it up, oiled everything and chucked up the pipe. I cut off an 8 inch section and then turned one end down to 2.82 inches. I also purchased a 6.5 center mount turbo output O-ring. That O-ring was way too thick to work on my pipe. But, I tried by turning a .5 inch section down to 2.70. The factory O-ring still wouldn’t fit. With no more aluminum left to cut I put 2 #30 O-rings in the groove and that worked perfectly.
8F7BF717-E0B7-4631-AF55-08ABC356C056.jpeg3D271C3D-01EB-4AB6-A65A-12125D5EE4BA.jpeg

I only have 1 O-ring in the picture. Then I drilled and tapped 3 holes in the cross over plenum to put set screws in for holding the aluminum pipe in place under pressure and vibration.

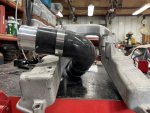
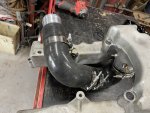
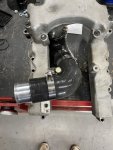
Next was a 3 inch ID to 2.5 inch ID 120° silicone conversion boot. A 6 inch aluminum 2.5 inch OD straight section of inter cooler piping was next. I had to do a lot of searching of Tuner parts houses to find all of this stuff. It seems the WRX and Supra crowd love to make miles long intercooler plumbing so parts are plenty and really very cheap. Then a silicone 2.5 inch to 2.5 inch 90° elbow got me to where I thought it would meet up with the Banks aluminum piping. Another 6 inch straight section was needed too.

Here is how it looked all assembled and mocked up:
B22F7C03-AA9D-454E-93E8-0C72894CB1F5.jpegFBBB388E-D395-4E3A-B15B-2B672A5831B4.jpegF15CCB12-8A1E-4496-B377-A6C8826B47BC.jpeg296710B5-D14C-45BF-A107-73B516B38582.jpeg

I also drilled sand tapped a hole in the turned aluminum pipe for a boost gauge hook up. I thought I had screwed myself over with the set screws. The had to be below the O-rings to maintain a good seal. Pushing the really tight O-rings past the drilled and tapped holes cut the O-rings. Silicone spray ate 2 more. Grease ate another pair. I ended up putting painters tape over the holes and dousing everything with silicone to get it successfully together.

Once I had the old manifold off, everything on the engine clean and new gaskets in place. The manifold runner on the passenger side didn’t want to go on because the #6 and #8 injector lines along with the fuel supply line to the fuel filter and the hose from the filter to the IP all pile up high enough to block the manifold runner. I messed with it a bit and got it to fit. Then, I found out my aluminum pipe set up was about a half inch too long. Thankfully the silicone boot compressed enough to let everything bolt on and get snugged down. Meaning I probably could have done without the set screws and all of their related issues. Next time.

I have been driving with this set up for about 2,000 miles now. Boost is about a half pound to a pound higher in steady cruise. EGT is down 50° to 100° due to the increased airflow no leaks means. We have very few hills here. But, with the cruise set on what we have the truck doesn’t down shift on hills it always has downshifted on. Jumping to 5-6 psi boost and just grunting its way up with no drama. I now have the WMI set to start at 5 psi because I can hit 4 psi just getting up to highway speeds with slight throttle. All in is 8 psi which is reached anytime I get more than 50% throttle. But it really spends very little time that high of boost now because the speed is already there.

MPG has gone up as well. 16-19 is now common instead of a once in a while thing.

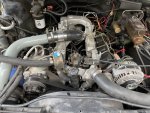
Here is what it looks like on the engine:
7730904A-4E40-4970-BCFD-BEF3A9B5B61B.jpeg
 

Sharecropper

Well-known member
Steel Soldiers Supporter
1,816
944
113
Location
Paris KY
Outstanding post and info. I’ll be watching this thread closely.
BTW, I have an excellent Banks filter box if you need it. Pay the freight and it’s yours.
 

Barrman

Well-known member
5,159
1,562
113
Location
Giddings, Texas
Thanks for the offer. My filter housing is ok as far as I know.

I plan to leave things alone and see what my mpg and driving experiences average out to. But, if I need to make more changes the direction to look right now is for a Banks 6.9/7.3 turbo. Bigger and with a wastegate.
 

Barrman

Well-known member
5,159
1,562
113
Location
Giddings, Texas
Soapy water would probably work just fine. The stuff I have is called Big Blu micro leak detector for air conditioning. I was expecting at most a few small leaks. Not the massive things I had.

I pulled the CUCV 6.2 intake that night after I took the video. Then installed a 3 piece 6.5 center mount turbo intake as described in post 531. No leaks now and lots of boost.
 

Barrman

Well-known member
5,159
1,562
113
Location
Giddings, Texas
My son Colton is living his life 60 miles away with a job in a town 75 miles from there. We don’t get to see each other much and maybe talk every other week or so on the phone. Trying to keep him up to date on things I am doing is difficult. He suggested I just start doing videos of what I am doing and he can watch on YouTube. Which is what I started doing. This week is my Spring Break so I had some time to do things.

Yesterday was removing the Banks down pipe to replace all the glow plugs and wrap the pipe. Here is the video:


Keith_J

Well-known member
3,657
1,313
113
Location
Schertz TX
What a major pain. Swapped all 8 on my 1031 a little over a year ago. Took about an hour and luckily, none swelled. 4 burned out. 2 out of those 4 failed lost their spade blades in the extraction process. Corrosion or manufacturing defects? These parts are magnetic so corrosion is my guess.
 
Top
AdBlock Detected

We get it, advertisements are annoying!

Sure, ad-blocking software does a great job at blocking ads, but it also blocks useful features of our website like our supporting vendors. Their ads help keep Steel Soldiers going. Please consider disabling your ad blockers for the site. Thanks!

I've Disabled AdBlock
No Thanks