• Steel Soldiers now has a few new forums, read more about it at: New Munitions Forums!

  • Microsoft MSN, Live, Hotmail, Outlook email users may not be receiving emails. We are working to resolve this issue. Please add support@steelsoldiers.com to your trusted contacts.


M1009 aka RED project under way

Barrman

Well-known member
5,165
1,580
113
Location
Giddings, Texas
I didn't count, but there are probably a dozen CUCV projects being documented on this site. Just this week. So, there isn't any need to add another. This falls more into the "what where they thinking" catagory.

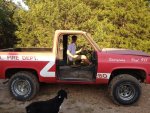
I got this truck from Mark in San Antonio after he got it from GSA in LA. Turns out somebody at the VFD needed the fues panel more than the truck did. It has sat in my field for the past 18 months or so while we collected parts and waited for shop space to take it all apart.

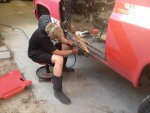
Colton and I got the interior stripped, the rear top off, all the wires under the dash removed, pulled the beat up doors and the engine running by hot wire. Pretty good weekend.

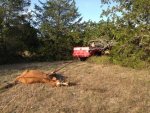
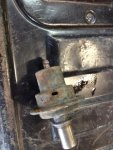
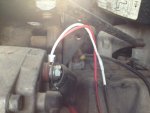
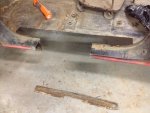
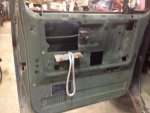
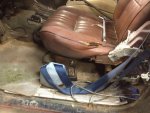
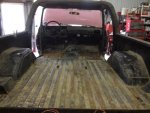
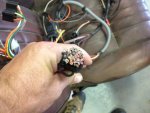
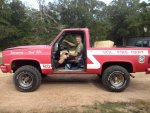
Pictured below are the before picture, the pull strap for the drivers door, the seat belt set up I can not figure out, the stripped interior, the cut where the fuse panel was removed from the harness and Colton driving around in it some wtih a big smile.

Anybody got ideas on how the "improved" seat belt system was supposed to work? I tried it a few times and just got tangled up.
 

Attachments

Warthog

Moderator
Super Moderator
Steel Soldiers Supporter
13,775
227
63
Location
OKC, OK
So is that the little kid that was sitting in AB Linn's infamous eBay chair a few years ago?

I say put some straps across the door openings and call it good. :-D

Last week I hauled of the 1009 shell to the scraper. It still had the seatbeats. :???:
 

Barrman

Well-known member
5,165
1,580
113
Location
Giddings, Texas
Joe, you already sent me replacement front seat belts a year or so ago. Yes, that is the same kid that was dwarfed by ABLinns chair back in 2006.

Chris, Joe supplied the harness. You will have to contact him about pricing.
 

Barrman

Well-known member
5,165
1,580
113
Location
Giddings, Texas
I know everybody is waiting for an update on yet another M1009 build. So here it is.

Colton finished cleaning up the new(used) fuse panel and all the connectors. We got the rest of the old harness all the way out. The starter relay was swapped out for one that will work (doghead relay) and the new wiring went in.

With no fuses in the panel, we had key activated starter motor and nothing else. We put some fuses I had laying around in and still only had key activated starter. Nothing else. I was getting voltage at both sides of all the fuses, but nothing worked. We also weren't getting power to the IP solenoid. I could unplug at the ignition switch and hot wire the IP though.

A new ignition switch was purchased along with new fuses. He put the fuses in and everything except the IP solenoid was getting power. He swapped out the ignition switch and all was good. We bolted the column back up and then hooked up the gauge panel to see what that would do. Cleaning the bulb holders got the gauge lights working, same with GEN 1 and Gen 2. We couldn't make the hi beam indicator work though. I didn't bother tracing to see if it was even getting power since the gauges will be coming out again.

Hot wiring the glow plugs because we still haven't put a ST-85 in the truck had us checking alternators. Gen 2 charges great. Nothing from Gen 1. We pulled the plug on the side of it and the pig tail is shot. We will replace them on both and see what we get.

While we had it running we decided to see about vacuum supply to the transmission. Nothing at the modulator with the engine running no matter the rpm. 5-7 at the control valve no matter the rpm and 12-17 at the vacuum pump. I hooked directly to the modulator bypassing the control valve after we blew the line out to make sure it wasn't plugged. Colton wanted to do the test driving. I didn't get any pictures because I was trying to hang on with no seats, doors or top while he was sitting on a wheeled shop stool trying to hold a steady throttle. He wasn't very steady and I couldn't tell if it shifted or not. We only got up to 30 mph before I had him shut it down and wait until we have seats in it. The engine didn't sound like it was doing 30 in first though.


We have some rust to cut out on the drivers side rocker and floor area. Metal working 101 will begin soon. Fixing the few wiring issues listed and stopping 3 injectors from leaking fuel is about all the work needed besides sand, prime, sand, paint, put things together, repeat. I will list stuff out as it happens.
 
Last edited by a moderator:

Barrman

Well-known member
5,165
1,580
113
Location
Giddings, Texas
He couldn't leave it alone now that it starts with key. He went back out while I was on here to drag a downed tree to the burn pile. That allowed me to get a picture. It also gave me an idea since he was "testing" the 4x4 system in a mud hole. I got behind the wheel with it in 4 low and accelerated. It shifted super hard and firm in all gears. We are all smiles here.

I forgot to mention in the above post that the fuse panel and wiring harness was used and from Warthog. Thanks again Joe.
 

Attachments

Good start on the m1009 build.We have an m1009 we are about to scrap.I have the hard top and a few other parts if ya need anything,;-) PM me names john. BTW I still have the door shells also (they are red btw).

If ya want to do a road trip we can make ya serious deal. Im located in Jacksonville NC.
 
Last edited:

Barrman

Well-known member
5,165
1,580
113
Location
Giddings, Texas
Thanks for the offer John. I have been collecting parts for more than a year now. Little things like the rod that holds the rear seat folded up, the big bolt for the spare tire rack, a spare fuel cap, all black out lights, a slave plug cover, a heater fan switch chrome tip and I am not sure what other small stuff I am forgetting. I figure if you are scrapping a truck, most if not all of those things are gone.

We didn't make any progress on the truck today, but it did get a work out. As all of you who followed Westy and Gimp on their Texas Trip 20 months ago know. I have two horses. One of them got the West Nile Virus in 2002. He lived when 18 others in my area died. Almost a year to the day later, he went blind. He managed very well for a blind horse all these years.

When I went out to feed them before work today, he was laying down and thrashing. I couldn't get him up, he was having seizures and his heart beat felt really weird and weak. I had to get to work so Colton got to check on him and try to get him to drink some water during the day.

We came home to find him worse. A vet was called to come out and put him down since i was not convinced a single shot to the head would kill him without making a painful mess of the deal. I have never thought about where in the head the brain of a horse is. I went to visit a neighbor that has been working on making an old back hoe run while we waited for the vet to show up. The neighbor wasn't home and the horse died on his own while I was gone.

We called the vet to cancel. The neighbor came home and brought his back hoe over. I got the hole just about all dug when a seal blew on one of the hydraulic rams. We had a huge leak and a horse to pick up, move 500 yards and then a hole to fill in yet. Time for plan B.

Plan B was for Colton to fire up RED, use RED to drag the horse to the hole and then hope the loader had enough fluid to pick up the horse and make at least 2 pushes of dirt. Attached is a picture of me dragging the dead horse. My thought was "we are always talking about beating a dead horse on SS. I bet nobody has ever dragged a dead horse."

RED got the job instead of any other vehicle because it has the oldest tires and Colton has missed a few mesquite trees in the field. Thorns in RED tires won't matter because it has to have new tires to be road legal anyway.

We followed the loader back to his place after it all worked out.
 

Attachments

Warthog

Moderator
Super Moderator
Steel Soldiers Supporter
13,775
227
63
Location
OKC, OK
Sorry to hear about the horse Tim. It was time. You will need to get a goat to keep the other horse company.
 

Warthog

Moderator
Super Moderator
Steel Soldiers Supporter
13,775
227
63
Location
OKC, OK
What's the difference between mules, donkeys, burros, and jackasses?
Here are the definitions according to the Mule Barn:
  • Mule: A domesticated, hybrid animal that results from crossing a mare (female horse) and a jack (male donkey).
  • Donkey: A domesticated ass.
Which, of course, begs the question "What is an ass?" Thankfully, Mule Barn also provides a definition of this particular animal.
  • Ass: A four-footed, hoofed mammal related to the horse, but smaller, with longer ears and a shorter mane, shorter hair on the tail, and a dark stripe along the back.
So, it seems the aforementioned jackass is simply a male ass. The main difference between the jackass and the donkey is their domestication -- the ass is wild; the donkey is domesticated. But what about the burro? Turns out that the burro is a small donkey that is often used as a pack animal because it is particularly sure-footed.


Others may have thier own definition :whistle:
 

Wildman

New member
4
0
0
Location
Giddings, Texas
We have now corrected the transmission issues. Turns out all it took was clean glasses and younger eyes. Below is a picture of the modulator that was on the truck. I got to look at it for the first time yesterday and found the problem. While it would give you whiplash shifting in 4 low, it wouldn't shift in 2 or 4 high. Now it is so smooth that we can't tell it's shifted until we manually downshift.
 

Attachments

Barrman

Well-known member
5,165
1,580
113
Location
Giddings, Texas
We had some time to mess with the alternators today. The ALT 1 light comes on and goes off when the engine fires up. However, no charging happens at BAT 1. ALT 2 has voltage at the light on the dash, the bulb is good, but the light never comes on. BAT 2 gets charged though.

We pulled the dash out yesterday and after a good bit of time gave up on the ALT 2 light. The alternator does charge after all.

ALT 1 was a bigger puzzle though since the light came on, went off when the engine started and no charging happened. Putting a volt meter to the positive and negative post at the back of ALT 1 gave no voltage. I used a shade tree trick today because I wasn't sure what else to try. A screwdriver to the rear bearing of the alternator showed it was magnetized. That means the alternator was working but the voltage wasn't going anywhere. A look at the isolated ground wire on the water cross over pipe showed the problem. Rust and a bolt not tight were found. Attached is a picture of the ground.

Each alternator charges like it should and 28.8 volts is at the slave plug on the grill.
 

Attachments

Warthog

Moderator
Super Moderator
Steel Soldiers Supporter
13,775
227
63
Location
OKC, OK
Love the color coded shrink tubing.

You going to have it finished by the time he gets his license?
 

Barrman

Well-known member
5,165
1,580
113
Location
Giddings, Texas
That depends on how much money he earns doing odd jobs and such. 2 years to go. I thought you would like the color coded shrink wrap.
 

Barrman

Well-known member
5,165
1,580
113
Location
Giddings, Texas
As mentioned above, both alternators were charging even though the ALT 2 light wasn't coming on. Again, we had voltage with the key on at the back of the gauge panel where the light goes. Just, no light. I plugged in a stock volt meter at the volt meter plug and it didn't show a thing. I figured the two were related. Time to read the -20 again.

The only thing we hadn't done that the TM mentioned was pull the ALT 2 and volt meter relays, run a jumper wire and see what happens. I just swapped in different relays instead. It worked. All lights and gauges now function.

The electrical stuff is just a side show compared to the body work though. Colton started cutting the rusted section of the drivers side rocker panel the other night. Tonight we got all the rust cut out on that side of the truck. The passenger side just has some pin holes where the door sill plate held in moisture. We are going to cut it all out though and make new metal.

This weekend he should get a chance to hand form a new floor section. We bought a rocker panel because the curves are too complex for hand forming. Should be a fun weekend learning how to bend metal, measure curves and weld. Attached are pictures of what we have now.
 

Attachments

M715VFD405

New member
489
4
0
Location
Weatherford/Oklahoma
Sorry to hear about your horse Tim. Red looks like it's coming along really well. Colton looks like he's having fun cutting that rocker panel. I'm looking to get a Mutt for my son and I to work on for his first car. I hope he enjoys building it as much as Colton looks like he is.
 
Top
AdBlock Detected

We get it, advertisements are annoying!

Sure, ad-blocking software does a great job at blocking ads, but it also blocks useful features of our website like our supporting vendors. Their ads help keep Steel Soldiers going. Please consider disabling your ad blockers for the site. Thanks!

I've Disabled AdBlock
No Thanks