• Steel Soldiers now has a few new forums, read more about it at: New Munitions Forums!

  • Microsoft MSN, Live, Hotmail, Outlook email users may not be receiving emails. We are working to resolve this issue. Please add support@steelsoldiers.com to your trusted contacts.

M1009 Heavy Maintenance Visit

Mg84648

Member
201
6
18
Location
Cumming, Ga
Thanks man. This is the first time I've done anything like this and I'm pretty pleased with how its turning out. I studied this forum for two weeks or so gaining knowledge, tips and tricks in preparation. You guys have already done the hard work of trial and error. I'm just applying the techniques you all have shared!
Very nice work!!
 

Mg84648

Member
201
6
18
Location
Cumming, Ga
So today is a quick update on the floor pan repairs ongoing.

There was considerable rot at the drivers door threshold and the kickplate area. I had planned on using a joggled repair with panel bonding adhesive suggested by several members (since I'm not a welder) but due to the numerous contour changes and underlying structure I decided to to a lap slice repair. I cut out the damaged areas careful to avoid underlying cab support. Funny thing is I still notched a cab support! So in aircraft sheet metal, which is the only experience i have in metal working, when cutting through skin where there may be underlying structure you would want to gain access to the backside and install a thin piece of titanium between the skin and the stringer or frame. The premise being that as you are cutting through the skin you will get instant visual feedback in the form of sparks when you hit the titanium instead of the stringer. Well when cutting through steel on a car with an electric grinder everything sparks! Even when you cut through the floor pan, into the titanium and then into the cab support! Ya, pretty happy about that one!

So I called up a buddy who came over a put a beed on the top leg of the cab support from underneath, Crisis averted!

I then cut the repair parts out of a full floor pan to overlap the cutout by two inches. I cleco'd them in place and picked up all the holes. I then used SEM Weld-Bond and stainless fasteners to attach the repair. I edge sealed both top and bottom using seem sealant. I grinded all surface corrosion on the drivers side and treated with Rustolium rust converter and finished with two coats of primer.

This is closer to a repair seen on airplanes then on cars but I felt more comfortable doing it this way and I think the results look good. Hope you guys enjoy.
 

Attachments

Last edited:

steelypip

Active member
769
68
28
Location
Charlottesville, VA
I prefer lap repairs as well - they're stronger, and usually easier to get alignment right. I've generally use aluminum pop rivets after the clecos to clamp the patch panel in place with panel bonding adhesive in the lap joint. Once the adhesive has set, hit it lightly with the body grinder to take the tops off the pop rivets and you have an easy to smooth, easy to seal joint.

The sheet metal screws for a floorboard repair make a lot of sense (stronger), but be careful of water ingress from underneath - you may want to paint the screw threads with more panel adhesive or a seam sealer to isolate them and seal the holes. Sheet metal screws are out of a hard steel and tend to rust quickly.
 

Mg84648

Member
201
6
18
Location
Cumming, Ga
I prefer lap repairs as well - they're stronger, and usually easier to get alignment right. I've generally use aluminum pop rivets after the clecos to clamp the patch panel in place with panel bonding adhesive in the lap joint. Once the adhesive has set, hit it lightly with the body grinder to take the tops off the pop rivets and you have an easy to smooth, easy to seal joint.

The sheet metal screws for a floorboard repair make a lot of sense (stronger), but be careful of water ingress from underneath - you may want to paint the screw threads with more panel adhesive or a seam sealer to isolate them and seal the holes. Sheet metal screws are out of a hard steel and tend to rust quickly.
Thanks for the comments gents,

I completely agree steelypip. I stayed away from sheetmetal screws and used truss heads, ( installed wet with sealant) and lock nuts and washers on the bottom. The bottom edges are fillet sealed and the protruding screw threads and nuts are coated with seem sealant. Water is certainly your worst enemy on these vehicles so I tried to make the repair as water tight as possible.

As far as the pop rivets, I like that idea. Should we be concerned with dissimilar metal though? I guess if they are installed "wet" it shouldn't matter right? Just thinking out loud. I did have to use three pop rivets on the kick plate repair due to inaccessibility.
 
Last edited:

steelypip

Active member
769
68
28
Location
Charlottesville, VA
Thanks for the comments gents,

I completely agree steelypip. I stayed away from sheetmetal screws and used truss heads, ( installed wet with sealant) and lock nuts and washers on the bottom. The bottom edges are fillet sealed and the protruding screw threads and nuts are coated with seem sealant. Water is certainly your worst enemy on these vehicles so I tried to make the repair as water tight as possible.

As far as the pop rivets, I like that idea. Should we be concerned with dissimilar metal though? I guess if they are installed "wet" it shouldn't matter right? Just thinking out loud. I did have to use three pop rivets on the kick plate repair due to inaccessibility.
This is for exterior body panels - like where you're doing a quarter panel or something similar. I used an air flanger to recess the existing edges, then cut the patch panel (an almost complete quarter panel in this case) to fit the flanges. Clamp in place and drill a few holes through the lap. Insert clecos to hold it all together. Once alignment (and fine trimming) are just where you want them, drill lots more holes in the lap (I did one about every 4"). Take it all apart, scuff as necessary, and apply the panel adhesive. Put it all back together and pop rivet with the aluminum rivets.

Come back after the adhesive has cured and knock the aluminum rivet heads off with a coarse disk on the body grinder. Reach behind the lap and pull the rest of the rivets out with pliers. Now you have a patch panel bonded to the vehicle with no aluminum anywhere. You have some little holes in the lap to deal with where the rivets were, but that's not a big deal. I epoxied little spots of fiberglass like bandaids behind each hole and then filled the lap and holes with metalized filler in the usual way.

For stuff like floorboards I'd use screws just like you did. I like the idea of using machine screws and nuts-you get a good clinch that way. Steel pop rivets would also work, but the core of each one has to be sealed after riveting to prevent water intrusion.
 
Last edited:

AECS

Member
305
3
18
Location
Munford, TN
This is for exterior body panels - like where you're doing a quarter panel or something similar. I used an air flanger to recess the existing edges, then cut the patch panel (an almost complete quarter panel in this case) to fit the flanges. Clamp in place and drill a few holes through the lap. Insert clecos to hold it all together. Once alignment (and fine trimming) are just where you want them, drill lots more holes in the lap (I did one about every 4"). Take it all apart, scuff as necessary, and apply the panel adhesive. Put it all back together and pop rivet with the aluminum rivets.

Come back after the adhesive has cured and knock the aluminum rivet heads off with a coarse disk on the body grinder. Reach behind the lap and pull the rest of the rivets out with pliers. Now you have a patch panel bonded to the vehicle with no aluminum anywhere. You have some little holes in the lap to deal with where the rivets were, but that's not a big deal. I epoxied little spots of fiberglass like bandaids behind each hole and then filled the lap and holes with metalized filler in the usual way.

For stuff like floorboards I'd use screws just like you did. I like the idea of using machine screws and nuts-you get a good clinch that way. Steel pop rivets would also work, but the core of each one has to be sealed after riveting to prevent water intrusion.
I want to make a removable panel in the bed of my 1009 to access the fuel sending unit. Droping the tank stinks. Only want to do it once...
 

Keith_J

Well-known member
3,657
1,315
113
Location
Schertz TX
Clecos rock! Excellent work! You also don't have to worry about heat causing corrosion. My step son's 1009 had cracks on the floor pan where the seats bolted, those had to be welded. Dirty job wire wheeling underneath and preserving the metal.
 

steelypip

Active member
769
68
28
Location
Charlottesville, VA
I want to make a removable panel in the bed of my 1009 to access the fuel sending unit. Droping the tank stinks. Only want to do it once...
I don't know just where that location is - if it's under the ridged metal, then it would be a lot of work to do something nice. If it's something flat or gently curved, then just cut a panel out a donor truck in the same area, fit it like it was a patch (with the flanger or without as you prefer), and use screws and non-cement sealer to join the two together.
 

Mg84648

Member
201
6
18
Location
Cumming, Ga
0818141648.jpg0825141529.jpg0813141640a.jpg0825141529a.jpg0813141640.jpg
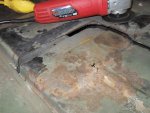
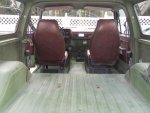
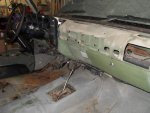
Its been a while since my last post but I've been chipping away at the passenger side floor so here is an update.
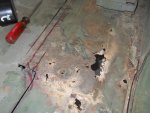
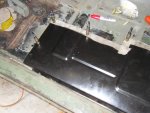
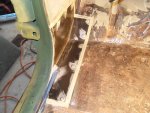
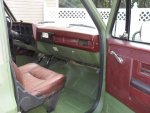
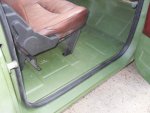
The rot wasn't as bad on this side as the drivers side but it seemed more wide spread if that makes sense. Small areas of rot dotted the kick plate area and the door threshold along with the rocker panel. So instead of dotting the whole interior with 2x2 inch doublers I decided to cut out large areas and install a lap repair in the same manner as the drivers side.

The removal of the damaged areas was identical to the drivers side so I won't bore you guys with rehashing the specifics. I did manage to NOT cut through the frame supports this time:naner: 
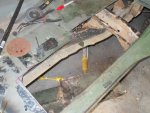
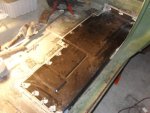
The only thing I did slightly different was using 3M's Panel Bonder instead of SEM weld-bond. It seemed to have a longer working time before beginning to set which alowed me time to install the hardware with out rippling the repair panel.
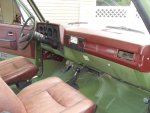
I fablicated the repair parts for the rear corner and kickplate areas from the remaining portions of the drivers side floor pans that went unused. Then I cut out the needed patches from passenger side floor pans ordered from RockAuto.com, Leaving two inches of over lap for good adhesion and stainless fasteners. Drilled, cleco'd, removed, deburred, primed, installed and edge sealed.

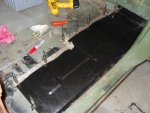
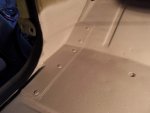
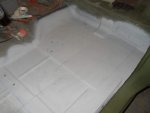
The next day was dedicated to treating the remaining surface corrosion with a grinder, wire wheel and Rust-olium reformer. Let dry for 24 hours then applied two coats of gray primer.

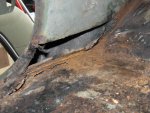
Now its on to the rocker panel which is epoxied in place just needs to be faired in.
 
Last edited:

Mg84648

Member
201
6
18
Location
Cumming, Ga
0828141559a.jpg0828141559.jpgHere are some pics of the completed floor. Not the best pics but it looks pretty good. Its two coats of 383 from Gilepsie.
Since these pics were taken there has been significant progress with re-assembling the interior so those will posted later tonight and tomorrow.
Enjoy!
 
Last edited:

cucvrus

Well-known member
11,294
9,691
113
Location
Jonestown Pennsylvania
Hey that is some excellent work on the M1009 repairs. You have definitely spent considerate time and attention to detail. Rarely do I see such nice work on these vehicles. It is usually a poor patch job at best. I hope all the other repairs go as well and turn out as nice as the inside. Keep up the good work and keep posting. I like it better with out the antennas. Also less holes in the outer body panels less places for rust. Thanks for sharing.
 
Top