

GunnyM1009
Well-known member
- 354
- 530
- 93
- Location
- Roanoke/Alabama
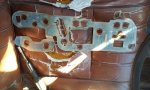
I realize this topic has been touched on many times but in every thread I read it states that there is not an aftermarket pcb that will work on the M1009. Well my pcb is shot which is causing one of my gens not to work and none of my cluster lights. After searching around on good ole google for awhile i found this. The photo should be on the post. Now after zooming in and comparing to my original it looks as if all the circuit ribbon routing is identical. Any thoughts.
Attachments
-
 19.9 KB Views: 108
 -
 58 KB Views: 109
Last edited: