• Steel Soldiers now has a few new forums, read more about it at: New Munitions Forums!

  • Microsoft MSN, Live, Hotmail, Outlook email users may not be receiving emails. We are working to resolve this issue. Please add support@steelsoldiers.com to your trusted contacts.


M1010 - No more DUVAC!!

lavarok

Well-known member
1,119
33
48
Location
Fellsmere, FL
As with most M1010s, my "shark" had the same 12v charging issues.
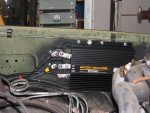
I tried the wire swap trick and it didn't help, so I bit the bullet and bought a Sure Power 52210 battery equalizer and some auto reset breakers.

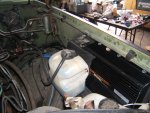
Yesterday, I removed the DUVAC and the related wiring. I then rewired the top alternator output to the 24v bus and the IGN wire of the top ALT to the bottom ALTs IGN wire.

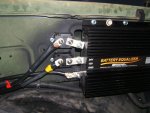
Today, I finished the install by mounting the Sure Power and running 2 AWG wire for supply, output, and ground. I took some 1/0 2 pole crimp lugs and removed the wire end. I used these modified lugs to connect the 12v and 24v poles from the Sure Power to the breakers. This saved space and saved me from making two wires. I wired the 24v 80amp breaker to the 24v bus. I wired the 12v 135 amp breaker to the negative terminal of the rear battery ( same place 12v bus for vehicle gets power ). I wired the ground from the Sure Power to the ground bus.

Once done, started the truck and turned on 12v accessories. The Sure Power LED turned green telling me it was working. Perfection!

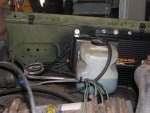
I then need to cover the breakers and the Sure Power terminals to prevent a possible accident, so I cut the old DUVAC cover and made a cover for the breakers and Sure Power lugs. I also needed a new place to mount my window washer fluid reservoir, so I screwed it into my new cover.

The only thing that might fail here is the weight of the washer fluid reservoir could break the cover over time. I plan to fashion some sort of bracket to alleviate this down the road, but for now it is working and holding up. I just won't fill it full!

Enjoy the photos. I know others have installed similar battery equalizers in their M1010s or M1028s with the DUVAC system; however, I don't think anyone has ever posted photos of the install.
 

Attachments

Last edited:

acmunro

Member
532
4
18
Location
Reynoldsville,PA
Looks like a good install. I have a question. I have two M1010. On one it has two Leece-neville alternators on the passenger side both are marked 12v. It has some "custom wiring" done at the alternators and some charging issues. The latest one I picked up has two Leece-neville alternators on the passenger side both are marked 24v. It has some fire damage at the DUVAC. My question is Does the M1010 use two 12v alternators like the rest of the CUCV chevys to get 24v or Does it use two 24v alternators to get 24v. I am not sure how the M1010 system works. Thank You
 

lavarok

Well-known member
1,119
33
48
Location
Fellsmere, FL
The M1010 stock setup is two Leece 24v alternators mounted on the passenger side. The DUVAC is essentially two units, a twin input voltage regulator and a battery isolator. It is supposed to sense when 12v is needed and pulse the top alternator on and off many times a second to create a 14v output from the top alt. It is worth noting that by itself, the Leece 24v alternator will not produce anything lower than 18v. I think this fact and poor design doomed the charging system from the start.

Many units and private owners have tried using a standard CUCV charging setup. This sounds like what was done on your 1st M1010 with the 12v alternators.

On your second M1010, you should consider a battery equalizer for producing a stable 12v supply. I doubt your stock items (DUVAC) are going to function correctly after a fire.
 

lavarok

Well-known member
1,119
33
48
Location
Fellsmere, FL
Oh yea - check the TM - there is a wiring diagram for the standard CUCV charging setup as well as one for the M1010. Once you compare both you will see the differences quite clearly.
 

acmunro

Member
532
4
18
Location
Reynoldsville,PA
Thanks for the info. The first one has the large leece-nevil alternators that are marked 12v, they must be from a different application. On the second one the fire looks like it started at the DUVAC so it is a gonner. Where did you purchase the items from your set up?
 

aboonski

Member
722
8
18
Location
West Melbourne Florida
Shark attack at Al's Air Force Base!!!! Not really, just a visit from Lavarok in his M1010 CUCV "Shark". Here's a short video of the action as he departs the driveway. Eventually I will have one of these too.

[media]http://www.youtube.com/watch?v=IoPs2Au43Iw[/media]
 

M1028A1ShelterCarrier

Active member
215
65
28
Location
Mammoth Lakes Ca.
I installed the same Surepower unit about three years ago and it runs flawless. Enough power to run a 12v transfer pump. Batteries are always equal. Before the Surepower, I use to be forced to swap battery positions every month or so. I left the DUVAC wired up in place just incase the Surepower goes down.
 

acmunro

Member
532
4
18
Location
Reynoldsville,PA
What does the DUVAC do ? My one M1010 had caught fire before I acquired it. I have been working on it a little bit at a time when I have time. I cut all the wires to the boxes on the fender -(where the fire had started) because the were all burnt up. I cut them back to where they were good and taped them. It seems to be charging in this condition as indicated by the volt meter. My question is. Once the batteries are fully charged would it just continue charging ? I didn't think it would charge at all.
 
Last edited:

lavarok

Well-known member
1,119
33
48
Location
Fellsmere, FL
acmunro - read post #3 above again. It's purpose was to charge the front battery which provides your 12v power source.

If you don't have the DUVAC working, then you need a stable source of 12v for your truck otherwise your front battery will drain.

There are two good options depending on what you want as an end result.
1] Install a battery equalizer to produce 12v from 24v.
2] Take the top 24v Leece Alternator and replace it with a 12v alternator. If you use a Leece your might be able to use the same brackets.

Both options present challenges, but are fairly straight forward. I would have opted for #2, but I wanted the full power of 2 24v 100 amp alternators (200 amp 24v) and 100 amps of 12v via my battery equalizer.

Option #2 may also be considerably cheaper than option #1.
 

doodaa

New member
22
0
0
Location
ashaway RI
Hi..I have an M1010 and need to get it charging correctly and happen to be running low on funds for truck till it gets working.Is there somewhere I can get info for putting 12v alt in place of top alt?Thanks for your time
Jim
 

Keith_J

Well-known member
3,657
1,313
113
Location
Schertz TX
Hi..I have an M1010 and need to get it charging correctly and happen to be running low on funds for truck till it gets working.Is there somewhere I can get info for putting 12v alt in place of top alt?Thanks for your time
Jim

First, check the wiring. Print out the F-10 in the appendix of the -20 TM, study it and compare with yours. Then get TB 43-0001-39-8 and check to see if this TB has been applied. You should have 3 diodes hanging by wires in the vicinity of the Duvac/Twinput. They are covered with tape and on a plastic wire connector. Take off the wrap and see if they have burned, if so, you need to replace them using Radio Shack #276-1144. Follow the wiring diagram to install correctly, diodes are marked with the cathode end banded. This is VERY important, the holders are polarized for correct installation but since you will replace a burned one, you need to trace the wiring. Cathode and anode ends are labeled on diagram F-10 in the Appendix.

Check all fuseable links on the wiring diagram. They should be replaced if burned using wire 4 gauges smaller (higher in number, like 14 gauge for a 10 gauge line.

Once the TB is applied and the wiring is repaired, now you can look for other faults. Both the Duvac and Twinput are solid state, they are also high-power electronics so they should work unless burned or potting blown up. One problem I found was corrosion on the alternator terminals. The ones more likely to cause problems are the ignition leads, attached to the regulators. These are steel and like to corrode.

Finally, on the Duvac is a set of Zener diodes attached to terminals 1, 2 and 3. These are snubbers, used to suppress transient high voltages. I have a source of the correct diodes so if these are fried, consider replacing. They are 1N4744a connecting Duvac terminals 1 and 3 (ground and 12 volt outputs) and 1N4751a for terminals 2 and 3 (ground and 24 volt outputs). Without these, the switching of the silicon controlled rectifiers in the Duvac will cause "noise" in the charging circuit which MAY cause high voltage readings on a cheap digital voltmeter. Analog voltmeters, like the one in the dash, are immune to these transients.

Sorry I cannot help you with a 12 volt alternator. But the above fixes are cheaper and proper.
 

mkcoen

Well-known member
Steel Soldiers Supporter
5,637
380
83
Location
Spring Branch, TX
I'm getting ready to dive into mine tomorrow. I have the circuit diagram for the charging system so I'm just going to have a go myself and then beg for help if I blow something up.

I wired the 12v 135 amp breaker to the negative terminal of the rear battery ( same place 12v bus for vehicle gets power ). I wired the ground from the Sure Power to the ground bus.
I'm planning to run the 12v to the 12v junction block (center left on the firewall). Is this where you ran yours or did you go straight to the batt?
 

lavarok

Well-known member
1,119
33
48
Location
Fellsmere, FL
Neg terminal of rear battery since you want the full 12v amperage of the Sure Power available to charge the battery (equalize) as needed.
 

mkcoen

Well-known member
Steel Soldiers Supporter
5,637
380
83
Location
Spring Branch, TX
Well got everything in today (huge THANK YOU to TexAndy for helping out) and it looked good. Started it up, LED was on, front batt was charging at 14.6 (it was a little low to begin with) and rear at 14.2. No smoke - always a good thing - and we shut it down congratulating ourselves for getting it right the first time (a little premature).

Then I noticed the LED wasn't going back out. With the truck off we were still showing full power at the batt equalizer. Since I put manual breakers in I flipped those and the LED went out and the equalizer started discharging back to zero. We fiddled with it a little more and discovered that leaving the 12v breaker set was fine as long as the 24v breaker was open.

We have it wired straight from the 24v bus bar to the breaker. Any suggestions on why we're still getting power?
 

lavarok

Well-known member
1,119
33
48
Location
Fellsmere, FL
When the truck is not in use, set the master light switch to off. When on, there is a relay that is ALWAYS drawing power.

This is related to the rear lighting in the M1010.
 
Last edited:

lavarok

Well-known member
1,119
33
48
Location
Fellsmere, FL
Also, it is not uncommon for the equalizer to run for a period of time to "equalize" the charge. This is normal.

But do make sure to keep that master light switch off when not in use. Otherwise, you will drain your batteries.

EDIT:

led ON = 12v draw

So, either your front battery is discharged OR there is 12v draw. The equalizer monitors the 12v side and turns on when draw is detected. There are no tunable options.

My bet is when you turn off the master light switch, the LED will go off. If not, make sure your front battery is fully charged and try again. You will want to keep the 24v breaker and the 12v breaker closed ( enabled ) to allow the equalizer to work properly. The relay that is drawing power is still draining your front battery....even with the equalizer off (24v breaker open). At least when the breakers were closed, you knew something was drawing power since the LED stayed lit. Find the reason for the draw....a] discharged battery , b] light relay

I had the same issue and always turn the master light switch off when the truck is not in use. It solved the problem for me. I actually found the relay in question when doing the "doghead" starter relay fix on my M1010. The relay plugs into the same plate as the starter relay and it was HOT....only after I studied the wiring diagram did I figure out that it is always on when the master light switch is on. It was then that I realized this was the culprit for my batteries draining over time as the truck sat.
 
Last edited:

mkcoen

Well-known member
Steel Soldiers Supporter
5,637
380
83
Location
Spring Branch, TX
The "master" switch was what we thought the culprit was to begin with so tried with it "on" and "off." I'll run the system for a couple of days to see what happens. Right now, as long as I'm not frying the front battery I figure I'm a mile ahead and just need to keep tweaking things to get it right.

I appreciate all the help Ian. I know virtually nothing about electronics but with your first post in this thread was able to make the swap without too much effort.
 

mkcoen

Well-known member
Steel Soldiers Supporter
5,637
380
83
Location
Spring Branch, TX
Well back to square 1 or at least 1.5.

LED is not coming on. Front batt is charging at 16.1 while the rear is at 14.6. The LED came on once this morning as I saw it through the open hood while I was starting it and then it went out and hasn't been seen since.

Any way to test the equalizer outside of the system? I hate to think something has gone haywire with it already.
 
Top
AdBlock Detected

We get it, advertisements are annoying!

Sure, ad-blocking software does a great job at blocking ads, but it also blocks useful features of our website like our supporting vendors. Their ads help keep Steel Soldiers going. Please consider disabling your ad blockers for the site. Thanks!

I've Disabled AdBlock
No Thanks