• Steel Soldiers now has a few new forums, read more about it at: New Munitions Forums!

  • Microsoft MSN, Live, Hotmail, Outlook email users may not be receiving emails. We are working to resolve this issue. Please add support@steelsoldiers.com to your trusted contacts.


M1078 LMTV planetary hub setup

coachgeo

Well-known member
4,971
3,340
113
Location
North of Cincy OH
Here are the part numbers for the Timken bearings that I received in the kit I bought. I still have not found a cover to modify like Steve, so I may try just using (4) U-joint clamp brackets (modified) to hold the cross T section for the spider gears in place to make the measurements. Or make 4 aluminum blocks with the half round section cut out, and bolt holes to bolt to the hub to make the measurements.
Which of these are also for rear hub? All.. or just the shims?
 

coachgeo

Well-known member
4,971
3,340
113
Location
North of Cincy OH
Allan, realized I may have worded poorly. Which of the parts you listed for the front Hub are the same for the rear hub's as well. Thank you.
 

scottmandu

Active member
822
35
28
Location
Texas
Has anyone noticed that the hub reduction is actually 1.714:1 and not 2:1? The large bevel gears are a 24 tooth, the small bevel gears are a 14 tooth. 24/14=1.714
 

Floridianson

Well-known member
Steel Soldiers Supporter
7,390
2,437
113
Location
Interlachen Fl.
The torque on the hub nut is surprisingly light.
As per TM take the nut down to 50 foot pounds. Back off 1/4 then tighten to 10-20 foot pounds. Then we see if the pins on the nut line up to the holes in the inner side gear. If not do not tighten any more but you can loosen the bearing nut up to one spline tooth to get inner side gear to line up with pins.
My drivers side side gear was right on at 20 foot pounds and the passenger side was one spline off so I just had to back off a tad to get the inner side gear holes to line up. When the inner side gear is locked into the pins on the bearing nut correctly the nut can not back off.
 
Last edited:

agazza2

Active member
483
31
28
Location
Ahwatukee, AZ
Fabricated front axle tools

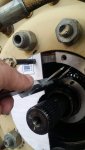
Fabricated up some tools to use on my front axle next weekend. I will try to check the clearance next weekend, and add the correct shims to see if that cures the excess gear noise in the front axle around 30-40 mph when I left off the throttle and the spiders are not loaded. The socket is from Fleetpride. I cut out the top, and then added 6 inch sleeve and re welded the top back on.

Depending on what it looks like I may go further since I have all the parts available to rebuild the front hubs.
 

Attachments

Floridianson

Well-known member
Steel Soldiers Supporter
7,390
2,437
113
Location
Interlachen Fl.
I will bet all your inner bearings need repacking so go deep and be done with it. My biggest fight was pushing on the hub with those tight hub seals back on the spindle. On any other type of truck I have done the hubs went easy. Myself as soon as I can get the outer bearing in and put the nut on I then run up the hub using the nut seating the seal and hub. No such luck on the FMTV not enough threads.
 
Last edited:

Floridianson

Well-known member
Steel Soldiers Supporter
7,390
2,437
113
Location
Interlachen Fl.
Just hope you saved the beans for dinner. Yes any of the FMTV hubs seals can be done without the correct tools. I got my seal driver before I found this out. In some cases seal drivers can be very helpful.
 
Last edited:

agazza2

Active member
483
31
28
Location
Ahwatukee, AZ
Just hope you saved the beans for dinner. Yes any of the FMTV hubs seals can be done without the correct tools. I got my seal driver before I found this out. In some cases seal drivers can be very helpful.
I was thinking for the seal drivers I could always use 3/4" plywood and cut out the correct size and then use a solid 1"/3" steel dowel center on the top of that to tap the seal in. Most likely I will measure the diameter of the outside of the seals today and pick up some pre-cut metal circles or thick plastic today and then weld something up tomorrow.

If I do not get the chance to do that, then Beans it is :)
 

DCLund

Member
30
4
8
Location
MN
Working on my hubs?
When checking gear lash, if the spider gears are already located on the hub by half rounds, why can't they be clamped in place by a bar or v block and bolts?
 

expeditionnw

Member
174
1
18
Location
Alaska
Working on my hubs?
When checking gear lash, if the spider gears are already located on the hub by half rounds, why can't they be clamped in place by a bar or v block and bolts?
no reason you couldnt, just super fiddly to install and remove 4 different clamping systems 50 times, while building the proper shim pack.
 

DCLund

Member
30
4
8
Location
MN
How about replacement of the seals during inner bearing re pack? I don't see any signs of leakage. I usually change all seals involved when i take apart a hub.
Is that a wise choice or overkill for just a repack of the inner bearing?
 

Floridianson

Well-known member
Steel Soldiers Supporter
7,390
2,437
113
Location
Interlachen Fl.
How about replacement of the seals during inner bearing re pack? I don't see any signs of leakage. I usually change all seals involved when i take apart a hub.
Is that a wise choice or overkill for just a repack of the inner bearing?
You want to repack you inner bearings and the CTIS seal are easy to change if you like the CTIS system. So yes if I had a working CTIS system I would change them out and be done with the hubs for your life time.
 

agazza2

Active member
483
31
28
Location
Ahwatukee, AZ
Checking the tools made for the project.

This weekend I took the cover of my front axle to verify if my aluminum blocks I made last weekend were going to work prior to disassembling the front hubs. They need to be milled down on the sides to work correctly. The blocks I have are to wide to bolt in place. But I have a question where everyone is getting in the feeler guage to check the clearance? Does not look like you could get one in easily to get to were the bevels gears are fully engaged. Could you use plasti-guage to check the clearance>

I was looking at this set-up and I think I may just make a aluminum plate (like the cardboard one in the photo) to make the measurement from the shims to the front edge of the hub face 2.168 - 2.173. along with blocks that are 2.168 - 2.173 that could slide in between the plate I make and the shims for a clearance check. Guess there are many different ways to make this measurement. but what is the easiest for everyone?

I did notice that my bevel gears look like new, but the wear pattern is a little low on the gear which usually means it would need to be shimmed out. It should show signs of wear near the center of the bevel gear. The socket I made did fit correctly. So at least one thing I do not have to make adjustments on.

Has anyone pulled out the ring and carrier assemble? After seeing inside of my hubs, I think more than likely my front differential noise may be in the ring and pinion and not in the planetary gears.
 

Attachments

Last edited:

Floridianson

Well-known member
Steel Soldiers Supporter
7,390
2,437
113
Location
Interlachen Fl.
Yea I am thinking mine is the ring and pinion to. I used the hand feel it gage not a feeler gage. Dial indicator would be the best way maybe. Don't believe Steve ever said a feeler gage. I used a black marker and marked the gear then just watched the movement. In the old days with a motor with points and no feeler gage on the side of the road we would use a match book cover to get the points real close to spec.
 
Last edited:
Top
AdBlock Detected

We get it, advertisements are annoying!

Sure, ad-blocking software does a great job at blocking ads, but it also blocks useful features of our website like our supporting vendors. Their ads help keep Steel Soldiers going. Please consider disabling your ad blockers for the site. Thanks!

I've Disabled AdBlock
No Thanks