• Steel Soldiers now has a few new forums, read more about it at: New Munitions Forums!

  • Microsoft MSN, Live, Hotmail, Outlook email users may not be receiving emails. We are working to resolve this issue. Please add support@steelsoldiers.com to your trusted contacts.


M1078 to M1079 Conversion and Build

Oxyacetylene

Active member
Steel Soldiers Supporter
518
179
43
Location
Stoneville, NC
I finally got to work on a project that I have been wanting to do for several years: to convert my M1078 to an M1079! Luckily for me I had all of the proper parts to make the swap, which I will cover as well. Before getting into the details I want to say thank you to all of those people who have helped me with this project, both directly and indirectly. The MV community really is the BEST! This project began 7 years ago when I bought a non-runner M1079. Upon receipt of that truck I realized that it would take a LOT to get it going, especially with the engine and trans in unknown condition and missing parts. So I ended up selling that truck for parts, with me keeping the M1079 van enclosure. Some time later I was able to also remove the other necessary parts for the swap. Over the next 7 years I used the van enclosure as storage, and even had to move it when I moved. My goal in performing the swap was to make some sort of extreme RV type of setup, and make it a mobile ham shack for amateur radio stuff. I am also trying to keep the swap as close to "factory" as I can, at least on the exterior, and in terms of how the enclosure is mounted.

First a few pics to show the major stages of the swap. Here's how my truck started out, with a cargo cover and troop seats:
Stage0.jpg
The first thing I did was to move the cargo cover and frame from the truck to the trailer:
Stage1.jpg
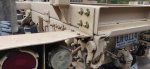
Next was removing the truck bed by cutting the 10 huck bolts on each side. The top frame rail I removed by cutting the 10 huck bolts on each side as well. More on this later.
Stage2.jpg
Now I installed the factory M1079 frame rail section, complete with the enclosure mounts:
Stage3.jpg
I installed the rear bracing plates that are not present on the M1078, but are on a M1079:
Stage4.jpg
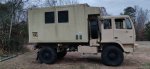
And finally mounted the van enclosure! Yeah the van enclosure is pretty dirty at this point, it had been sitting for 7 years!
Stage5.jpg
 

Attachments

Oxyacetylene

Active member
Steel Soldiers Supporter
518
179
43
Location
Stoneville, NC
OK now for some technical details. I chose to swap the frame rail rather that fabricating new mounts on the existing frame for a couple of reasons. Firstly, I had the M1079 frame rail, and I wanted it to be as close to factory of a swap as I could. Secondly, I wasn't sure if the factory frame rails were hardened, and I didn't want to weld on them if they were. Plus the factory M1079 frame section has the lift arm supports built in, and it also has a cross brace at the front and the rear which is not present on the factory M1078 rails. On an M1078, the bed itself provides that bracing and is where the lift arms are mounted.

So, what parts did I swap, or have yet to swap?
  • M1079 frame rail section
  • Rear frame tie in plates
  • Original mounting bolts, springs, pads for the van enclosure
  • Mud flap mounts that attach to the lift arm sections
  • Rear mud flap mounts that attach to the tail light frames (I still need to swap these onto the truck)
  • Wiring harness that connects to the front of the van enclosure to provide 12/24v power and ties into the blackout switch (I still need to install this)
The only part I did not get at the time is the M1079 rear leaf springs. They are indeed a different part number and are a little heavier to accommodate the added weight. I'm not sure if I will take a leaf from a M1078 spring pack, or leave it as is. More on this later. I also do not have the 200 amp alternator that comes standard on an M1079. This won't be a huge deal for me I don't think, as I plan to have a separate battery in the enclosure to run things rather than running off the truck batteries and alternator.

Making this swap required cutting a lot of Huck bolts. I cut all of them with a Harbor Freight 4.5" angle grinder and cut off wheels. My method is to cut the "nut" side of the bolt off, trying to keep the cut close to where the hex portion is. Then I take a punch and just knock the bolt loose from the remaining portion of the nut. If done correctly there is no damage to the steel under the bolt. Once you have done a few you get faster. The really annoying ones are the two located in the front lift arm mount area. Those took a lot more time. Here's an example of one being removed, just before hitting it with a punch. If you cut them this way, they punch out pretty easy:
Cutting_Huck_Bolt.jpg

Now, on to the subject of how to mount the M1079 frame rail section. I had originally thought to put Huck bolts back in, but this was not practical for me. The equipment to install them is expensive, or you have to find a shop with the equipment to install them. I ultimately decided to use grade 8 hardware with Nord-Lock washers. If you have never heard of those, check out the vibration tests on them. I didn't want to just tack weld a grade 8 nut to the bolt, because that might affect the hardness of the bolt in that area, and after that is it really a grade 8? You can use fine or coarse thread bolts with the Nord-Lock but I opted for fine thread. Did you know that if you use a lock washer of any type, you should really use one on BOTH sides? It makes sense when you think about it, since the bolt heads are not captive. So yeah that increases the cost of the hardware. I found a decent price for a box of 100 of them on eBay.
 

Oxyacetylene

Active member
Steel Soldiers Supporter
518
179
43
Location
Stoneville, NC
Here's a picture of the M1079 frame rail section, awaiting install. Note that it also has front and rear cross braces that are not on the M1078 frame rails. The frame rail needed cleaning as well. It spent most of those years waiting just sitting on that M1082 trailer, until I finally moved it to the pallet so I could haul mulch.
M1079_FrameRail.jpg
 

Keith Knight

Well-known member
Steel Soldiers Supporter
708
1,478
93
Location
Wauchula, FL
Keep up the hard work, it’s worth it in the end. I did the same thing you doing just about a 1.5 years ahead of you. If you have any questions feel free to contact me. My thread is Keith’s M1078 project on this sight. I’ve been posting for a long time on my 1078 then 1.5 years ago bought a 1079 and started the swap. Where are you located? I’m in central Florida.
 
Last edited:

Oxyacetylene

Active member
Steel Soldiers Supporter
518
179
43
Location
Stoneville, NC
Right now I am in the process of cleaning and painting everything. I'd doing the exterior with Behr exterior paint and I am really happy with how it looks so far. The interior of the enclosure needs a fair bit of work, but it's a start! I removed the steel plate strips from the floor of the enclosure, which saves weight and also makes the floor even. The floor of mine has a lot of dents, but I plan to put down a vinyl plank floor. I had to drill the bolt heads off to remove the plates, and then cut the remaining bolt portion off. Apparently this enclosure had water just sitting in it at some point, as evidenced by those rusted bolts, and the overall condition of the electrical panel.

Next upcoming work projects for the enclosure:
  • finish cleaning and painting
  • Install the military 120v air conditioner with heat! This is not the one that was made for the M1079, so I'll have to fab a mount adapter. This one is single phase 120v, so I can power it with a small generator or anywhere with an RV hookup. Requires a 20 amp hook up, but maybe it will run on a 15 amp circuit if I am not running the heat?
  • Make sure I dry out the open void between the inner and outer floor panels. Mine has/had some water in it.
  • Seal up some of the seams on the roof and window frames.
Above I mentioned that I did not swap the M1079 rear leaf springs. I might be OK with the stock M1078 springs. After all, I do not plan to load the enclosure to the normal weight capacity. The cargo bed alone weighed 1940 lbs, and the empty enclosure supposedly weighs 3360 lbs. That's a net difference of 1420 lbs, but I took the plates out of the van floor which saved at least 200 lbs. Then again, the M1079 frame rail section is a lot heavier since it has the lift arm mounts. I still figure roughly 1500-1600 lbs heavier than it was with the bare cargo bed.
 

Oxyacetylene

Active member
Steel Soldiers Supporter
518
179
43
Location
Stoneville, NC
Keep up the hard work, it’s worth it in the end. I did the same thing you doing just about a 1.5 years ahead of you. If you have any questions feel free to contact me. My thread is Keith’s M1078 project on this sight. I’ve been posting for a long time on my 1078 then 1.5 years ago bought a 1079 and started the swap. Where are you located? I’m in central Florida.
Do you have any issues with condensation inside the van enclosure? This morning after a cold night, there were droplets on the ceiling. I noticed that they seem to form where the internal cross braces must be. A few nights ago when it started to cool off and get foggy, I could see faint lines on the top side in those same areas. I'm guessing that those cross braces are conducting heat from inside to outside and contributing to the condensation.
 

Oxyacetylene

Active member
Steel Soldiers Supporter
518
179
43
Location
Stoneville, NC
Were the rear springs a 4 leaf or just a heavier 3 leaf?

My 1079 only had a 100A alt…
I'm not sure, as the parts truck was gone to the scrap yard by the time someone else pointed out that the M1079 had different rear springs.

Edit: I went back and checked through Keith Knight's build thread and from what I can tell, his M1079 donor had 3 leaf rear springs. What is interesting is that his M1078A1 had 4 leaf rear springs.
 
Last edited:

coachgeo

Well-known member
4,970
3,340
113
Location
North of Cincy OH
I'm not sure, as the parts truck was gone to the scrap yard by the time someone else pointed out that the M1079 had different rear springs.

Edit: I went back and checked through Keith Knight's build thread and from what I can tell, his M1079 donor had 3 leaf rear springs. What is interesting is that his M1078A1 had 4 leaf rear springs.
sounds about right. My A0 1079 and 1078 side by side showed the springs the same in all ways. Im thinking adding Timbrens or similar to help with sway and other weight control..

Here is their manual to choose by specs... since our trucks are not in their choose by vehicle list
 

Attachments

Ronmar

Well-known member
3,269
6,613
113
Location
Port angeles wa
I'm not sure, as the parts truck was gone to the scrap yard by the time someone else pointed out that the M1079 had different rear springs.

Edit: I went back and checked through Keith Knight's build thread and from what I can tell, his M1079 donor had 3 leaf rear springs. What is interesting is that his M1078A1 had 4 leaf rear springs.
I should have added my 98 1079 has 3leafs front and rear…
 

GeneralDisorder

Well-known member
Steel Soldiers Supporter
1,470
4,100
113
Location
Portland, OR
My 2008 1079 A1R has 4 leafs in the front and rear springs. Also has front coil-over shocks for the never-installed armored cab.

It may simply be that the A1+ trucks changed to a 4 leaf pack on all models. Might be a matter of the 3 leaf having thicker leaves and there not being any real difference in load rating between the two. The GVW on my truck is 25,980 lbs - is that not the same GVW as the A0 trucks? Wouldn't that imply they all have the same spring specification for load rating regardless of differences in construction?
 

Ronmar

Well-known member
3,269
6,613
113
Location
Port angeles wa
My 2008 1079 A1R has 4 leafs in the front and rear springs. Also has front coil-over shocks for the never-installed armored cab.

It may simply be that the A1+ trucks changed to a 4 leaf pack on all models. Might be a matter of the 3 leaf having thicker leaves and there not being any real difference in load rating between the two. The GVW on my truck is 25,980 lbs - is that not the same GVW as the A0 trucks? Wouldn't that imply they all have the same spring specification for load rating regardless of differences in construction?
GVW = Curb weight + payload. Curb weight(empty weight + #404 of fuel and #606 of crew weight) on an A0 M1079 is 18,834 +5000 in payload for 23,834 pounds…
 

Oxyacetylene

Active member
Steel Soldiers Supporter
518
179
43
Location
Stoneville, NC
My 2008 1079 A1R has 4 leafs in the front and rear springs. Also has front coil-over shocks for the never-installed armored cab.

It may simply be that the A1+ trucks changed to a 4 leaf pack on all models. Might be a matter of the 3 leaf having thicker leaves and there not being any real difference in load rating between the two. The GVW on my truck is 25,980 lbs - is that not the same GVW as the A0 trucks? Wouldn't that imply they all have the same spring specification for load rating regardless of differences in construction?
2008 M1079A1R? very nice! I'm slightly jealous, ha ha. On the spring rates, I think it is hard to tell. I don't know if they went to 4 leaves because the A1 and A1R trucks are a little heavier, or if it's a similar spring rate divided over more leaves, or both.
 

GeneralDisorder

Well-known member
Steel Soldiers Supporter
1,470
4,100
113
Location
Portland, OR
GVW = Curb weight + payload. Curb weight(empty weight + #404 of fuel and #606 of crew weight) on an A0 M1079 is 18,834 +5000 in payload for 23,834 pounds…
I'm just going off the GVW listed on the passenger door data plate. Not sure on my curb weight but the weight listed on the AAR van box is "Tare Wt 3,360", "Gross Wt 8,360", and "Net Wt 5,000"

I'm sure the A1R truck weighs more than the A0 trucks by a fair bit. The high pinion rear axle, the 260 amp alternator.... not sure of weight differences with the C7 engine.....

It's obvious that all vintages of the 1079 are significantly heavier than a 1078, and yet they did not see fit to reduce the payload capacity one bit. Still listed as carrying 5,000 lbs of whatever you can fit in the box.

Rick
 

Oxyacetylene

Active member
Steel Soldiers Supporter
518
179
43
Location
Stoneville, NC
The next big thing was to mount the combo AC/heat unit that I have been storing in preparation for the van swap. It's a Nordic Air unit, rated at 9k BTU on cooling, and I *think* about 4500 BTU on heat. I haven't found the manual for this exact model, so if one of you has it, please let me know. The part number is GSQ346ZABNW00G1. I wanted to use this unit because it is 120v single phase as opposed to the "made for M1079" units which are larger, heavier, and require 3 phase power. These are also R-22 refrigerant units, and luckily the one I acquired shows green on the sight glass and appears to be good. Since this unit is smaller, I needed to make a couple of mounting adapters. Nothing fancy, I simply took two pieces of 2" square aluminum tube that I already had and drilled those in just the right spots to mount on the bottom of the unit, and span between the rails on the M1079. this worked out pretty well, and I used some foil backed foam to fill the surrounding gap.

2022-01-23 15.22.48.jpg

2022-01-23 17.05.00.jpg

It may not be the prettiest install, but it's in there for now. I plan to also try and make a short power cable that I can hook into the ECU jack that is already on the cable tray just above. I am going to be rewiring everything to get rid of the 3 phase electrical panel and go with a smaller single phase. Did I mention that this thing is loud?
 

Oxyacetylene

Active member
Steel Soldiers Supporter
518
179
43
Location
Stoneville, NC
Now that the AC unit was out of the floor and out of the way, I started cleaning the floor and cleaned the walls some more. This van enclosure had water sitting in it at some point, as evidenced by the bathtub ring that you can see in the pics. Did you know the floor of these things is green!? I plan to put some type of flooring in, likely vinyl plank.

I started with the front of the floor:
2022-01-25 13.32.46.jpg

After several water changes in the mop bucket. Still lots of staining, but much better than it was:
2022-01-25 14.07.15.jpg
 

Oxyacetylene

Active member
Steel Soldiers Supporter
518
179
43
Location
Stoneville, NC
Nice. I just pulled up all the steel plating on my floor and walls - about 650 lbs of 6" x 1/2" steel plating. Nice weight reduction. That takes my box down to about 2700 lbs. Gives me a bunch of ready made mounting points as well.
I haven't decided if I am going to remove the plates on the walls or not. I kind of like having them there as rails for bungee cords and straps, and a small measure of protection for the blackout shades when they are down. You make a good point though about reusing the bolt holes for mounting other stuff.
 
Top
AdBlock Detected

We get it, advertisements are annoying!

Sure, ad-blocking software does a great job at blocking ads, but it also blocks useful features of our website like our supporting vendors. Their ads help keep Steel Soldiers going. Please consider disabling your ad blockers for the site. Thanks!

I've Disabled AdBlock
No Thanks