• Steel Soldiers now has a few new forums, read more about it at: New Munitions Forums!

  • Microsoft MSN, Live, Hotmail, Outlook email users may not be receiving emails. We are working to resolve this issue. Please add support@steelsoldiers.com to your trusted contacts.


M1088 camper conversion

B-Dog

Well-known member
164
288
63
Location
Denver, CO
Too late... Got the switch wired up, got the mirrors hooked up/working correctly, and now...

The other one is also on as well, just after this pic was taken.

They do shake a bit so I'd have to say they're not "done" yet, but they are on and functional and MILES better than the OEM ones. How did you reinforce yours?
Looks great! I used some aluminum plate/washers for the top mounts but the bottom mounts need something more because the mirror pushes in on the door skin. In other words, plates on the inside of the door won't do anything on the bottom. I welded a bar to the door skin to distribute the load. Dude on Broke Overland (Youtube) used screws from the inner door skin to support the outer skin - I thought that was a pretty genius idea. Yours are mounted closer to the hinge than mine which probably helps a bit. (y)


1596462343097.png


Did you use reinforcement plates inside the door for the mirrors?
Kinda - see above
 

Reworked LMTV

Well-known member
1,449
1,124
113
Location
TN
Looks great! I used some aluminum plate/washers for the top mounts but the bottom mounts need something more because the mirror pushes in on the door skin. In other words, plates on the inside of the door won't do anything on the bottom. I welded a bar to the door skin to distribute the load. Dude on Broke Overland (Youtube) used screws from the inner door skin to support the outer skin - I thought that was a pretty genius idea. Yours are mounted closer to the hinge than mine which probably helps a bit. (y)


View attachment 807822


Kinda - see above
Stay off the heat when you weld. I welded and it bowed in. TIG if you can. Bondo if you must.
 

AllenF

Member
56
38
18
Location
Riverside, Ca
Nice. Who makes the transmission cooler. Model # ?
On the M1083 it was my wifes company. Thermal Dynamics in Ontario Calif. No they won't sell to the public. I know because their sticker is on the side of my unit. It is a beast of a cooler. Major trans fluid lines. I am not sure about the upright dual fan unit on the M1088. But it is possible they made those too.
 

Swamp_Fox

New member
22
12
3
Location
Arkansas
With a 1088, one frame doubler is inside the main rail and one is on the outside. The stacked rails seen on the other variants are not found on the 1088. This leaves the tops of the rear tires about ~1" (max) below the top of the main chassis frame rail, so in my case, I actually want to build upwards for clearance before building outward with the box.

Basing it off of others I've seen on the net, a floor level approximately even with the cab level will be my goal. This should give more than adequate clearance all around and still keep it to a manageable overall height (right at 12', slightly more with solar panels and protective rails maybe). As an example, this is 2ifoverland's former rig and fairly representative:


My "single-height" frame rails:


If anyone is looking to get rid of a set of the doublers off of a 1083 or equivalent, I'd be interested in grabbing them.
I like your set-up. What was the thinking (or math) to go with two air intakes and filters? The attached picture of another set-up I think only shows one lower coming out the right side.
 

Attachments

ckouba

Well-known member
Steel Soldiers Supporter
562
1,527
93
Location
Oregon
The short story is I copied what I had seen. I corresponded with a couple of people, found out what they used for filters and went about incorporating them. I used hard piping where I have seen some use flexible ducting because I didn't want to think about possibly collapsing the plumbing under heavy load. It was pretty straightforward and seems to be working out fine.
 
Last edited:

ckouba

Well-known member
Steel Soldiers Supporter
562
1,527
93
Location
Oregon
Had a pretty productive weekend. Made an interior for the cab:


Painted the engine blanket with rubberized paint (looks great but the verdict is still out on if it will fully cure)


Headliner looks pretty good:


I also made an overhead console as well (sorry for crappy pic):


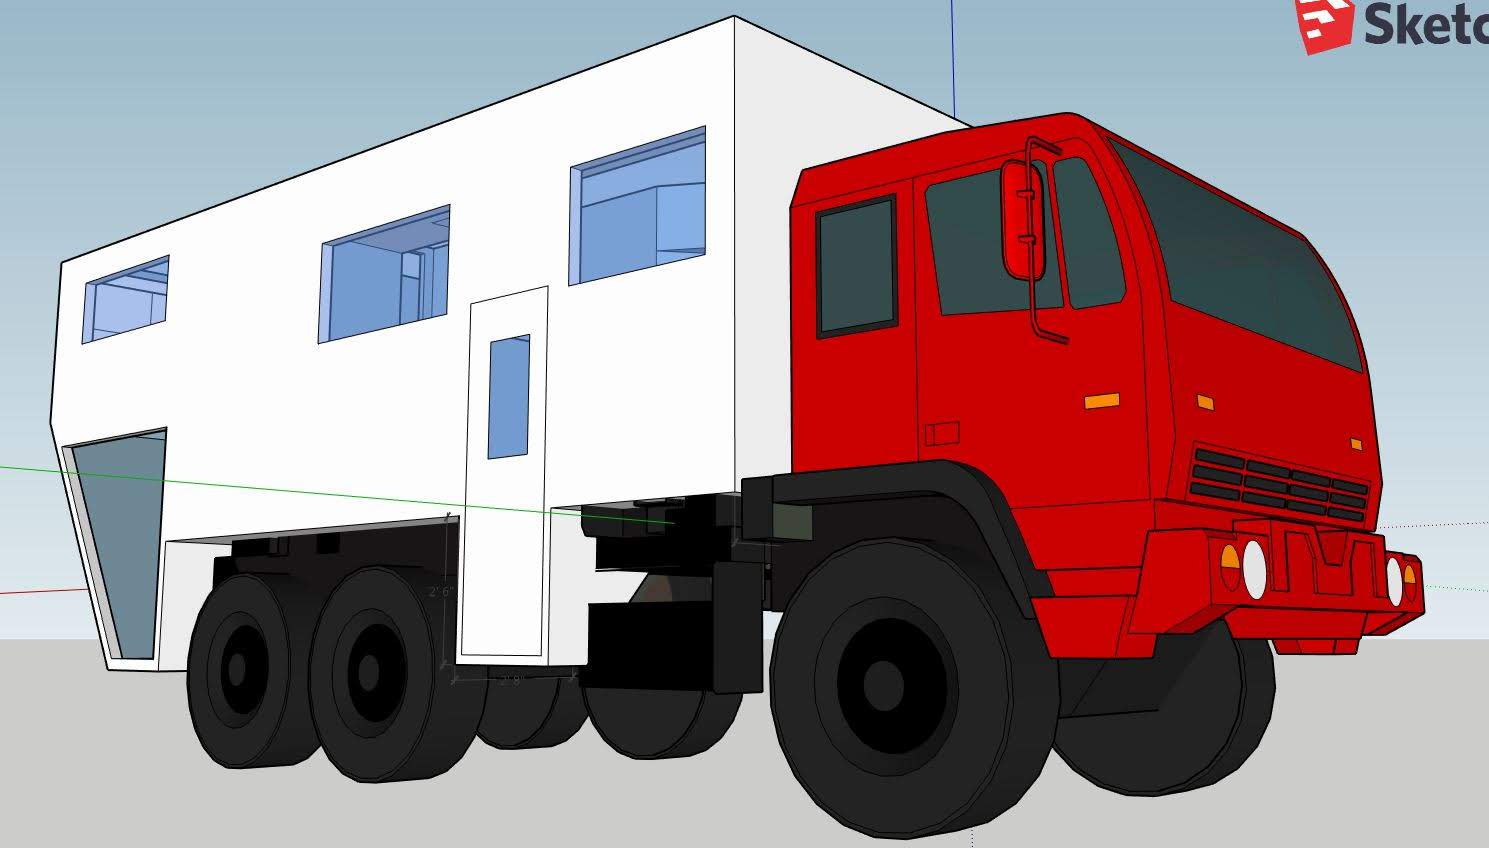
The center panel of the rear wall remains empty because I intend to make a pass-through to the camper body. I don't want to waste the time and energy to make the panel now and then modify or completely re-make it later.

I went with a rather industrial theme on the interior because it is a truck and we don't care about flashy stuff. I am pretty happy with it and the wifey thinks it looks fantastic, so I'm calling it good! I need to touch up some places where I didn't get the black paint down on the interior as thickly as I thought, but it definitely has made the cab a more comfy-seeming place to be. Still to come is a bit of carpet on the floor under the seating areas, and if the rubberized paint doesn't cure, over the engine area as well.

Next up is wiring in all the crap that I've been accumulating- interior lighting, exterior lighting, radio, CB, reverse cam, mirror switch, etc... I picked up a simple 12 circuit panel which I will wire all that crap out of independently. I found switches which fit the punchouts on the dash though, so that makes the install very appealing for things which need switches. I am struggling a little bit logistically with how to wire up the overhead to be able to install and remove it when necessary. This will take a few additional connectors and some pre-planning, but it is doable.

I also need to work in the glovebox doors for the console as well, so it's usable more than just as an overhead electronics space.

These are the last few hurdles I want to clear prior to starting the sub-frame and box build-out. I already feel like I have a million moving pieces to this project and I'd like to get some wrapped up before opening another can of new ones.
 
31
8
8
Location
Yucca Valley, CA
[QUOTE="
" I found switches which fit the punchouts on the dash though, so that makes the install very appealing for things which need switches."
[/QUOTE]

Looking good man! what switches did you find that fit
 

ckouba

Well-known member
Steel Soldiers Supporter
562
1,527
93
Location
Oregon
Thanks Steven! I think it came out pretty well in general and fantastically for an amateur.

I only bought SPST and SPDT so far, but if you Google-fu 44x 22 mm or 1.74 x .87 in hole switches, you'll find many options. I found plenty of options out there, for multi-pole and lit up indicators, etc... just didn't like the pricing on them. These were reasonable in comparison. They do feel a little cheesy, but I think they'll get the job done for now.


Price Per Unit
(USD)
Carling Technologies
Switch, SPST, 15A, 125VAC, On-None-Off, Silver-Nickel, Silver Tin-Oxide, Gold

Mfr. Part #: L11D1S001-AZZ00-000
Allied Stock #: 70131611
Customer Part #: None
Unit: EA​
$3.770​
Carling Technologies
Switch, 15A, 125VAC, SPDT, 90/10 Silver-Nickel, Silver Tin-Oxide, Gold, On-Off-On

Mfr. Part #: L16D1S001-AZZ00-000
Allied Stock #: 70131614
Customer Part #: None
Unit: EA​

$4.470​
 
Last edited:

ckouba

Well-known member
Steel Soldiers Supporter
562
1,527
93
Location
Oregon
Getting back to making progress...

Drew up a plate to use the shock mount holes to secure a subframe mount. Had one laser cut to validate layout. Everything lined up but needed a little more material up top. Rev 2 went in for manufacture, but here is rev 1 in place:


And with the rail behind it, showing about how much more I will be adding:


I got everything back together 2 weeks ago. The cab interior looks great and it's nice to have radio and intercom now. Decent seats are fantastic to have and all the sound deadening I put in seems to have done an excellent job on reducing the overall noise level, almost making the intercom a little redundant. We took it out in the Gorge for a hike last Fri and we all had a good time. I was trying to get there via dirt/FS roads but they were closed, presumably due to all the recent fire activity, but it looks great outside of the carport:


Seeing this picture reminds me I still need to paint the grill.

Chris
 

In2Fords

Member
47
17
8
Location
Hawaii
Looking great!
We stayed at lost lake in the gorge about 3 weeks ago, loved it but ya, most of the fs roads were closed, if you want some gravel road fun head up to sunset falls in Washington, there's also road thru the middle of camp, beautiful drive for hours.
 

ckouba

Well-known member
Steel Soldiers Supporter
562
1,527
93
Location
Oregon
If you're ever passing through again, drop a line.

Meanwhile, progress has been made:


Still working on the right beam but should be firmly attached soon (dinner break). With the back located, I can get on with drawing up the front plates and getting them cut out and installed. Then it's onward and upward from there.

Chris
 

Reworked LMTV

Well-known member
1,449
1,124
113
Location
TN
With a 1088, one frame doubler is inside the main rail and one is on the outside. The stacked rails seen on the other variants are not found on the 1088. This leaves the tops of the rear tires about ~1" (max) below the top of the main chassis frame rail, so in my case, I actually want to build upwards for clearance before building outward with the box.

Basing it off of others I've seen on the net, a floor level approximately even with the cab level will be my goal. This should give more than adequate clearance all around and still keep it to a manageable overall height (right at 12', slightly more with solar panels and protective rails maybe). As an example, this is 2ifoverland's former rig and fairly representative:


My "single-height" frame rails:


If anyone is looking to get rid of a set of the doublers off of a 1083 or equivalent, I'd be interested in grabbing them.
Top picture is Martin and Bethany's former rig. They sold it. Bought a Ram with a box. Sold that and bought a house in Alaska.
 

mauinate

Member
58
63
18
Location
Canyon Lake, CA
Nice work Chris! I'm on the same path with a new to me 1088 with a 1083 bed. I probaby won't go pass through, but am looking at an 18-20' box. Maybe a frame stetch of 2' and a 2' overhang. What are you planning on for your box?

Nate
 

ckouba

Well-known member
Steel Soldiers Supporter
562
1,527
93
Location
Oregon
Hey Nate,

If you catch the start of the thread, you'll see this screen grab:


It's the current concept for size/shape but will likely forgo the dropped stairwell. I'd like to do it but not sure I'll pull it off.

Specifically for the cabin, I will be doing the rail on rail subframe and a basic square steel tube structure. At this point I am still working through exactly what sizes and such, but I am comfortable with the work content for the build out. It may be heavy for a camper but it will be fine for the chassis. I haven't drawn in much, but this is the skeleton I'm starting to develop:

1603897058001.png

I am not planning on stretching the frame as I want the undivided volume of the cargo bay. I think it can be done appropriately without it.
 
Last edited:

mauinate

Member
58
63
18
Location
Canyon Lake, CA
Thanks, I saw that and read through the thread. What length are you looking at for your box overall and living space? Are you completely losing the ability to tow anything by blocking the hitch area? If you are not towing, do you need the added aux trans cooler still? Thanks,
 

ckouba

Well-known member
Steel Soldiers Supporter
562
1,527
93
Location
Oregon
As drawn, the box is 22' 3" along the roofline, and I believe it will be 11' 10" to the roof from the ground. I am trying to incorporate as much storage as I possibly can. The base rail for the subframe which I just attached is 16' 4" long.

The dropped tail will obscure the mount for the pintle hitch and as drawn, the floor of the cargo bay drops below the level where a receiver hitch would be located. The depth of the cargo bay floor ~2' would also pose some challenges if the trailer tongue is short, but I can design around them at this point if I feel compelled.

The reality is that I don't feel compelled though. I don't want to drag a trailer to places I want to go with this rig so I am opting out. Time may change that opinion, and until the steel starts getting cut anything is possible. I am drawing closer to that event though but have been comfortable with that decision so far through all the planning.

So yeah, I probably could have deleted the trans cooler, but it was easy enough to keep it there and we are planning on desert travel (domestically speaking), so I went through the effort. Wasn't that tough though.

Are you building your own box? What construction/material?
 
Last edited:
Top
AdBlock Detected

We get it, advertisements are annoying!

Sure, ad-blocking software does a great job at blocking ads, but it also blocks useful features of our website like our supporting vendors. Their ads help keep Steel Soldiers going. Please consider disabling your ad blockers for the site. Thanks!

I've Disabled AdBlock
No Thanks