• Steel Soldiers now has a few new forums, read more about it at: New Munitions Forums!

  • Microsoft MSN, Live, Hotmail, Outlook email users may not be receiving emails. We are working to resolve this issue. Please add support@steelsoldiers.com to your trusted contacts.


Major rust repair help/ideas.

ldmack3

Well-known member
Steel Soldiers Supporter
849
1,737
93
Location
N. Central Idaho
Need some ideas on rust repair for my M35A2.

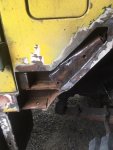
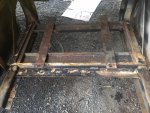
The fenders attach to the cab structure with 3 - 1/2” bolts. On both sides this is a major rust factory.
RH side has no access to the nut side on two as they inside the channel structure. Top point is open access and is good, middle is very loose with no access and I fear will break off when I reattach the fender, lower is totally gone with no access. I can spray rust remover/preventive through the 3 holes knowing it won't get every nook and cranny, just hoping for the best. I do not have a facility where I can remove the cab and do the repair correctly. For the fastener repair I'm thinking of drilling a 2 holes in the back of the channel by going through the attach point. Probably taking a 3” bolt to fasten the fender back on. Another option is to cut out the rusted side of the channel and weld in a new plate, maybe 3/16” after welding on nut plates, or threading the plate (not my fav) or drill through like mentioned above. With a section cut out I would also have a better treatment of the rust. Not sure my little MIG can weld 3/16.

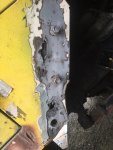
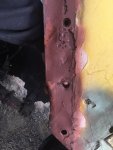
LH fender is similar except there is access to 2 of the three attach points. Again major rust area. Top hole is outside the channel as the RH is. Middle hole has access though the back of the channel I can stick a washer and nut on a bolt. See pic with my finger sticking out. Bottom hole is totally gone and no access so eithr drilling or plate replacement.

Both sides have additional rust in that area up towards the vent. I can cut out some sheet metal and weld in a new piece, but knowing myself if I cut it out and find more problems I won't be able to let it go. Work scope creep doesn't begin to describe what is happening?

Long winded but wanted to give enough description for some good responses.
 

Attachments

Last edited:

Recovry4x4

LLM/Member 785
Super Moderator
Steel Soldiers Supporter
34,014
1,813
113
Location
GA Mountains
There are square nuts back there captured in a little cage. Odds are strong that the cages will break. In that case, I've created access by cutting open that channel. It sucks but thats the only way. As far as rust, just all flat sheet metal, just do your best to cut out and weld in new. I just pulled the front fender off my 5 ton and I patiently used a wrench and oil and took about 20 minutes of screwing the bolt in and out before I got it out. Just don't rush it.
 

ldmack3

Well-known member
Steel Soldiers Supporter
849
1,737
93
Location
N. Central Idaho
There are square nuts back there captured in a little cage. Odds are strong that the cages will break. In that case, I've created access by cutting open that channel. It sucks but thats the only way. As far as rust, just all flat sheet metal, just do your best to cut out and weld in new. I just pulled the front fender off my 5 ton and I patiently used a wrench and oil and took about 20 minutes of screwing the bolt in and out before I got it out. Just don't rush it.
So after you cut it out did you go back with the square nuts in cages or weld in standard nuts? I got the bolts out already. The ones in the pic were to protect the threads when I sand blasted them. What is the thickness of that structure you cut out?
 

Recovry4x4

LLM/Member 785
Super Moderator
Steel Soldiers Supporter
34,014
1,813
113
Location
GA Mountains
I've done it a few ways. I've gone as far as riveting in galvaneal. If I'm patching I weld a nut in the back. For those that break you can try to knock them back in and use a gripsert. I think they make them in 3/8.
 

ldmack3

Well-known member
Steel Soldiers Supporter
849
1,737
93
Location
N. Central Idaho
use a body saw and cutoff wheels. avoid torch work as it distorts the metal. tack weld, then skip weld the new metal in place. If it looks like its going to distort and warp, tack a strong back on it, using tacks on one side so it can be removed easy.
Like an iceberg, it was worse than I thought. It had a fist size blob of bondo in there.
 

Attachments

ldmack3

Well-known member
Steel Soldiers Supporter
849
1,737
93
Location
N. Central Idaho
There is more. Under the jam is gone. Have to pull battery tray to cut it out. Then figure out how to weld from underneath.
Good idea on washers. I've been using backer strips but I might try washers this time.
Thanks.

And then there is LH side.
 

Bill Nutting

Well-known member
Steel Soldiers Supporter
569
1,267
93
Location
Chesterfield, Mi.
If you have some rusty parts, like the battery tray, that are still sound, clean them up with a wire wheel as best you can and coat the parts with POR 15. This will encapsulate the rust. You have to then paint over the POR (stands for paint over rust) with a top coat. I’m told that POR is UV intolerant.
As far as welding the sheet metal parts, I use a mig welder and lots of time. Patients is everything. Like Davidb56 said, tack it a little at a time. I tack one very small tack, move a few inches and tack a very small spot. Then go back around and repeat. The trick is to not let the sheet metal get too hot. If you go real slow in the welding phase, you will spend less time in the grinding phase. When we restored my wife’s M151, we found that she was very good at welding in the patches and grinding. Why? Because she didn’t know to hurry. She would spend an hour welding and grinding a small patch. In the end you couldn’t tell where the patches were. We didn’t use any body filler. The tub looks good as new and is all steel. The 151 had a lot of holes drilled in it, like more than fifty that had to be filled. We used a unibit and drilled all of the holes out to 1/2”. I used a hole saw in the drill press without the center drill bit. I clamped a piece of sheet metal down and made a bunch of 1/2” plugs. These fit so tight that they snapped into the hole. Sometimes we used a magnet to level them for the first few tacks. Once the welding and grinding was done we used the best epoxy primer we could find, DP90. It’s very expensive but is worth it if you want the restoration to last.
 
Last edited:

jasonjc

Well-known member
5,325
283
83
Location
Gravette Ar.
You can get new "cage nuts" from Fastenal or McMaster carr . They are better as they let the nut move a little to line up easier , where as a nut welded directly to the body can move. Just my 2cents.

 
Last edited:

Merc1973

Active member
308
38
28
Location
Sykesville, MD
Keep up the good work.

I foresee some patch welding on mine. I have a 120/240v stick welder. What do you mean by backer strip or the washer method. What gauge steel are these panels?
 

cattlerepairman

Well-known member
Steel Soldiers Supporter
3,167
3,072
113
Location
NORTH (Canada)
I think most sheet metal is 16 gauge. Washers...when butt welding a patch he tacks a few washers to one panel so the washers one half sticks out from the panel edge and gives the patch something to rest on/be welded to.
 
Top
AdBlock Detected

We get it, advertisements are annoying!

Sure, ad-blocking software does a great job at blocking ads, but it also blocks useful features of our website like our supporting vendors. Their ads help keep Steel Soldiers going. Please consider disabling your ad blockers for the site. Thanks!

I've Disabled AdBlock
No Thanks