• Steel Soldiers now has a few new forums, read more about it at: New Munitions Forums!

  • Microsoft MSN, Live, Hotmail, Outlook email users may not be receiving emails. We are working to resolve this issue. Please add support@steelsoldiers.com to your trusted contacts.


"Major Zippidy" M923 build

juanprado

Well-known member
Steel Soldiers Supporter
5,509
2,709
113
Location
Metairie/La (N'awlins)
In Bed front storage

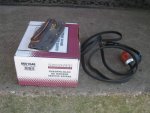
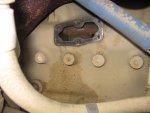
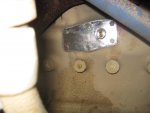
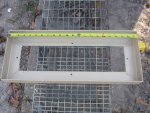
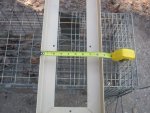
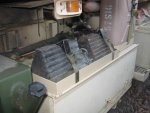
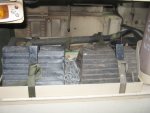
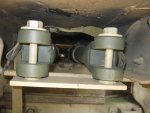
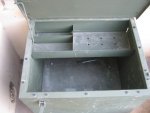
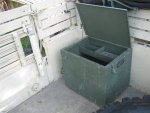
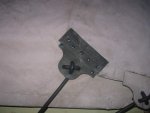
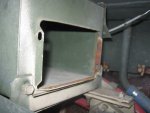
Picked up this tool box at the Ga Rally from Mwmules. I believe it is for the lmtv trucks in the cab. Fits the front of the bed perfectly and does not interfere with the troop seats nor the drop side. I used pcb box mounting spacers under it so it would not rust here in the subtropics on the bed floor. Nice box with a storage tray and perfect height, the same as the bed. I mounted off the corner so I can still access the hold down pockets in the corner in case I need to strap something in.

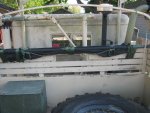
Just in case as the motto says "be prepared". I also mount a nylon stretcher across the front of the bed on the head boards. It is held down by 3 long straps similar to the fuel/water can straps but longer that I picked up off flea bay. It does not interfere with the bows or cover or the bow storage pockets.
 

Attachments

Last edited:

juanprado

Well-known member
Steel Soldiers Supporter
5,509
2,709
113
Location
Metairie/La (N'awlins)
My GMA cover had the junk super rope that does not hold up. A piece broke on my corner and the cover was flapping. The corner where the rope goes through got delaminated and I lost one layer and the middle filler I guess while driving on the interstate. Zev GoldnEagle was kind enough to give me a corner off a junk soft top.

I cut it down and glued it with the H66 vinyl glue. My wife was helping me with the glue and said why don't you rivet it? Hmn, darn good idea... So a few long rivets through the thick middle filler for extra security. A black sharpie to dull the rivets and new 5/16 edmp supper rope.
 

Attachments

juanprado

Well-known member
Steel Soldiers Supporter
5,509
2,709
113
Location
Metairie/La (N'awlins)
Rhurey had an awesome deal on led clearance route lights with mrap brackets. The L bracket was perfect for what I had in mind. This summer I had to back up in perfect darkness at the boy scout camp a few times. Sure nice to have some more light than just the LMTV back up lights I have on my mudlfaps.

Drilled 2 simple 3/8 holes through the bed support ribs for the L bracket. The original trucklite bracket mounts to that. The lights now can tilt up or down and swivel 360 with this set up. I can shine light backwards or sideways to the truck.

They are low draw super bright leds. I have them on a separate on/off switch with indicator light I already had for front bumper lights that I removed when I installed the winch. I just ran a wire to the back and Y them together. I used some wire loom from the light to the bed to keep the wires neat and from being snagged. Wish I had them this summer.
 

Attachments

juanprado

Well-known member
Steel Soldiers Supporter
5,509
2,709
113
Location
Metairie/La (N'awlins)
Blower Motor Replacement

knocked out another repair item today.

Blower motor was locked up. I used a good pull from a scrapper.
Easiest way I saw to change the motor was to pull the squirrel cage fan housing off the heater box with the motor still attached. 4 Phillips screws. I had tried to just unbolt the motor with its 4 screws but the transmission filter was in the way. Either move it or the fan housing. I chose fan.

One wire hook up and the push pull cable. Not too bad. Fan now blows and I do have some air flow to the windows with the defrost but volume is disappointing even on high in comparison to civy vehicles.
 

Attachments

infidel got me

Well-known member
1,685
32
48
Location
Newberry, Florida
The bottom of the blower motor has a flat spot on it if you rotate it but still lacks about a 1/4 inch from coming out ahhhhhhhhh. I took the high road and un bolted the filter assy. I wish I read this 2 days ago as your way is a lot easier. At least my trans. filter housing bolts will come out easily next time lol . Thanks for a good read and nice updates to truck
 

juanprado

Well-known member
Steel Soldiers Supporter
5,509
2,709
113
Location
Metairie/La (N'awlins)
The bottom of the blower motor has a flat spot on it if you rotate it but still lacks about a 1/4 inch from coming out ahhhhhhhhh. I took the high road and un bolted the filter assy. I wish I read this 2 days ago as your way is a lot easier. At least my trans. filter housing bolts will come out easily next time lol . Thanks for a good read and nice updates to truck
Thanks!

I suspect the flat side (why even bother?) would work but it did not and I did not want to bend the squirrel cage as I was keeping it for a spare. Seems like the engineers at hunter who built the heater are not in sync with the am engineers.....

I did not do the t filter because those fine thread bolts with lock nuts are so much more work.....
 

juanprado

Well-known member
Steel Soldiers Supporter
5,509
2,709
113
Location
Metairie/La (N'awlins)
Wilton C2 Vice

When I had installed my winch this spring I also installed the vice mounting plate at the same time off a scrapper wrecker.

At the GA rally Carnac had a vice and $150 brought it home. I was not sure what I was getting into as I had never taken one apart and not sure what this one would need. It is a Wilton C2 vise model 101059.

When I got it home and inspected it all I saw was missing in parts was the horse shoe-washer and 3 screws & the 2 swivel clamp nuts with bars. I soaked it with wd40 black can rust penetrating spray. Next day I unscrewed the long rod as it came out ok. Using a nail flat pry bar, I gently worked it and the jaws spread apart. I was relieved to see it was not seized, the pipe jaws and vice jaws were like new with no wear, scratches, or beat marks.

The date code is on the long key weight on the bottom of the tube on the smaller jaw. Mine is 5/84. I looked up the corresponding parts sheet off wilton's site to order the parts. There are 2 different sheets depending on date made.I searched online and found an aftermarket vice parts manufacture- Mountain Products in Colorado. His website showed the original horse shoe washer next to his improved machined and harder one. The oe looked like a stamped washer and cheap. His swivel clamp nuts and bars claimed to be also made from better hardened materials than OE. I spoke to Kevin on phone to confirm and felt comfortable using his stuff. The swivel nuts were about the same price as Wilton oe. The horse shoe washer was $45 vs $15 for the OE but that is the main part that takes the strain so I went with it. $100 in parts.

I sanded the vice using a fiber hard sponge like disk. (not sure of the right name). Some of the carc was peeling and a few rust spots. Looks like the vice was red/orange underneath. I also pulled the pipe jaws straight out as they are held on with a spring clip. Cleaned up everything and painted with rustoleum self etching primer which is green. Not the same green as carc but close enough, flat, and I liked how it looked. One thing I did was coat the handle with the primer also. It did not like it as it was too thick so I had to sand some off for the handle and washer to move smoothly.

I replaced the 2 5/8-11 coarse 3 inch carriage bolts that hold the swivel brackets to the base. I found them at my home depot "superstore" in galvanized. I coated the serrated base gear , jaw tube, and handle screw with liberal amounts of bostitch anti seize.

Vice was easy to restore and came out great. I also sanded the vice plate, primed with the same paint, and top coated with rustoleum camo sand. Not the same shade as the military but close enough. The Wilton spread bolt pattern was exactly the same as the holes already drilled in the plate so that also worked out nice.
 

Attachments

Last edited:

juanprado

Well-known member
Steel Soldiers Supporter
5,509
2,709
113
Location
Metairie/La (N'awlins)
Block Heater

Since my water pump gasket / copper crush washer is leaking, I am changing it this weekend. Since I had to drain the coolant, I decided to go ahead and install a Block heater.

Now I know where I live is not exactly cold but we do get in to the 20-30's sometimes :)
My batteries recently were slightly down during the last cold snap so I thought why not install a block heater since I got it very cheap as my son works at O'reilly's and I get his family discount and save some wear and tear on the batts.

Zerostart 8601046, 120V , 1500 Watt
http://www.oreillyauto.com/site/c/detail/ZRO0/8601046.oap?ck=Search_8601046_-1_1340&keyword=8601046

Plate is rear mid engine on the right side under the exhaust manifold. 6 1/4 coarse bolts 3/4 inch long. Easy to unscrew, unbolt plate, tap plate off block & clean off block. I used a new to me grey permatex silicone specifically for water pump and thermostat housings that resists anti freeze. I believe this is a newer formula. I switched to new bolts and lock washers 1 inch long with no problem.
http://www.oreillyauto.com/site/c/detail/PER0/22071.oap?ck=Search_22071_-1_1340&keyword=22071

The plate looks deceptive in that it appears it can be bolted either way but that is not the case. The middle bolts will not align if "backwards". Don't ask me how I know...
 

Attachments

juanprado

Well-known member
Steel Soldiers Supporter
5,509
2,709
113
Location
Metairie/La (N'awlins)
Wheel Chock Holder bracket

One of my scout leaders who teaches welding at the Boy Scout camp was gracious enough to take my rough idea and weld me a bracket to hold my rubber wheel chocks. Thanks Glenn!

It fits perfect on top of the passenger tool box inbetween my pioneer rack and the jerry can holder. Some paint, a few machine screws with lock nuts and 2 cam lock style military nos straps I picked up at the GA Rally.

Works well and look like it could have been "OE"
 

Attachments

juanprado

Well-known member
Steel Soldiers Supporter
5,509
2,709
113
Location
Metairie/La (N'awlins)
Under Bed Tow bar brackets from TMG

My bows and staves are usually mounted 95% of the time and when I take them off, I keep them together as a unit as they are bolted at the bow corners so they don't come apart with the wonderful roads we have and the off road I use it at camp. I never use the front storage pockets or underneath the bed for the bows.

I saw the brackets Those Military Guys were offering in the spring and went for it. I just got around to installing it. They are deceptively simple and came with no instructions. One bracket is a double stud with a lip that grabs underneath the storage rod. The other bracket is one stud and grabs the bottom of the bed ribs.

Remove all 3 1 inch tow bar pins and store safely. Ok to leave the 2 3/4 pins.

For my medium tow bar and truck, the only way I got it to fit was with the lunette on the left driver's side with the swivel collar facing the back of the truck due to the angled ribs of the bed.. The inner legs need the flat face on the yoke towards the ground and the other side with the lip that the tow bar pin flat face locks into facing up.

The swivel leg slides into the collar and the bracket with one stud goes through it with a lock nut and washer. As it tightens up then it pulls up and locks solid on the ribs of the bed support.

The other bracket with the double stud goes through each inner leg yoke with a nut and washer and the bracket has cup that grabs the storage rod from underneath. It is all rock solid after tightening and does not move. Even if it did, it really has nowhere to go as the frame and bed will keep it captive.

Kind of pricey for what it is $65 but they engineered, designed, tested, painted, profit, and manufactured a worthwhile product and at the end of the day it was reasonable if all is taken into consideration.
 

Attachments

Last edited:

juanprado

Well-known member
Steel Soldiers Supporter
5,509
2,709
113
Location
Metairie/La (N'awlins)
front rim hubcaps

My front tire rims are camian / fmtv wheels. They make a hubcap add on kit that fits these wheels for the fmtv to protect the ctis components.

A few years ago, I got my front right stock wheel stuck 8-10 inches deep in nice mucky Mississippi red sandy clay. While trying to get out and spinning the tires, I snapped off the valve stem from the inner tube. My nice mess became more fun :-(

When I saw these hubcaps I thought they looked cool and maybe could save my bacon down the road even though I do not have ctis.

A fellow member, spartan, sells these reasonable on epay.

Thanks to this thread and pics made it an easy install.
http://www.steelsoldiers.com/showthread.php?149933-Wheel-covers

I picked up my die nut to clean the 4 studs of rust/dirt and a used 1 7/16 1/2 drive socket off epay. I only had a 3/4 drive and was afraid it would be too thick. The socket made it much easier to chase the threads with my 1/2 drive electric impact with plenty of lube.

They are easy to come off also if I need to remove on the road.

Attached is the blueprint build with instructions and part numbers for all components.
 

Attachments

pevrs114

Active member
187
32
28
Location
Monroe, NC
This thread is full of fantastic, very clean and simple ideas.

KISS principle in full effect. I will definitely be referencing this thread later.

Thanks!
 

juanprado

Well-known member
Steel Soldiers Supporter
5,509
2,709
113
Location
Metairie/La (N'awlins)
Gave the truck come attention. Did an oil change, transmission spin on, and coolant filter changes. Fresh wiper blades and a new washer fluid switch. Sourced switch very reasonable from fellow member Suprman.

Power washed it and cleaned the cover using kaboom no drip foam which I have used before on the hmmwv. Very happy with the no drip kaboom removing the multiple colors and layers of dirt, algae, mold, and mildew here in the banana republic.

Picture of the coolant filter with 4-1/2 years on it. Much cleaner than my last change with pictures earlier in this thread. Filter is definitely doing its job. Would strongly advise anyone with a M939 to add a coolant filter.
 

Attachments

Top
AdBlock Detected

We get it, advertisements are annoying!

Sure, ad-blocking software does a great job at blocking ads, but it also blocks useful features of our website like our supporting vendors. Their ads help keep Steel Soldiers going. Please consider disabling your ad blockers for the site. Thanks!

I've Disabled AdBlock
No Thanks