• Steel Soldiers now has a few new forums, read more about it at: New Munitions Forums!

  • Microsoft MSN, Live, Hotmail, Outlook email users may not be receiving emails. We are working to resolve this issue. Please add support@steelsoldiers.com to your trusted contacts.


Maxspeed3's Deuce Build Thread

yolner

Active member
393
68
28
Location
Rockville, MD

Heath_h49008

New member
1,557
101
0
Location
Kalamazoo/Mich
I can't think of any way to save the sand. You would need an enclosed space, some way to dry it, and then screens to sift it.

For $4/50lbs it just isn't worth the effort in my opinion. (If you buy it by the pallet, and wheedle the department manager, you might be able to get it even cheaper.)
 

bigginstactical

New member
246
1
0
Location
port angeles washington
For your wood I would recommend automotive clear. We have been using for years on wood and works way better then any wood finish out there. Hit it with about three or four coats, sand next day with 400 or even 320 and hit with three more. Trust me you will be very happy! You can also stain the wood before hand, I'm sure many stains will work but we have only used the Minwax line of stains with no problems. The automotive clear works and lasts really well because of the amount of UV screeners and additives in it compared to a wood finish. I just did a massive desk project with the cheapest clear and it worked great, only used one gallon too with 9 coats. keep up the good work!
 

maxspeed3

Member
64
0
6
Location
Burnsville, Minnesota
So another update from this weekend. Of course the weather wasn't the greatest for working on the truck. However she did give me a scare. I went to start her up to take her for a cruise and one of the gaskets on an oil filter blew out....lets say I had a small oil spill like the Exxon Valdez in my cul de sac.... 2 new filters later she's good to go!
 

maxspeed3

Member
64
0
6
Location
Burnsville, Minnesota
Another status update:

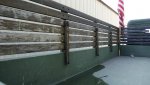
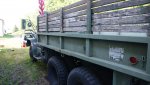
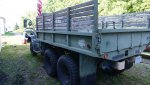
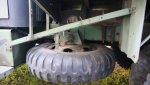
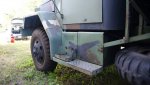
Well, the weather continues to stuck around here. Pretty much has rained everyday this week and last weekend. Progress has been slow...Today is the first nice day in a while, although its supposed to storm tonight but who knows anymore. I did however get 1 mudflap installed on Tuesday (pics to follow this weekend) I got them from Northern Tool 24" x 30" (about 13$ each -rubber). I had to measure up the mounting holes and used a standard drill. I do however need some washers to make them flush with the head of the bolts, but overall I really like the appearance of them. There a lot better then the stock military ones. (mine were starting to fall apart). There the floppy kind you would typically see on a dumptruck.

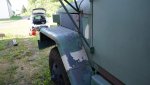
As far as sanding and painting goes. I decided after the first bag of sand for pressure sanding, I'm going to use that method for the "hard to reach" or small pieces, (i.e. the frame rails and even the wheels, exterior bits). The bumper on my truck has so many coats of paint it was taking forever to get to bare metal. Yes, this process works very well, its just really time consuming... But the after results are going to be worth it! Also I burned through a 50lb bag just to do a section of the bumper and part of the hood. It does use a lot of sand.......

So for the bumper I'm going to try some paint stripper to "get rid" of a few extra layers to see how that works.

Photos of the truck to follow this weekend (if the weather cooperates)

Justin
 

Heath_h49008

New member
1,557
101
0
Location
Kalamazoo/Mich
We're drinking from the same tap my brother. I'm taking the paint off in layers. Pure water, needle scaler (not the best tool for speed or thin metal) and my grinder with $5 HF polycarbide discs.

I have considered liquid stripper, but questioned the cost per sq foot.

http://youtu.be/ETVSlQHbzrs
 

maxspeed3

Member
64
0
6
Location
Burnsville, Minnesota
We're drinking from the same tap my brother. I'm taking the paint off in layers. Pure water, needle scaler (not the best tool for speed or thin metal) and my grinder with $5 HF polycarbide discs.

I have considered liquid stripper, but questioned the cost per sq foot.

http://youtu.be/ETVSlQHbzrs
I tried some liquid stripper (cheap household stuff) from Home Depot (its 25ish $ for a gallon) and I used only a quart to do the entire bumper, the right fender and part of the hood. It works VERY well. Just make sure if you do use it you get a really nice set of neoprene gloves and wear a sweatshirt or something. I happened to splash some on my arm and it burned like ****! Rinsed it with some water and it was fine after 10 minutes.. Oh and wear goggles, It will melt your your eye and the trip to the ER wouldn't be fun at all....

I'm going to use the paint stripper for the places where there are a lot of layers and the pressure sanding for the thinner spots. The paint stripper works within 5 minutes and the paint will literally fall right off the truck! The thicker you apply the stripper the better it works. Some places had 5+ layers of paint and it took it down to bare metal!
 

maxspeed3

Member
64
0
6
Location
Burnsville, Minnesota
So 3 weeks later I finally have the time to work on her this weekend! Went down last night and picked her up. She fired right up as usual and she seemed rearing to go! We got caught in a heavy rain shower (first time I've ever had her in the rain) It was pretty cool, although she needs new wipers and seals for the windshields it was still fun to drive her in the rain. I stopped off at a friends house on my way home who has a M109 (I believe) who hasn't seen my truck since last year. He is on here somewhere, not sure of his forum name....

Here are a bunch of photos of the truck from very early this spring and from last fall before I started any work to the exterior of the truck. I'm going to try to get more photos of her this weekend.

Enjoy!

http://www.youtube.com/watch?v=MU5tfTG6mE8&feature=youtu.be
 

Attachments

maxspeed3

Member
64
0
6
Location
Burnsville, Minnesota
Here is a cell phone pic that I snapped this morning. I'll take more with my DSLR this week of the progress. The black on the bumper is Rustolem rust converter and the white is Killz exterior primer. I thinned the primer with a little bit of mineral sprits and used my air powerd spray gun. For the entire hood, both fenders and the sides of the hood fender area I only used about an inch from the top of a pint of the primer, so maybe a couple of ounces and just enough thinner, maybe an ounce. and the primer dried very quickly. Today I'm going to see how well it sands.
 

Attachments

maxspeed3

Member
64
0
6
Location
Burnsville, Minnesota
Yesterday I went and picked up a c-turbo and a few other parts from tie6044 Thanks Again Scott!! The install took about 2 and a half hours to do. The hardest part was aligning the bolt that holds the slobber tube (crankcase breather) on the oil return line on the turbo. Its kind of a weird setup.... One bolt holds the flange, and the second bolt passes through a bracket on the slobber tube and into the second hole on the flange for the oil return line. Other then that she fired right up and sounds excellent! I need to get the camera out today and get some photos.....

I know I keep saying that....aua
 
Last edited:

maxspeed3

Member
64
0
6
Location
Burnsville, Minnesota
20130706_172644_resized.jpg20130706_200322_resized.jpg20130706_200326_resized.jpg

Photos of the C-turbo (left) next to the D-turbo (right). A lot smaller hot side on the C, which is why it makes such a beautiful noise! I had always thought these turbos were single scroll instead of twin scroll. Twin scroll with a T4 flange for the win!
 

maxspeed3

Member
64
0
6
Location
Burnsville, Minnesota
Just realized I haven't given an update on the truck for over a month now. Progress has slowed a bit over the last month. I'm hoping it cools off here in MN this weekend so I can go get her this weekend and continue sanding and painting. After a lot of thought I did decide on a name for her last week. "Vivian"

I did also pick up an OD canvas cargo cover from a new friend I met at Cruise night in Lakeville. The search is on now for fiberglass bows and the end curtain. The gentleman I met was a mechanic on the Army for over 30 years and gave me a really good idea of where my truck was originally from. He thought Ft. McCoy. He also gave me a few pointers for correctly painting the truck for era specific i.e. white stars on the doors,hood and bumpers. Also the correct placement of the numbers on the bumpers & fenders. He will be a valuable resource when it comes time to put the finishing touches on the truck.
 
Top
AdBlock Detected

We get it, advertisements are annoying!

Sure, ad-blocking software does a great job at blocking ads, but it also blocks useful features of our website like our supporting vendors. Their ads help keep Steel Soldiers going. Please consider disabling your ad blockers for the site. Thanks!

I've Disabled AdBlock
No Thanks