• Steel Soldiers now has a few new forums, read more about it at: New Munitions Forums!

  • Microsoft MSN, Live, Hotmail, Outlook email users may not be receiving emails. We are working to resolve this issue. Please add support@steelsoldiers.com to your trusted contacts.


MEP-002A Exhaust Question plus Machine Resurrection

Tinstar

Super Moderator
Super Moderator
Steel Soldiers Supporter
4,256
1,707
113
Location
Edmond, Oklahoma
Unless I'm missing it, the TM's seem to be terrible as far as showing the battery and slave port cable routings, but without looking at one of mine, I believe the slave port negative goes to the back of the ground stud on the frame just behind and left of the slave port.
Then another separat wire runs from that same stud over to the negative on the starter where the battery negative attaches.
The slave port positive runs right to the starter.

As far as the negative goes you can attach it anywhere to the chassis, engine, whatever and you should have a good path back to battery negative, assuming all your other wires and ground straps are in place.
If in doubt, attach it to the block somewhere since the starter will be your biggest current draw.
If you attach it to the frame and your ground strap across the motor mount is missing or broken and the ground from starter - to the frame is missing you will have cranking issues trying to start it from the slave port.
All ground straps are in place and in great shape.

The original (old at least) has the ground cable going directly from the port to the starter in one continuous cable.

I couldn’t tell from the TMs either.
 

Tinstar

Super Moderator
Super Moderator
Steel Soldiers Supporter
4,256
1,707
113
Location
Edmond, Oklahoma
Just out of curiosity... is the plan to use the MEP-002's slave port with your CUCV? If so, do you need to use a 2 pin to 1 pin Nato adaptor to use Nato slave jumper cable?

I'm considering buying a Nato slave cable to enable jumping one genset off the other if the need arises. However, that would require me to purchase (2) 2 to 1 pin adaptors plus a ~12ft Nato slave jumper cable as well. Alternative I guess... is to buy a long set of automotive jumper cables which would be significantly less expen$ive.
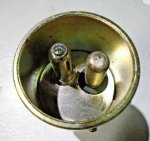
Exactly that.

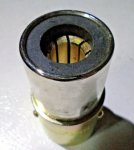
I do have the adapter that I bought NOS.
It’s heavy and works well and is difficult to remove once you insert it.

I used the adapter and my CUCV to start machine several times when I was waiting for my batteries to show up.

Now it will be a backup

IMG_0719.jpegIMG_0720.jpeg
 

Tinstar

Super Moderator
Super Moderator
Steel Soldiers Supporter
4,256
1,707
113
Location
Edmond, Oklahoma
IMG_0718.jpeg

Funny how the shorter ground cable has a red ring terminal on it.

The positive cable has just a plain flag terminal with no shrink sleeve.
 

Ray70

Well-known member
2,377
5,092
113
Location
West greenwich/RI
That slave port assembly looks correct just based off the pic. Ground cable looks to be about the right length...
Out of curiosity did the one on the machine look like someone had modified it to make the ground reach to the starter?
 

Tinstar

Super Moderator
Super Moderator
Steel Soldiers Supporter
4,256
1,707
113
Location
Edmond, Oklahoma
That slave port assembly looks correct just based off the pic. Ground cable looks to be about the right length...
Out of curiosity did the one on the machine look like someone had modified it to make the ground reach to the starter?
It does not.
By all appearances it looks like all factory work and nothing is modified.

I'll install it as recommended.
It will rarely get used.
Just wanted to make sure I wasn’t going to melt anything.
 

Guyfang

Moderator
Staff member
Moderator
15,881
22,131
113
Location
Burgkunstadt, Germany
Here is what I see.
GROUP 16 SKID BASE ASSEMBLY
(Figure #) 56 - AOOOO AOO AFFFF SLAVE RECEPTACLE ASSEMBLY EA 1 1
(Part #) 72-5984 30554

The only thing here important is 72-5984

This is the first entry to the Slave Recpt. information. It has the figure # 56, but no Item number. That tells me its the prime number, for the whole Recpt.

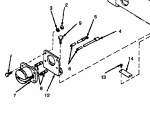
The picture shows an arrow to item #7.
(Figure #)56, (Item #) 7 PAOZZ PAOZZ PAFZZ (NSN): 5935-00-295-6403 CONNECTOR, RECEPTACLE. EA 1 1
ELECTRICAL
(Part #) MS75058-1
(Part #) 323-0337

This number is JUST for the connector, nothing else.

1690490934291.png

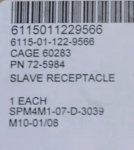
According to my book, the compleat recpt for the MEP-002A should be NSN 6115-01-122-9566, Part # 72-5984

The same info is for the MEP-003A.

Is this what numbers you used?
 

Tinstar

Super Moderator
Super Moderator
Steel Soldiers Supporter
4,256
1,707
113
Location
Edmond, Oklahoma
Here is what I see.
GROUP 16 SKID BASE ASSEMBLY
(Figure #) 56 - AOOOO AOO AFFFF SLAVE RECEPTACLE ASSEMBLY EA 1 1
(Part #) 72-5984 30554

The only thing here important is 72-5984

This is the first entry to the Slave Recpt. information. It has the figure # 56, but no Item number. That tells me its the prime number, for the whole Recpt.

The picture shows an arrow to item #7.
(Figure #)56, (Item #) 7 PAOZZ PAOZZ PAFZZ (NSN): 5935-00-295-6403 CONNECTOR, RECEPTACLE. EA 1 1
ELECTRICAL
(Part #) MS75058-1
(Part #) 323-0337


This number is JUST for the connector, nothing else.

View attachment 902232

According to my book, the compleat recpt for the MEP-002A should be NSN 6115-01-122-9566, Part # 72-5984

The same info is for the MEP-003A.

Is this what numbers you used?
IMG_0723.jpeg

Yes, exactly.
 

Guyfang

Moderator
Staff member
Moderator
15,881
22,131
113
Location
Burgkunstadt, Germany
Then you have what is supposed to be there. Just hook the neg to the back side of the ground stud. Do not over tighten the ground stud. They are soft and you will have two parts in your hand before you know it.

We always used a load terminal from a 3KW DC set, with the 002A and 003A sets, as a ground terminal. You have to drill out the mounting hole a bit, but since the load terminal is so much bigger, it never broke off again.
 

Tinstar

Super Moderator
Super Moderator
Steel Soldiers Supporter
4,256
1,707
113
Location
Edmond, Oklahoma
Then you have what is supposed to be there. Just hook the neg to the back side of the ground stud. Do not over tighten the ground stud. They are soft and you will have two parts in your hand before you know it.

We always used a load terminal from a 3KW DC set, with the 002A and 003A sets, as a ground terminal. You have to drill out the mounting hole a bit, but since the load terminal is so much bigger, it never broke off again.
Thanks for the tip!
Will install when the weather cools down a bit.

Electricians should be here later next week to install a generator hookup at the power pole.
 

rickf

Well-known member
3,016
1,302
113
Location
Pemberton, N.J.
I have a 1500 watt 24 volt generator that I use to start my equipment when I can't get to it with another 24 volt vehicle. I have a slave cable hardwired to that set that I can just plug into whatever I am trying to start. Small engine stuff like compressors and such will start right up just on the current from the genset but bigger stuff you need to let it charge the batteries for a minute or two. 1500 watts at 24 volts is 62 amps so it is a pretty good charge. The main problem is getting that damn thing started with it's one and done pull rope!!! Especially when it is zero degrees out.
 

rickf

Well-known member
3,016
1,302
113
Location
Pemberton, N.J.
I don't remember Guy, I will look at it the next time I am out back. I need to get it in the garage and put a new carb on it, if I can find the carb I bought about 6 years ago. It is one of those small gasoline screamers that whine like no tomorrow. I have that and it's 1500 watt 110/220 brother that no longer puts out 220.
 

Tinstar

Super Moderator
Super Moderator
Steel Soldiers Supporter
4,256
1,707
113
Location
Edmond, Oklahoma
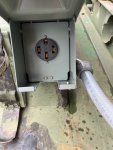
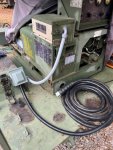
71623262267__06001BAD-01E2-4E11-9093-D4519A13DC96.jpegIMG_1041.jpeg

Finally got around to wiring this for a 50A plug.
Didn’t want the box on the generator itself due to vibration.

Electricians were out last week and installed the generator lockout box and related items on the power pole.
So now the only cord I have to deal with is the big 50A, 50’ one. Thing is heavy.

Tested all connections and ran generator for an
hour today to make sure the vibration wasn’t going to be an issue. No problems.
I can still access everything and still use the fire extinguisher bracket without moving it.

It’s a relief getting all of that finally completed
 

Chainbreaker

Well-known member
1,748
1,834
113
Location
Oregon
Just a tip... you should consider closing off the ~ 1/2" opening where the wires would normally feed into the load terminals on the AC Reconnection box. I had one of my boxes taken out by mice and it was up on its trailer like yours. Mice love to nest in the bottom of that box in winter!

Several ways to close off mouse access to box internals:

1. Screen off the interior opening located in rear of load terminals that leads down to the transformer area with hardware cloth.

2. If no need to retain access to the load terminals you could screw or glue a solid flap (metal, wood, or?) across the external wire entry opening slot on external hinged flap.

Here are some pictures of what I did: Reference Post #21: Craig tulls drawing (003A) | Page 2 | SteelSoldiers
 
Last edited:
Top
AdBlock Detected

We get it, advertisements are annoying!

Sure, ad-blocking software does a great job at blocking ads, but it also blocks useful features of our website like our supporting vendors. Their ads help keep Steel Soldiers going. Please consider disabling your ad blockers for the site. Thanks!

I've Disabled AdBlock
No Thanks