• Steel Soldiers now has a few new forums, read more about it at: New Munitions Forums!

  • Microsoft MSN, Live, Hotmail, Outlook email users may not be receiving emails. We are working to resolve this issue. Please add support@steelsoldiers.com to your trusted contacts.


Mep 003a fuel pump connectors

Light in the Dark

Well-known member
Steel Soldiers Supporter
3,561
5,066
113
Location
MA
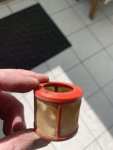
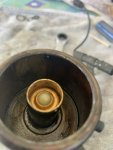
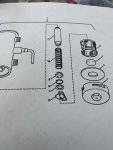
The bottom of each pump has a mesh strainer which can be removed and cleaned. On the 002/003 after that is a separator, then two canister style filtering heads.
 

uniquify

Active member
221
210
43
Location
Sioux Falls, SD
The interesting thing about that whole scenario is how did pump two filter clog before pump one?
I agree it seems odd for the #2 pump to clog before #1. Was the filter screen present in #1? Was it clean? Maybe #1 clogged first last time (possibly long before you acquired the genset) and got cleaned, but #2 wasn't fully clogged at that time and didn't get attention. I could imagine a partially clogged filter catching more crud than a clean filter.

Whatever the case, I'm glad you got the pumps working now.
 

rickf

Well-known member
3,009
1,290
113
Location
Pemberton, N.J.
I had never had it apart before this happened so anything is possible. Both filters were dirty but #2 was really dirty and clogged. I think #1 was cleaned at some point and #2 was never done. I got this unit straight from an Air Force base so PMS was not being done as called for obviously. The tank was brutal inside.
 

Brother Hec

Member
31
42
18
Location
Nm
Brother Hec Here. Please accept my apologies for failing to reply to all who have responded to my questions regarding the failed pumps and the associated connectors. You all are extremely knowledgeable and kind to a rookie like myself. I joined this forum becasuse I had questions and was hoping to get at least one response. Instead, I have been educated and inspired to continue to learn more. Please accept my sincere thanks to all who have shared their wisdom and experiences with me.

In return, I would like to answer "some" of the excellent questions that you have posted to me. My generator was bought from a neighbor who had it installed inside a building and used it to run a workshop. He ran it periodically and changed oil and the air/oil filters. The genset was minimally maintained, but not abused. I bought the genset to run an irrigation pump for agricultural use. I did not put the genset into immediate use since COVID "crap" limited my access to supplies/services to complete irrigation pump and genset installation. The genset has been "moth balled" but run periodically. The last time I tried to start the genset was right before I posted my question on this forum. Basically, the genset primed and kicked over but would smoke and die. I attempted 2-3 starts but then it stopped smoking altogether and would not kick over. I then noticed that I did not hear the pump in the prime/run position. I tried the transfer pump and it did run but it is not connected to any fuel supply. The genset is enclosed in a sound "proofing" enclosure (doghouse). I removed sides to expose pumps and found that it has 3 pumps as you all have indicated. I know I had previously heard the prime/run pump (E1 or E2) but neither was running now due since I did not hear/feel noise/vibration from pumps. I checked lines and none were leaking. I explored the lines that lead from pumps and in between the water separator and the 2 fuel canister filters. I also looked at the injector pump... but did not take it apart. It was a good experience but it left me with the same question you have asked me.... how can a system with redundant pumps have both pumps fail? After reading your thoughts, I think what happened was that the pump was running on one pump only when I bought it. The genset is not running now because the sole pump has probably froze up due to crud or varnish. Again, after reading your thoughts, I looked around for the pencil EMI filters and found them as well as the metal connectors on each pump. I thought about testing for "juice" at each pump to determine if the filters were not letting juice flow to pumps. However, I could not find a way to take connectors off at pump without trashing them. Again... this is why I asked the connector question which has resulted in a bounty of GREAT information and suggestions/advice. I have thoroughly appreciated all your ideas, thoughts, and kind words.

Currently, I am planning to follow your advice to disconnect the rubber connectors ahead of the EMI filters/pumps and check for juice. If there is juice... I will take that as an indication that EMI filters may have gone the way of the Doe-Doe. However, before cutting them out... I want to remove E1 and E2 fuel pumps (and probably transfer pump) and clean them up per the diagram that I was graciously provided above. I want to reinstall and test for operation of pumps. If pumps still are still a No-Go... then it will be time to eliminate the EMI filters and seal up the connections to prevent corrosion as noted. Once I have the pumps operational, I will take out the fuel tank and clean out.... it is EXTREMELY filthy! The fuel level meter does not work and I do not know it the electrical sensor (fuel cut-off) needed for the aux pump refueling is operational. My prime goal is to get this genset to pump fuel to injector pump and KEEP RUNNING! I hope that I can continue to rely on your expertise when I dive into the fuel tank and cleaning up the remainder of the fuel system. Thank you all for being so gracious and sharing your collective wisdom with me!
 

rickf

Well-known member
3,009
1,290
113
Location
Pemberton, N.J.
Thanks for the update and from the sounds of things you are headed in the right direction. I would say that since the transfer pump is still working to leave that one in place for the time being, if it ain't broke, don't fix it. I did mine because of a couple reasons. One, I am a mechanic so that is what I do, take things apart and put them back together. You are just learning so don't push your luck. There are issues that pop up with things like this that will take you by surprise and can make a good pump a bad pump. and the second reason was my unit is a very high hour unit and after seeing the condition of the main pumps and the fact that mine is not enclosed it made sense to do it. Remember, I said I had used that pump to keep the set running as I was repairing the other pumps. I did that simply by moving the lines around so that pump was drawing fuel from the tank and feeding it to the filters. Believe me my lines looked like spaghetti while this was all going on but this was during a major snowstorm and power was out for a couple days already. If I were smart, I would have just used the line for the aux pump and ran that line into my spare tanks of fuel and then hooked up the outlet of the pump to the filters. But no, brain was in "We can make this work by turning the lines into spaghetti" mode. So in doing all of that I ended up pulling the same dirty fuel from the tank into that pump also.

ANYWAY, when you go to take the bottom cover off of the pump you will probably need to put a wrench on it. Just a fair warning so you don't think it will come off by hand. Have a clean rag to lay out the parts on and some fine emery cloth or sandpaper to clean the inside of the pump barrel. My electrical filters were good so I left them in there but if you are wary of them as others have said they are not needed for what you are doing, you may want to cut them out while you have full access to everything and then you do not have to worry about them going out later at the worst time. I am sure that is what will happen to me.
 

Brother Hec

Member
31
42
18
Location
Nm
Thanks for the update and from the sounds of things you are headed in the right direction. I would say that since the transfer pump is still working to leave that one in place for the time being, if it ain't broke, don't fix it. I did mine because of a couple reasons. One, I am a mechanic so that is what I do, take things apart and put them back together. You are just learning so don't push your luck. There are issues that pop up with things like this that will take you by surprise and can make a good pump a bad pump. and the second reason was my unit is a very high hour unit and after seeing the condition of the main pumps and the fact that mine is not enclosed it made sense to do it. Remember, I said I had used that pump to keep the set running as I was repairing the other pumps. I did that simply by moving the lines around so that pump was drawing fuel from the tank and feeding it to the filters. Believe me my lines looked like spaghetti while this was all going on but this was during a major snowstorm and power was out for a couple days already. If I were smart, I would have just used the line for the aux pump and ran that line into my spare tanks of fuel and then hooked up the outlet of the pump to the filters. But no, brain was in "We can make this work by turning the lines into spaghetti" mode. So in doing all of that I ended up pulling the same dirty fuel from the tank into that pump also.

ANYWAY, when you go to take the bottom cover off of the pump you will probably need to put a wrench on it. Just a fair warning so you don't think it will come off by hand. Have a clean rag to lay out the parts on and some fine emery cloth or sandpaper to clean the inside of the pump barrel. My electrical filters were good so I left them in there but if you are wary of them as others have said they are not needed for what you are doing, you may want to cut them out while you have full access to everything and then you do not have to worry about them going out later at the worst time. I am sure that is what will happen to me.
👍
 

Ray70

Well-known member
2,358
5,020
113
Location
West greenwich/RI
Hey Brother Hec, your problem seems pretty straight forward since your pumps obviously are not running. It does seem odd that all 3 pumps have stopped, but if the Aux pump was used in the past and has stale fuel in it, or the float is stuck up ( or the tank if full ) that would explain the Aux pump.
You will find that it is fairly easy to disassemble and clean the old pumps and 95% of the time they can be fixed simply by cleaning out the varnish, but occasionally I have found a burnt coil which means replace the pump.

Also note: Having redundant pumps does not always mean the gen will work if ONE pump fails... Sound odd?? Well, often times the check balls and plunger get stuck. If you have 1 bad pump and it's inlet ball is stuck closed the "Good" pump will still not be able to supply fuel to the IP. because the stuck ball is blocking the flow ( either on the suction or pressure side )

Lastly, it used to be standard procedure for me to unplug 1 of the pumps on my 002 and 003 to "Save" it for the day that the other one failed, rather than having both running all the time. However, these days the fuel quality is so BAD that I have recently changed my thinking and plugged them back in to keep them exercised, to help prevent the plungers from getting stuck.

Don't let your machine sit too long without exercise and keep fresh / treated fuel in it. This LSD fuel will cause all kinds of issues wit you IP and fuel pumps within a few months if you neglect it.
 

Brother Hec

Member
31
42
18
Location
Nm
Following excellent advice given and pump diagram provided (priceless!!!)… I have removed pump and started disassembly. I believe pump was not working because it is severely frozen with varnish. See pictures. I was having problems removing part #9 in diagram due to varnish. It is a piston head with plastic valve in center that I think might be how fuel passes from one part me to the other (just spit balling it). The filter in picture is EXTREMELY FRAGILE. Might need your advice on how to clean it. I soaked part #9 it in brake cleaner and it came free. This pump may work. I would appreciate your continued advice as I proceed. Thank you.
 

Attachments

Brother Hec

Member
31
42
18
Location
Nm
Found it. What brand of throttle body cleaner… does it matter? Currently I can’t get another part out. See part 11 above. It is down inside tube and looks like it is screwed in… but how? It looks like it is a long piston that needs to mov up and down. Any thoughts.
 

rickf

Well-known member
3,009
1,290
113
Location
Pemberton, N.J.
That will be the part that is giving you the problem and yes it is the piston. Put whatever solvent in there you choose, throttle body cleaner should work bu it evaporates very quickly which I think will cause the gunk to just grab back on but give it a try. If they have tried it and it works go for it. I think I used WD 40 since it is a solvent and somewhat of a lubricant. Get the stuff down in there and then invert the pump and tap it on a block of wood a few times. turn it back over that try tapping the piston back down a bit using something soft against the piston and a small hammer. Be sure you tap against the solid part of the piston and not the valve in the center. see that little white ball? That is the valve to let fuel through as the piston comes up, if you push in gently on that you will be able to get some solvent down to the other side of the piston. Keep adding solvent/lube and keep the inverting and tapping going on and eventually the piston will start to move. Patience is key here!!! Do not really hammer on anything, tap on it. It will let go eventually. Add the solvent into both line openings to try to get it to the other side of the piston. Once you get it out (and you will get it out) then take some fine sandpaper and clean up the inside of the barrel and the outside of the piston. Reassemble and I bet it works like new. The piston should just slip in and out with no resistance. You got this beat now. PATIENCE!!
 
Last edited:

Brother Hec

Member
31
42
18
Location
Nm
Rick.
I appreciate your vote of confidence!! Yes.. I saw the white valve you mention. It too is stuck. I have not banged on anything for the reasons you stated. The problem is that the piston is stuck in bottom of cylinder (brass tube) and it needs to come down. I will soak it in solvent and continue to coax it loose. Thank you for your patience.
 

Ray70

Well-known member
2,358
5,020
113
Location
West greenwich/RI
Soak it from both sides as Rick mentioned. I use Berryman's B12 carb cleaner, it's about the most toxic ( best ) stuff you can find!
After a good soaking try tapping the pump body on a piece of wood to dislodge the plunger. The pump body will hit the wood first, not the center tube, so no fear of damage. Once it's out clean everything, tube, plunger and BOTH check balls. Lube, reassemble and test.
 

Brother Hec

Member
31
42
18
Location
Nm
OK…, I got the steel plunger/piston out!!!! Now what is safest way of sanding the inside of the THIN brass tube that plunger came out of? I thought of using some 400 grit paper wrapped on pencil or something close to diameter of plunger. What would you suggest?
 

Ray70

Well-known member
2,358
5,020
113
Location
West greenwich/RI
What's in there that you want to sand off, just varnish? If so you're probably better off with a round "Pipe cleaner" style wire or nylon brush and more carb cleaner. Fine sandpaper or emery cloth wrapped around a dowel or anything round ( like a pencil ) will work as well, just don't get too aggressive, stay with 400g or finer. if possible, chuck it in a cordless drill and spin it like a flap wheel, so the loose end wants to fling outward against the tube.
 

Brother Hec

Member
31
42
18
Location
Nm
Thanks. I used 400 grit to remove vanish because plunger was hanging up in tube. Lubed it and put it together. I hope it works. All the parts are clean and move freely. Now I’ll remove the other pump and do it again. You all are fantastic. I’ll report on next pump and how they test out. Thank you!!!!
 
Top
AdBlock Detected

We get it, advertisements are annoying!

Sure, ad-blocking software does a great job at blocking ads, but it also blocks useful features of our website like our supporting vendors. Their ads help keep Steel Soldiers going. Please consider disabling your ad blockers for the site. Thanks!

I've Disabled AdBlock
No Thanks