• Steel Soldiers now has a few new forums, read more about it at: New Munitions Forums!

  • Microsoft MSN, Live, Hotmail, Outlook email users may not be receiving emails. We are working to resolve this issue. Please add support@steelsoldiers.com to your trusted contacts.


MEP-802 hose connections- assistance!

kwartk

Member
34
6
8
Location
pa
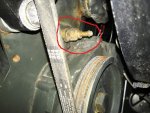
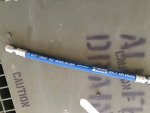
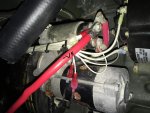
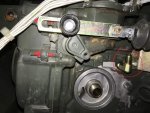
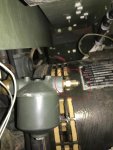
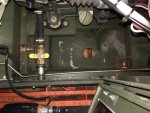
Thanks in advance for looking at my post..This is my first post and a newbie to ex military Genset. I bought an MEP802 as a backup unit for my farm pumps. I was cleaning the unit and noticed almost all the fuel hoses / connections had been removed, i. I am not a mechanic but do understand basic engines...I have attached pictures (circled the connectors)....sorry to ask this naive question..can someone advice where those connectors link to? I am especially baffled by the connector just above the Oil filter and also the connector on the secondary Fuel filter.. Also what is the hose size / ID? thanks..
 

Attachments

jamawieb

Well-known member
1,412
512
113
Location
Ripley/TN
1st picture is the connector for the oil pressure line. The line goes up around the dead crank switch
2nd picture is the fuel filter connector and that line goes to the water separator
3rd is just the drain for the fuel tank, line connects both adapters you have circled.
 

Guyfang

Moderator
Staff member
Moderator
15,903
22,183
113
Location
Burgkunstadt, Germany
If you look at TM9-6115-641-24P, figure 17, Sheets 1 and 2, you will see a diagram of the fuel lines and where they go. TM9-6115-641-24, page 2-119 shows the same thing and in TM9-6115-641-10, page 2-30.1 is Figure 2-21. Fuel System Diagram Plate that might help also. The parts manual will tell you how long each hose is.
 

kwartk

Member
34
6
8
Location
pa
dependable; Guyfang; jamawieb---many thanks for the lifeline!....really appreciate the education..thx!
 

kwartk

Member
34
6
8
Location
pa
I came across another missing part that has me stumped. I've gone thru the Tech manuals but admit its a challenge to follow so any help is very much appreciated.. I have attached a picture (circled) the connectors minus hose. Where do these connect too? thx....
 

Attachments

Guyfang

Moderator
Staff member
Moderator
15,903
22,183
113
Location
Burgkunstadt, Germany
You are missing at least one piece of the radiator overflow and drain system. It starts from overflow bottle, it goes straight down to a tee, the radiator drain hose, and then down to another tee, the block drain hose, and then it exits through a hole on the side of the generator, down low. Look at TM9-6115-641-24P, figure 16, item 37 is the hose from the block drain. That's the hose that comes from the petcock shown in your picture. You also need to see if the rest of the hoses are there! Oh, the block drain petcock is a little hard to get at when you want to open it, but you should at least try it to see if it still works.
 

kwartk

Member
34
6
8
Location
pa
Once again Thx and Thx!!! I guess i now appreciate what my grade school teacher always told me...The Devil is in the Detail! looks like the block drain petcock is damaged so i will need to hunt for one...will let you know how i fare...
 

kwartk

Member
34
6
8
Location
pa
sorry about the delayed update..was out of town for a few days...The radiator and drain stops look ok. I filled it with coolant today and no leaks. so i "presume" no issues..will find out when i get to starting the machine... I got my local truck hydrulic shop to make the missing hoses, have tried them and they all fit well....I read in the manual I need to ensure i have the machine earthed so I need to get an earth/ground rod & cable from homedepot. will see how I fare ...
 

Attachments

kwartk

Member
34
6
8
Location
pa
after a couple of weeks dilly-dallying , I finally plucked the courage, read the manual 2 times! and ready to go ahead. I connected a ground rod and connected the ground cable to the G on the generator. I also hooked up 2 12v batteries, however when I connected the -VE terminal there was a big spark that almost melted the battery's negative terminal post!!. any advice?
 

Guyfang

Moderator
Staff member
Moderator
15,903
22,183
113
Location
Burgkunstadt, Germany
Stop. Drink a cup of Java. Now look at the manual again. Cause if you hook up batteries and get a spark, there can be but few possibilities. One, you have the CB-1 pushed in and there are things turned on. But this should make a small spark, nothing big.

Two, you have hooked up the wires wrong. OK, lets clarify something here. The control panel end of the set is the rear. Now, the batteries are hooked up like this. The battery on the right side of the set, the Positive terminal should go up to the positive side of the starter. The negative goes under the engine to the positive side of the left side battery. The negative terminal gets hooked up to the only cable left over. That should go to a ground point, Like the engine. Whats your hook up look like?
 

kwartk

Member
34
6
8
Location
pa
Guyfang, appreciate your early response and advice. I have the cables hooked up as you describe above. I noticed the CB-1 is fully pushed in ..should i pull it out? I guess i need to pull it out. I also unscrewed the FU1 and the fuse seems to have blown so i will replace that...a quick one what does the CB1 actually do? many thanks...
 

Attachments

kwartk

Member
34
6
8
Location
pa
k, so i replaced the fuse in FU1 and pulled out CD-1...no sparks or any sound, however I noticed that the new fuse i put in FU1 has blown again..as ever any pointers greatly appreciated. also Guyfang, when you say the negetive terminal has to go to a ground point .. I see a white covered cable (I assume its a ground) from the -ve terminal but it seems to be connected to the metal block of the starter...
 

jamawieb

Well-known member
1,412
512
113
Location
Ripley/TN
We can't really tell from the battery hookup but the one of the negatives usually goes to a bolt below the starter as the ground point. If you don't have the batteries in series and your grounding one out, that will cause the melt down of the battery terminal and the fuse to blow.
You should have a positive going from the starter to the battery positive (we will call that battery 1), then a wire going from the battery 1 negative to 2nd battery positive, finally from 2nd battery negative to the ground bolt below the starter. That will give you the batteries in series and 24volts.
 

jamawieb

Well-known member
1,412
512
113
Location
Ripley/TN
We can't really tell from the battery hookup but the one of the negatives usually goes to a bolt below the starter as the ground point. If you don't have the batteries in series and your grounding one out, that will cause the melt down of the battery terminal and the fuse to blow.
You should have a positive going from the starter to the battery positive (we will call that battery 1), then a wire going from the battery 1 negative to 2nd battery positive, finally from 2nd battery negative to the ground bolt below the starter (usually). That will give you the batteries in series and 24volts. Exactly how Guyfang described.
 

kwartk

Member
34
6
8
Location
pa
thx....will verify the connections again. Here is a pic of how it is hooked up at the starter end. The red cable -VE goes to the -VE terminal post on the 2nd battery:-?
 

Attachments

Top
AdBlock Detected

We get it, advertisements are annoying!

Sure, ad-blocking software does a great job at blocking ads, but it also blocks useful features of our website like our supporting vendors. Their ads help keep Steel Soldiers going. Please consider disabling your ad blockers for the site. Thanks!

I've Disabled AdBlock
No Thanks