• Steel Soldiers now has a few new forums, read more about it at: New Munitions Forums!

  • Microsoft MSN, Live, Hotmail, Outlook email users may not be receiving emails. We are working to resolve this issue. Please add support@steelsoldiers.com to your trusted contacts.


Mep-802a engine change

Diesel Dogg

New member
11
5
3
Location
Twining Michigan
I have an 802a genset that initially was a hard start machine. Then as time went on it got worse, now it's a no start and very low compression in 1 hole. I recently acquired a "new" reman surplus engine for this set. Is there anything I need to be aware of when swapping out the engine?
 

Mr4btTahoe

Active member
121
65
28
Location
Indiana
I have an 802a genset that initially was a hard start machine. Then as time went on it got worse, now it's a no start and very low compression in 1 hole. I recently acquired a "new" reman surplus engine for this set. Is there anything I need to be aware of when swapping out the engine?
Out of curiosity... did you check things over to find out why it was dropping compression? Valve adjustment or burnt valve, etc.?
 

Guyfang

Moderator
Staff member
Moderator
15,837
21,998
113
Location
Burgkunstadt, Germany
This is not rocket science. Have you downloaded the TM's? Read the TM. Then once more. First look at the machine. If the screws all over it looked rusted, buy some replacement screws, nuts and washer now, instead of later, when you want to put it back together.

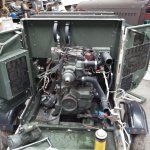
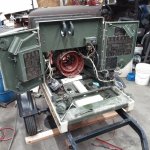
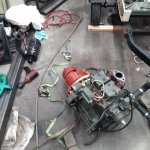
Take the box off the frame. Then pull out the engine/main gen, set them on the floor and separate them. It is possible to pull them out without pulling the rear housing off, but after having done this a number of times, Its so much easier to just pull the box off first, then go from there.

I never mark wires, as I have from time to time done that, only to find someone had hooked 1-2 wires up wrong. When you mark wires, you simply repeat someones stupid mistake.

Go for it! Someone here will always have an answer to any question you might come up with. I should not take more then a few hours to get it out. A big plus, would be a helper, and overhead lift of some sort.
 

zarathustra

Active member
Steel Soldiers Supporter
235
58
28
Location
glasgow,ky
Do yourself a favor.... get a cordless nut driver with a 5/16 socket attachment. You might want to get a set of nut drivers that will remove rounded heads too. The cordless tool needs to provide lots of torque. You will also need a 3/8 driver and some Balistol or equivalent to loosen seized nuts.

And that center screw in the front of the control panel -- that's where the cover handle latches.... that one is always fun.

Last couple of times I went through major disassembly there was always one or two screws that I had to remove with a sawzall 'cause the screw head was rounded, and the nut was rounded and unattainable.

For reassembly I bought a tap so that I could re-tap those captured nuts. Many times the threads get a little confused when removing a heavily rusted screw.

This is not difficult to do, it just requires a lot of time and patience.

good luck
 

Guyfang

Moderator
Staff member
Moderator
15,837
21,998
113
Location
Burgkunstadt, Germany
Good comments! I never fooled with oil or penatrating oil after the 3-4 set. I simply triggered off the cordless nut driver, and broke them off. I had about a 1000 extra, everything. Screws, nuts and washers. Simpler and faster that way. When you are ready to put it back together, say something. There are a few tricks there also.
 

jamawieb

Well-known member
1,412
509
113
Location
Ripley/TN
I usually take the back half (radiator side) in one piece. Unbolt from the skid and pull that section with the radiator off. Then I leave the generator head bolted to the skid and use a 3 point puller on the back of the generator head to push the rotor out of the housing with the engine attached. This way you can leave the wires for the generator hooked up. Then you pull the motor and rotor out. Move the rotor over to the new engine and do everything in reverse. Takes about 4-6 hours to do everything.
 
Last edited:

Diesel Dogg

New member
11
5
3
Location
Twining Michigan
I usually take the back half (radiator side) in one piece. Unbolt from the skid and pull that section with the radiator off. Then I leave the generator head bolted to the skid and use a 3 point puller on the back of the generator head to push the stator out of the housing with the engine attached. This way you can leave the wires for the generator hooked up. Then you pull the motor and stator out. Move the stator over to the new engine and do everything in reverse. Takes about 4-6 hours to do everything.

I like the option of pulling the radiator end a lot better than disassembling the whole set down to the skid. I'm pulling it in the shop tonight for the tear down this weekend. I also plan to mouse proof it while in the shop, when I dug it out today there was some mouse evidence in it. Thank you for all the replies and suggestions, hopefully this is a fairly painless repair.
 

Diesel Dogg

New member
11
5
3
Location
Twining Michigan
Well. I got it in the shop tonight and started the disassembly. It went surprisingly fast and I didn't encounter any stuck screws or anything exciting. Here's a pic of the little bugger that started all the grief. Also a pic of where I am at now. Anything special I need to pay attention to when pulling the stator out of the housing?
 

Attachments

jamawieb

Well-known member
1,412
509
113
Location
Ripley/TN
Well. I got it in the shop tonight and started the disassembly. It went surprisingly fast and I didn't encounter any stuck screws or anything exciting. Here's a pic of the little bugger that started all the grief. Also a pic of where I am at now. Anything special I need to pay attention to when pulling the stator out of the housing?
You will need to unbolt the lug panel and push it to the side. Then take the center support off (inbetween the doors on the back) so you can get a puller on the rotor bearing, take the louvered cover off, take the four nuts off holding the stator (housing) to the motor, and finally just lift the motor up just a little and use the puller on the rotor to slowly push the rotor and motor out. Also need to get some scrap wood and put under the gen head housing (stator)after you lift it up a little to support it. Just be patience and it slides right out.
 

Guyfang

Moderator
Staff member
Moderator
15,837
21,998
113
Location
Burgkunstadt, Germany
Would have been easier to just take the whole thing apart. Both front and back can be lifted out in more or less one big piece. But this way will work also.
 

Diesel Dogg

New member
11
5
3
Location
Twining Michigan
I had a few minutes tonight and pulled the engine and stator out. It's a lot simpler than I had first suspected, it definitely helps to have someone run the cherry picker. The stator drive plate unbolted from the flywheel and came just as nice as could be.
 

Attachments

Diesel Dogg

New member
11
5
3
Location
Twining Michigan
Once up and running are you going to tear down the old engine and report your findings? Curious to see if you trashed a valve or what!

Yessir. My thoughts exactly. I'm very curious as to what got destroyed inside the engine. The only down side being that I don't have another flywheel to use the engine if it is indeed repairable.
 

Diesel Dogg

New member
11
5
3
Location
Twining Michigan
Well I got the engine in and fired up tonight. It's runs pretty rough and smokes quite a bit. I'm not sure if the smoke is just unburnt fuel in the muffler, or what yet. Do you guys think the running rough could just be from it being run the first time? I'd like some input from the experts on this one, I don't want to destroy another engine.

Thank you for all the help and tips so far.
 

Diesel Dogg

New member
11
5
3
Location
Twining Michigan
Well I got the engine in and fired up tonight. It's runs pretty rough and smokes quite a bit. I'm not sure if the smoke is just unburnt fuel in the muffler, or what yet. Do you guys think the running rough could just be from it being run the first time? I'd like some input from the experts on this one, I don't want to destroy another engine.

Thank you for all the help and tips
 

jamawieb

Well-known member
1,412
509
113
Location
Ripley/TN
Well I got the engine in and fired up tonight. It's runs pretty rough and smokes quite a bit. I'm not sure if the smoke is just unburnt fuel in the muffler, or what yet. Do you guys think the running rough could just be from it being run the first time? I'd like some input from the experts on this one, I don't want to destroy another engine.

Thank you for all the help and tips
It may smoke some but not a lot and it should not run rough. Are you sure the engine is a reman? Let it run about 10 mins and if its still running rough and smoking, you may have more issues.
 
Top
AdBlock Detected

We get it, advertisements are annoying!

Sure, ad-blocking software does a great job at blocking ads, but it also blocks useful features of our website like our supporting vendors. Their ads help keep Steel Soldiers going. Please consider disabling your ad blockers for the site. Thanks!

I've Disabled AdBlock
No Thanks