• Steel Soldiers now has a few new forums, read more about it at: New Munitions Forums!

  • Microsoft MSN, Live, Hotmail, Outlook email users may not be receiving emails. We are working to resolve this issue. Please add support@steelsoldiers.com to your trusted contacts.


MEP 802A Fix-up Thread

CallMeColt

Well-known member
Supporting Vendor
900
1,256
93
Location
Wilson County, Texas
Ran for 3.5 hours @ 100%. Cleaned off some of the crap built up over the years. Tested the auxiliary pump & it works great. Now to get a hookup to the house & really stretch it legs.
 

Daybreak

2 Star Admiral
Steel Soldiers Supporter
1,521
740
113
Location
Va
Howdy,

The 2nd post has links to stuff like the Infamous well nut, and Ultimate well nut, a fuel return lines...
 

CallMeColt

Well-known member
Supporting Vendor
900
1,256
93
Location
Wilson County, Texas
Well, it's been a while. I broke my foot & wasn't able to do much. Got the generator mounted onto a trailer. Not as good as the military trailer they should be on but I got it for only $400. Painted it all sand. Going to do a few more coats. I wired in & put 7 outlets on the side of the generator. 240v twist lock & 6 125v outlets. Put a generator interlock on my house & ran everything on a 104 deg day for 5 hours or so. Can't run the whole house, but the important stuff can be left on without worry over overload. A few days ago, got the trailer tags as a custom trailer so it's serviceable!

Plan to make the gap to the rear an under deck storage area for generator cables, minor tools, extra fluids, etc. Tread plate on top with a handle that opens from the rear. Also plan to mount some 40mm ammo cans up front & maybe a jerry can holder for my Sceptor MFC's. Spare tire mount will go somewhere as well.

Picked up an auxiliary fuel hose from eBay for ~$40. Put a fitting on my truck's 45 gallon bed tank to run off of when at my off grid place.

If I can find a way to do it without major work, I'm going to put 4 jacks to level it & get the tires off the ground when it's needed.
KIMG1064.jpg
 
Last edited:

CallMeColt

Well-known member
Supporting Vendor
900
1,256
93
Location
Wilson County, Texas
I'm also kicking myself in the butt.... 2 weeks ago I could have gotten an running, but in rough shape, 802A mounted on the proper trailer for $500. Doubt I'll ever get that opportunity again. I made the mistake of bringing the wife & she wasn't having it. She's usually okay with my projects but this one she said no too. Gotta let her have a win every once in a while. Figured it could have been a great parts machine & I could have gotten the proper trailer. Oh well!
 

CallMeColt

Well-known member
Supporting Vendor
900
1,256
93
Location
Wilson County, Texas
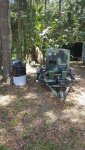
Wanted to share an update. Used it at my off grid place last weekend. 8 hour round trip towing. Ran into some issues out there.

No Fuel shutoff issue popped up again at 0330.... had to take the panel off & unplug the float switch. The new gaskets & well nut I put on the top of the tank started leaking. Then at 1030, it stalled out.... no fuel in the tank. Found the fuel return line came off & the radiator fan spread it all around the inside for me! Lovely! Got that put back on & besides a mess, it kept chugging along for another 24 hours. I had a friends friend weld some diamond plate onto the trailer for areas to stand. Some welds broke making some wonderful vibration noise! As I was packing up, I noticed another fuel leak running down the side of the engine block. Not exactly sure where it was from. Lastly, the frequency gauge started bouncing around.

I decided I was going to just remove all the covers & replace all fuel return lines, clean it up, etc. Ended up completely removing the fuel tank. Ordered the better parts for the 2 well nuts. Ordered the proper NSN 3 pack of fuel sender gaskets. Got 15ft of fuel return lines & the tees.

Came out the next day to find a little coolant where the low part of the fuel tank goes. Appears as if the radiator has a leak.... great. Started the process of removing it. I did find that an information plate of some type was left in the fan shroud area that must have hit the fan & bounced around. My best guess is the leak is from that. Also finding that whoever worked on this unit last used whatever hardware they had & some of the captive nuts are stripped. Also noticing that some parts are missing like the battery tie downs, guards, etc.

Really, really wish I just got the $500 parts machine. Would have been worth it for just the radiator, not to mention the trailer. I was only able to find one new radiator for $350, but it's not an exact bolt on as Lister Petter has so many variants of the LPW2. I'd have to fabricate proper mounting brackets.

Oh, & before I even went on the trip, one of my electrical plug boxes had the tabs snap off so it was hanging...

Wish me luck everyone! Looks as if I purchased my unit at a high price that came with the bonus of being a money pit! I'm sort of at that point of no return though.... just need to fix it 100%. In to deep to walk away.
 
Last edited:

CallMeColt

Well-known member
Supporting Vendor
900
1,256
93
Location
Wilson County, Texas
Figured I'd share some pictures of the work so far. New fuel return lines & brass tank bulkhead fittings installed. Removed radiator. You can see where the piece of metal had fun in the shroud. Filled the radiator with water & laid it out to confirm that it does leak. Will put a new thermostat in since I have it very easy to get too. Waiting on parts for the rest of stuff. Light In The Dark has a radiator for me.... may just do it anyways as I bet that his is in better shape than mine.

On the positive side, I'm able to clean everything up real well. I was able to put bolts in places they were missing to get rid of some of the rattling when the unit runs. The captive nuts are fantastic, but when one is loose it's like an annoying baby rattle that never stops.

Having a hard time getting the first fuel filter off.... looks to be the one put on in 2006. Metal is thin & it keeps bending on me!


41401643_1944048058987946_8922812338604605440_n.jpg41416251_2183790204984492_4020232029214867456_n.jpg41432498_295105324646321_1464289281898971136_n.jpg41484430_328903491012639_331644352256278528_n.jpg41393556_466877853811576_3492847600460103680_n.jpg
 
Last edited:

Light in the Dark

Well-known member
Steel Soldiers Supporter
3,522
4,964
113
Location
MA
You mean the fuel filter behind the dead crank (fuel separator)? If so, do yourself a favor and take the other side panel off that obscures it (which means taking the last roof panel off too). With the side panel off you can get the filter wrench much higher up on the can, and if needed, you can add a pipe extension to the filter wrench to get just enough torque on it to break it over. And dont forget to oil the seal before reinstallation!
 

Bmxenbrett

Member
602
29
18
Location
NY
Where is the rad leaking? There brass radiators so can be repaired prety easily.

Light in the dark is right about the spin off fuel filter in the back. Remove that pannel..everyone ever put on was put on by the hulk dry. Do your self another favor and put a liberal amount of grease on all the filter gaskets when you put new on. Doing this wall allow them to come off years down the road.
 

CallMeColt

Well-known member
Supporting Vendor
900
1,256
93
Location
Wilson County, Texas
I ended up doing exactly what you guys said but without reading you're posts. :) I used a set of huge channel locks to twist it off. Used a bunch of oil on the gasket.

New thermostat installed.

Radiator dropped off to be cleaned, rodded, & patched. Hopefully will have back Monday.

Put the fuel tank back in & finished up fuel return lines. Made a few changes along the way to keep the line more secure & will take some pictures to share later.

Oil changed & new filter.

Tapped all the captive nuts that someone previously put self tapping screws in. All came out good.

Changed my electrical boxes to metal & am re-mounting more securely since I have to top off on that side now.

Installed one of the battery tie-downs.

Did a few minor things to reduce the rattling when it's running.

Not happy about having to do all the work, but at least it will be good to go for a long while after it's all done. Hoping that I get the radiator back so I can have everything back together by next week.
 

Guyfang

Moderator
Staff member
Moderator
15,686
21,630
113
Location
Burgkunstadt, Germany
Looks good.

Picture #1. The tank hold down bolt. Underneath the bolt is supposed to be a plastic "foot" to keep the bolt from vibrating a hole through the plastic tank. If the foot is missing, find a scrap piece plastic, and put it under the end of the bolt.

Keep up the good work!
 

CallMeColt

Well-known member
Supporting Vendor
900
1,256
93
Location
Wilson County, Texas
Looks good.

Picture #1. The tank hold down bolt. Underneath the bolt is supposed to be a plastic "foot" to keep the bolt from vibrating a hole through the plastic tank. If the foot is missing, find a scrap piece plastic, and put it under the end of the bolt.

Keep up the good work!
Looking at it, I figured there should be something there. I have some scrap 1/2 thick plastic that I will fabricate into a 2x2in foot with a recessed part for the bolt to hold it in place. Thanks for the heads up!
 

CallMeColt

Well-known member
Supporting Vendor
900
1,256
93
Location
Wilson County, Texas
So, got the radiator back. They cleaned out the inside & patched the hole. It was nasty in there!

Started the install hoping to have it together in a few hours..... didn't happen.

When they removed the tanks to clean it & put the radiator back together, it must have all shifted a bit. I'm sure the body panels all shifted a bit with everything removed too. Now the bottom brackets don't line up right making it not sit flush with the opening. They're not even close... maybe 1 inch off. Not the end of the world, but it is causing the shroud for the fan to hit just a bit. After taking it in & out a few times, I decided to call it a night. Already had a frustrating day at work. Contemplating leaving the shroud off or hacking off the lower mounting points then just figuring out a different way to fasten the lower part down.

I did fill the fuel tank & let the pump prime everything up for a while. Forgot the attach one of the hoses back up (like I knew I would) from the first filter to the second one. After some yelling, I managed to get a wrench in place to tighten it up even though all the panels around it were back on. No leaks anywhere so it seemed. Nothing from the tank even after moving the trailer around a bit. Did a few harsh stops with the tractor to see if the gaskets or anything would leak as they did before & I didn't see anything. At least that all seems well!
 

Guyfang

Moderator
Staff member
Moderator
15,686
21,630
113
Location
Burgkunstadt, Germany
All TQG' have this problem. When re assembling them you often need to loosen things up a bit, get everything centered, and then hand tighten all the screws, before running them down. For the top covers and doors, I often used 4-5 old punches, I ground down a bit. Then put the top on, shove the punches in, in a few places all over, top center my million holes. Then screw all the screws in, before tightening them.
 
Last edited:

Light in the Dark

Well-known member
Steel Soldiers Supporter
3,522
4,964
113
Location
MA
I just got done with a front oil seal replacement on an 802... I left the entire front end together and just unbolted along the bottom edges and slowly took the entire radiator end out in a single piece. I feared with the sheer amount of fasteners, that misalignment was almost assured. Glad I did it that way.

f4e21ef977b789fd19294b3be4273273ae2bff85-1.jpg254ba4722a8bc77641c6a3ab14ebcc7364096b70-1.jpg
 
Top
AdBlock Detected

We get it, advertisements are annoying!

Sure, ad-blocking software does a great job at blocking ads, but it also blocks useful features of our website like our supporting vendors. Their ads help keep Steel Soldiers going. Please consider disabling your ad blockers for the site. Thanks!

I've Disabled AdBlock
No Thanks