Where do i get a replacement and which panels must come off to replace them?If anyone has a set that leaks when its moved or when its filled up to the brim, the fillerneck/tank rubber is rotted.
-
Steel Soldiers now has a few new forums, read more about it at: New Munitions Forums!

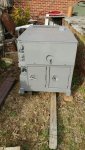
MEP-802A fuel tank removal.
- Thread starter campwell
- Start date

More options
Who Replied?- 18,136
- 27,237
- 113
- Location
- Burgkunstadt, Germany
On the side of the skid.Is this below the fuel tank on the tank itself, or the petcock on the side of the skid? Thanks !
I did find one leaker that had a nut under the tank, between the tank and bottom of the gen set. Vibrations wore it through. The unit waited so long for a tank, they took the set down range again, (where the problem started to begin with!) and stole a tank from someone else. So that tells you how many tanks the army bought!
kb3bf
Member
- 127
- 2
- 16
- Location
- Howard County Md.
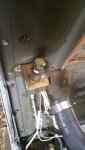
4 hours into the panel teardown of my 802A, I am taking a break from the fuel tank removal. It is also raining here in the Mid-Atlantic region and of course I am outside (under a under a large picnic tent).
I found a couple likely leaks starting with the drain line fitting and several fuel lines that may explain the difficult start ups. At this point I can only slide the tank sideways, not up and out, so there is more panel removals to be done. I am trying to see if everything has to come off around the fuel tank or there is only the back sloping panel left to remove.
The Radiator has been removed and required a good cleaning inside and out. The is no question where this generator has been (year 1994, 1500hrs) as there is sand, and sand mud pies, soaked in old fuel and oil.
The fuel tank needs a major clean up job too since there is a 1/8" layer of sludge and some scattered hardware (from the float?). The rubber collar at the inlet neck is completely rotted so I need to do some searching and hope to find a replacement source.
At least I know at one point I was able to fire up this generator. That gives me some hope in continuing with the repairs, as long I don't screw things up.
Last edited:
kb3bf
Member
- 127
- 2
- 16
- Location
- Howard County Md.
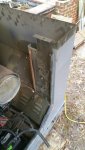
Ok I got the fuel tank out of the 802A after some 6hrs of tribulation having to deal with frozen hardware.
But what is that long bar under the left side skid that prevents the last two panel bolts from being removed? There is no similar rod on the right side and I had to bend the left side panel out of the way without removing it to free the tank because I could not fit a socket wrench to remove the last two bolts.
After some good scrubbing I have a brand new looking fuel tank. I now have to decide what to do with the rear tank drain plug. Plug it up permanently or figure out how to make a good seal?
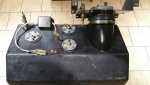
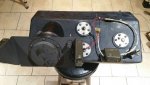
The rest of the sensors and floats look fine. I am replacing all small hardware with SS due to the many damaged and stripped screws. I am not reassembling the panels for now until all seems to work OK.
Is 6hrs a reasonable time to remove the fuel tank for first time around, considering the hardware issues
But what is that long bar under the left side skid that prevents the last two panel bolts from being removed? There is no similar rod on the right side and I had to bend the left side panel out of the way without removing it to free the tank because I could not fit a socket wrench to remove the last two bolts.
After some good scrubbing I have a brand new looking fuel tank. I now have to decide what to do with the rear tank drain plug. Plug it up permanently or figure out how to make a good seal?
The rest of the sensors and floats look fine. I am replacing all small hardware with SS due to the many damaged and stripped screws. I am not reassembling the panels for now until all seems to work OK.
Is 6hrs a reasonable time to remove the fuel tank for first time around, considering the hardware issues
Last edited:
kb3bf
Member
- 127
- 2
- 16
- Location
- Howard County Md.
Chrispyny,
I have taken pictures on my cell (and they should be reasonable quality since it is a Note4 phone), but being new to the Forum I don't know yet how to upload them. Can you or someone advise what would the best way to handle this? Let me know. I would be delited to share them.
I have taken pictures on my cell (and they should be reasonable quality since it is a Note4 phone), but being new to the Forum I don't know yet how to upload them. Can you or someone advise what would the best way to handle this? Let me know. I would be delited to share them.
This site requires you to upload the pictures to its servers, then move them to each of your posts.Chrispyny,
I have taken pictures on my cell (and they should be reasonable quality since it is a Note4 phone), but being new to the Forum I don't know yet how to upload them. Can you or someone advise what would the best way to handle this? Let me know. I would be delited to share them.
It may be easier to upload the pics to your desk top and go from there. You can certainly try to do it from your phone.
When posting, and adding pictures, first click on ' go advanced', then scroll down to the additional options tab, and click on manage attatchments. Then upload your pics by following the instructions, then click on each picture, drag and drop to the post, and submit. Like i said, it is easier with a desktop or even ipad.
Or you can email me them and i'll put up what looks helpful.
My email is xxxurobikxxx@hotmail.com. Just remove all the x's.
Thanks
Also, i dunno if 6 hours is normal to pull a tank. I can say for sure if I have to pull the tank to replace the rubber filler neck, or get to the lower tank drain to seal it, and spend 6 hours just to pull it, i might just let it leak!!!
Last edited:
Posting up some pics for our fellow member.
Attachments
-
 29.7 KB Views: 124
 -
 53.5 KB Views: 125
 -
 43.5 KB Views: 123
 -
 47.3 KB Views: 119
 -
 38.9 KB Views: 126
 -
 32 KB Views: 119
 -
 50.5 KB Views: 123
 -
 51 KB Views: 130
 -
 41.3 KB Views: 127
 -
 75.5 KB Views: 123
Last edited:
Korgoth1
New member
- 191
- 6
- 0
- Location
- radford, va
No tank removal necessary for the leaks, only the front panel needs to come off (the one the fill neck attaches to) not to hard. I got a rubber pipe adapter from lowes(3in to 4in I believe) It was not direct fit(I could not find anything standard that would work) I cut it in half, boiled it, and worked it on still hot, tightened the hose clamps the way you do waterline. It worked out perfect.Where do i get a replacement and which panels must come off to replace them?
With the cover off you can inspect the floats, loom up wires, and change the rubber line out that can't normally be reached. Good to go for another decade or two.
Last edited:
- 18,136
- 27,237
- 113
- Location
- Burgkunstadt, Germany
KB3BF,
Ya done good. Unless you do this all the time, 6 hours is good time. You will be a generator mechanic before you know it. Take the time to look at EVERYTHING. You have invested 6 hours in the teardown, so you should not let it go to waste. Take more pictures and post them. Maybe one of these eagle eyed guys will see something else you need to look at. I saw that the primary fuel pump looks like it needs a new plug. Or or you can buy new pins and repair the old one. When the pumps come new, they come WITHOUT plugs. I would just buy a male and female plug that you happen to like and replace both ends.
Ya done good. Unless you do this all the time, 6 hours is good time. You will be a generator mechanic before you know it. Take the time to look at EVERYTHING. You have invested 6 hours in the teardown, so you should not let it go to waste. Take more pictures and post them. Maybe one of these eagle eyed guys will see something else you need to look at. I saw that the primary fuel pump looks like it needs a new plug. Or or you can buy new pins and repair the old one. When the pumps come new, they come WITHOUT plugs. I would just buy a male and female plug that you happen to like and replace both ends.
kb3bf
Member
- 127
- 2
- 16
- Location
- Howard County Md.
Thanks for the encouragement and help in posting the pictures. I'll add more during the reconstruction phase which will be when I have some free time off from my regular job.
I want to make sure I don't miss anything so if anyone has comments and advice please feel free to interject them here. While I do some car and engine work myself (I had a Mercedes 240D for some 25 yrs) I am an electrical engineer and I feel more comfortable with the electrical aspects of the generator. Nevertheless it's been a good learning curve to do this complete tear down while addressing the leaks, I am also cleaning up the mess on the generator floor and checking everything else for possible problems.
I want to make sure I don't miss anything so if anyone has comments and advice please feel free to interject them here. While I do some car and engine work myself (I had a Mercedes 240D for some 25 yrs) I am an electrical engineer and I feel more comfortable with the electrical aspects of the generator. Nevertheless it's been a good learning curve to do this complete tear down while addressing the leaks, I am also cleaning up the mess on the generator floor and checking everything else for possible problems.
kb3bf
Member
- 127
- 2
- 16
- Location
- Howard County Md.
I forgot to ask, does anyone know if I should use any type of sealants when mounting the sensor covers back on the fuel tank, or rubber on rubber should suffice with the compression of 5 screws? What about the rear fuel drain port?
- 18,136
- 27,237
- 113
- Location
- Burgkunstadt, Germany
I would not use sealants. The cork gaskets work well if you still have them and they are in good shape. If not, you can get gasket material and make your own. IF you do use sealants, make sure they are meant to be used with Diesel fuel. The military uses JP-8 fuel for everything from rotor wing aircraft, tanks, trucks and generators. The JP-8 turned Black RTV into silly putty. I don't know how it reacts with diesel. Do not over tighten the screws. Snug is good. Look at the rubber compression plugs that fit into the tank. see if they are torn, or if they work at all. Over Tightening these plugs tears the imbedded nuts in them loose and the plugs will not get tight. When you say rear drain port, what do you mean? There is a side fuel tank drain petcock. Is that what you mean?
kb3bf
Member
- 127
- 2
- 16
- Location
- Howard County Md.
Hi Guyfang,
the cork gaskets are mostly ok but one of them is split in half and the rest have separated.
I did get some Permatex gasket sealer that is diesel fuel and oil tolerant, and used very little of it just to hold them in place.
I agree on not tightening the screws too much and luckily no nuts are loose.
Yes I was referring to the drain petcock but I did not see the need for any sealant there.
OK I am ready to pressure test the whole tank at about 3 psi and see if it holds the pressure. If it does I can start the reassembly.
Last edited:
- 18,136
- 27,237
- 113
- Location
- Burgkunstadt, Germany
Sounds good!We are going to make you a generator mechanic yet!!
Talk to you in the morning. Its 22:42 and my wife is yelling at me to come lay down.
Talk to you in the morning. Its 22:42 and my wife is yelling at me to come lay down.
kb3bf
Member
- 127
- 2
- 16
- Location
- Howard County Md.
fuel tank overhauled
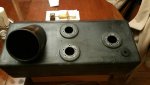
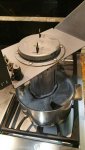
I was able to pressure test the fuel tank at 3-5 psi and it hissed air at the fueling cap, but nowhere else. So now I can start rebuilding the generator. I am grateful for the advice given about using a FERCO 3" to 4" adapter to seal the fuel inlet to the tank. The original one was torn in two pieces.
The adaptor had to be trimmed 2", 1" at each end and it had to be "boiled on" in order to get it to stretch. See images.
I know the rubber used is not diesel rated, but hopefully it will buy me time until I find an original part.
At least now I don't have to mess with frozen and rusty hardware, since I am replacing all 5/16 screws/nuts with new SS.
Attachments
-
 41.5 KB Views: 93
 -
 36.6 KB Views: 98
 -
 40 KB Views: 88
Last edited:
kb3bf
Member
- 127
- 2
- 16
- Location
- Howard County Md.
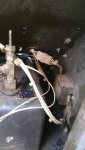
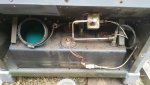
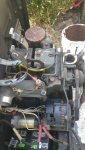
Enclosed is an image how I pressure tested the fuel tank.
In preparation for the rebuilding, I flushed the radiator and engine coolant.
Just to play it safe I covered the exhaust port since it was too close to the water thermostat opening and i did not want to pour it accidentally in the wrong place.
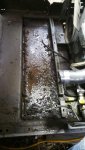
Having removed most of sludge on the generator floor I found out most of the paint is gone too.
In preparation for the rebuilding, I flushed the radiator and engine coolant.
Just to play it safe I covered the exhaust port since it was too close to the water thermostat opening and i did not want to pour it accidentally in the wrong place.
Having removed most of sludge on the generator floor I found out most of the paint is gone too.
Attachments
-
 55 KB Views: 81
 -
 69.3 KB Views: 80
Last edited:
kb3bf
Member
- 127
- 2
- 16
- Location
- Howard County Md.
No tank removal necessary for the leaks, only the front panel needs to come off (the one the fill neck attaches to) not to hard. I got a rubber pipe adapter from lowes(3in to 4in I believe) It was not direct fit(I could not find anything standard that would work) I cut it in half, boiled it, and worked it on still hot, tightened the hose clamps the way you do waterline. It worked out perfect.
Korgoth1,
I did exactly what you said down to the boiling and it worked. Many thanks for this valuable tip. You can see the FERNCO 3by4 coupler in the images and comments in my latest postings.
Kb3bf
Last edited:
Howdy,
Since you are finding things which are deteriorated. I would suggest you also replace all the fuel return lines.
MEP-803A + MEP-802A Filters Information
MEP-8xx fuel return lines
24v charging thru slave port
Remember, the convenience plugs are 10 amps only. Best to use the main lugs. I would have something around which you could put some load on your unit.
- 114,254members
- 167,171threads
- 2,353,467posts
- 5,773online users