• Steel Soldiers now has a few new forums, read more about it at: New Munitions Forums!

  • Microsoft MSN, Live, Hotmail, Outlook email users may not be receiving emails. We are working to resolve this issue. Please add support@steelsoldiers.com to your trusted contacts.

MEP-802a rotor removal

serial14

Member
101
11
18
Location
Albuquerque, NM
I'm working on replacing the engine on my 802 which requires a full tear down of the generator. I've gotten everything taken off but am stuck at the stage of removing the rotor from the fly wheel. I've been working on getting it removed for several days now and have used copious amounts of PB Blaster to help loosen up any rust/dirt that maybe in the joint with no success. I've read the TMs, I've searched SS, and I've looked at lots of tear down photos and I don't think I'm missing anything on how its supposed to come apart( 5 bolts on adapter plate ).

All of the parts on the generator are in pretty good shape, not much rust, paint and coating on the rotor is still in tact. Naturally there is coat of moon dust across everything from is previous life, so I'm baffled on what could be locking it up so badly.

Does anybody have any tricks or suggestions?
 

Guyfang

Moderator
Staff member
Moderator
15,979
22,369
113
Location
Burgkunstadt, Germany
Dead Blow Hammer is what I call a plastic sand filled hammer. I am but a simple generator mechanic, who is losing his english skills slowly but surely.
 

Guyfang

Moderator
Staff member
Moderator
15,979
22,369
113
Location
Burgkunstadt, Germany
Scan0001.jpg

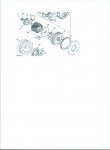
When you say generator head, Just what part are you talking about? Item Item 42? Item 25? Because I have never had a real hard time with the disassembly of a MEP-802A main gen. Yeah, sometimes we had to tap it a bit. And yes, you can use heat. I have used a heat-shrink gun to warm things up. Just not cook it. But have never had all the problems you are having.
 

serial14

Member
101
11
18
Location
Albuquerque, NM
Guyfang, in your picture I can't get part 25 to separate from part 42. I have removed bolts 16.

I haven't tried heat yet because I don't see a good way to get heat to the area of the fly wheel that I need. Additionally there is soo much fly wheel mass my thought is that 1, it'll take for ever to heat up and 2, heat will also get transfered into part 25 just as much as 42 and not give me the sizing differential I'm looking for.
 

Guyfang

Moderator
Staff member
Moderator
15,979
22,369
113
Location
Burgkunstadt, Germany
I had this problem with other sets, but never the MEP-802A. 60 KW's mostly. What we did was to rig up a sling on the exciter rotor. Suspend the whole thing about 2-3 inches above the floor. Put two pieces of plywood and some cardboard under the main gen rotor. Then screwed in an old bolt and washer into the shaft. Heated up a bit around the shaft. Then took a brass drift and a dead blow hammer and hit the bolt a few times. My boss told me to "Let gravity do the hard work boy, not your arm." We normally had 4-5 people around to control the main gen rotor if it came out a little too fast. A 60 KW rotor weighs just a tad more than a MEP-002A. We used some WD-40 on it the night before. Just left it hanging from our A-Frame in the shop. Dont know if the WD-40 helped, but sure cant hurt. Why are you removing the Exciter rotor? Is it defective?
 

serial14

Member
101
11
18
Location
Albuquerque, NM
guyfang,

I'm doing all this to replace a bad engine with a rebuilt one. I didn't anticipate all this trouble.

I currently have a strap around the main rotor section( not the exciter rotor ) and have lifted up the whole thing( rotor, motor, skid ) to try and let gravity do the work. It hasn't been successful yet, but I also haven't left it like that for a long amount of time. I can rig it up to do that though. It has been soaking in PB-Blaster for over a week now with out much success as well.

Your comment about the bolt and drift is an interesting one. I'm not picturing it very well. Are you talking about bolt 16 in your picture above? and thus hammering the flywheel away from the adapter plate? Also what shaft did you apply heat to?

On the 802 rotor we see a threaded hole on the end of the shaft where the end bearing is, we were thinking of sticking a bolt in there and attaching a slide hammer to it so that we could hammer the hole rotor away from the fly wheel.
 

Guyfang

Moderator
Staff member
Moderator
15,979
22,369
113
Location
Burgkunstadt, Germany
Let me see if I have this right. The motor is still attached to the main AC rotor? Please take a picture and send it to me.

I think we are on the same street, but going in opposite directions.

You want to take the main gen off the old engine, and put it on another rebuilt engine. Right? If so, there was no need to remove the main gen. If all you want to do is separate the main AC from the engine, and you have taken out the bolts, (Item number 16 in the pictures) then you have to remove 5 bolts, (item 39 in the picture) that are hidden between the fins of the flywheel. They are a pain to get at, but doable. Then you can remove the bolts, (Item 32) that hold the flex plate, (Item 35) from the rotor shaft.

We always put wood blocks under the main gen, removed the bolts and pulled it apart. No need to fool with the main gen. It can stay mounted on the skid base. Are we closer to what you are trying to do?
 
Last edited:

serial14

Member
101
11
18
Location
Albuquerque, NM
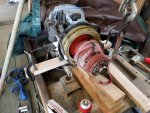
Here is a picture of the situation. The problem is the red plate won't come out of the tan fly wheel. All 5 bolts holding the red plate into the fly wheel have been removed. genRotor.jpg
 

Guyfang

Moderator
Staff member
Moderator
15,979
22,369
113
Location
Burgkunstadt, Germany
Now I understand.

Well, like I told you in post # 11, you can remove the flywheel and rotor, from the engine, without removing the Drive Disc, (red plate) from the Flywheel. That would make this job easier. If all you want to do is change motors, then that's what I would do. Separate the flywheel from the engine. Check the main bearing, (item 20) to make sure it's still good, and then put the main gen back together again, and attach it to the new engine.

Or, if you just have to remove the drive plate from flywheel:

Have you tried removing the bearing, (item 20) and then whooping on the shaft with your dead weight hammer? And (even better) after removing the bearing, I would remove the exciter rotor, (item 23). That way you have lots of shaft to whoop on, without fear of doing any damage. Use caution to ensure the rotor does not fall and get screwed up. After all this hassle, you would probably flip out and jump off the roof.

I have never in 28 years of repairing gen sets, seen a drive plate not separate from the flywheel. There is absolutely no reason that they should not come apart. Since there is no mechanical reason, then there can only be:

1. Someone has used some kind of adhesive, or:

2. The drive plate is not the right one. The drive plate for the 400 hertz is a bit bigger, I think. But I am going from memory, of seeing one about ten years ago. This cant be a 400 hertz main gen, cause the flywheel is too large, hence, its a 60 hertz main gen. There is no earthly reason these two parts should not come apart after removing all 5 bolts, (item 16) from the drive plate. None.

After looking at this picture for the 500th time, I wonder, if it's the paint? I have never seen a drive plate painted. Never. Always bare metal. Could the paint have something to do with the problem? You said the engine was bad. Did it overheat? Run with little or no oil? I sure wish I was there. This sounds interesting. But it ain't getting your gen set fixed.

Right now, if you just have to separate the drive plate from the flywheel, the I would follow the suggestions listed above. If you don't want to do that, then just remove the flywheel from the engine. It's the fastest way, with the least possibility of damaging something. If you do remove the flywheel from the engine, use new bolts to put it back together. Grade 9, (I think). Torque them up by the book, dry, not wet.

Please close the loop on this. I am very interested.
 
Last edited:

serial14

Member
101
11
18
Location
Albuquerque, NM
The whole goal is to replace the engine so I don't really care about all the other stuff. That being said, I re-read your comment about just removing the flywheel and I'm not seeing how that is possible on the 802. According to pictures and the manuals I've looked up on the 802, you can't get bolts #39 that attach the flywheel to the crank shaft of the engine until you remove the drive plate. The air fins on the fly wheel look down on to the drive plate, not down into the crank shaft mounting surface. Am I missing the trick?

I can't for the life of me figure out why it won't come off either. I came to the same conclusion as you that there must be some "adhesive" action going on. Perhaps from the paint? I also wonder about the drive plate. It looks to be made out of 1/8" steel plate and it also looks like its a tight fit into a machined surface on the fly wheel, so could it be binding from adhesive, paint, dust, rust, etc? With how much I've beat on the thing with out a single bit of movement I'm really starting to wonder.

My current thought/plan is to get my slide hammer on the end of the rotor and apply hammering force that pulls the rotor directly out and away from the fly wheel. I haven't done it yet, but maybe that different force vector would help out.
 

Guyfang

Moderator
Staff member
Moderator
15,979
22,369
113
Location
Burgkunstadt, Germany
You can try the slide hammer. It should work. But once again, I think I would remove the bearing and exciter rotor, to keep them from being in the way, or damaged. You can get by without doing it, but got to be a bit careful.

I haven't done this procedure since about 2008 or 2009. but for the life of me, I seem to remember getting out the bolts, (#39) out by inserting a wrench in between the fins and turning out the bolts. Its a PITA.

Or am I mixing this up with another gen set? If so, then that only leaves the slide hammer, or the dead fall hammer, with the exciter rotor removed, and beating on the shaft.

Putting the drive plate into the flywheel and taking it out was never, ever, a problem. This simply baffles me. Normals tapping it one or twice with a dead weight hammer was enough.
 

serial14

Member
101
11
18
Location
Albuquerque, NM
Well once I get the time to try the slide hammer I'll report back.

In looking at my rotor, I'm not seeing how the exciter coils or mail coils would slide off the main rotor shaft. I also don't see any pictures in the manual referencing that. Is that something the bigger gensets let you do but not a 802?
 

jamawieb

Well-known member
1,413
514
113
Location
Ripley/TN
Guyfang may be thinking of the 002a which you separate the rotor from the flywheel like he is explaining. But on the 802a, the plate and rotor have to be removed, to gain access to the flywheel bolts. I'm also interested in knowing the reason why yours wont separate, so keep us posted.
 

serial14

Member
101
11
18
Location
Albuquerque, NM
I had a few moments today in the shop to give it another try. Got the slide hammer setup with a 3 jaw puller and put that over the bearing on the end of the rotor. The whole thing put up a fight, but I at least got the bearing off which needs to be replaced anyways. Still no movement at all from the rotor coming loose from the fly wheel. With the bearing gone, I'll now have thread in a bolt to the rotor and pull on that.

I'm at a pretty big loss for more ideas. Maybe add some heat incase there is an adhesive behind the plate when there shouldn't be? I'm starting to think about giving up on this genset and start tearing down my other one that truely has a bad engine. MAYBE it'll come apart easier and I can rebuild using cherry picked parts form both sets.
 

Guyfang

Moderator
Staff member
Moderator
15,979
22,369
113
Location
Burgkunstadt, Germany
There is no earthly reason for that rotor to not separate from the engine. None. There has to be some kind of adhesive holding it together. Now that you have the bearing off, take the exciter rotor off. Wrap a bunch of rags around the shaft, put a bunch of cardboard under the main gen rotor, and use a BFH on the shaft. I don't see any other way. I have done this procedure any number of times, and never had anywhere the problems you have.
 
Top
AdBlock Detected

We get it, advertisements are annoying!

Sure, ad-blocking software does a great job at blocking ads, but it also blocks useful features of our website like our supporting vendors. Their ads help keep Steel Soldiers going. Please consider disabling your ad blockers for the site. Thanks!

I've Disabled AdBlock
No Thanks