• Steel Soldiers now has a few new forums, read more about it at: New Munitions Forums!

  • Microsoft MSN, Live, Hotmail, Outlook email users may not be receiving emails. We are working to resolve this issue. Please add support@steelsoldiers.com to your trusted contacts.

MEP 8XX wiring question

jimbo913

Active member
280
33
28
Location
Maryland
I am preparing my 803A for service and my plan is to connect a 15'-20' flexible power cord extension to it for connection into my outside power box, which feeds my main. I am looking at using Carol wire jacketed SOOW 4/4 stranded power cord which is rated for 60A.
My question is, will the lug nut design of the MEP power panel work with stranded wire or will it damage it as the nuts are tightened? Most installs I see are using solid wire, so hoping someone has successfully used stranded wire.
 
Last edited:

DieselAddict

Well-known member
Steel Soldiers Supporter
2,486
1,890
113
Location
Efland, NC
You can use it successfully if you are careful with installing it. The main thing is to keep it from getting in beside the shoe of the lug as you tighten it down. I give mine a good twist to control the fine wires of the cable. This makes sure you will get it under the shoe of the lug. The type of lug used on the MEP generators has a long shoe that comes down flat and not a screw that twists down onto the cable. Never use flexible cable with a lug that has a screw that twists down onto the cable. Those won't work.

If you want extra protection or you expect to be connecting and disconnecting the wire regularly it is best to use a flexible wire adapter that will crimp onto the end of the SOOW conductors and provide a more rugged connector pin to put under the lugs. You will need to have someone with the specialized crimper install them for you.
 

Daybreak

2 Star Admiral
Steel Soldiers Supporter
1,521
741
113
Location
Va
Howdy,

It really depends on whether you are mounting the generator to be permanent. If that is the case, you would then use conduit and get #6 THHN.

If you will only connect it to the power inlet, then I would suggest a few methods. Tin the ends... or you could look over the various Anderson Fusion Solder Style ends. They come pre-filled with the solder, you simply high-heat them and put your stripped cable in.

On a larger generator cable set I use 2/0 welding wire with the Anderson SB350 connectors
2011-10-20_13-59-14_40.jpg
 

jimbo913

Active member
280
33
28
Location
Maryland
Mike,

How large before you use the 2/0? I have that sitting around but it would be overkill in this application. I thought about putting tin on the ends and that is what I might do. Down the road I might hard wire it if I add in an auto start/transfer kit.
 
Last edited:

Daybreak

2 Star Admiral
Steel Soldiers Supporter
1,521
741
113
Location
Va
Mike,

How large before you use the 2/0? I have that sitting around but it would be overkill in this application. I thought about putting tin on the ends and that is what I might do. Down the road I might hard wire it if I add in an auto start/transfer kit.
Howdy,
The 2/0 wire and Anderson SB350 ends are for my 30kw Tiger Power PTO generator.
30kw tiger pto.jpgTransconnect m26.jpg The sb350 pair plugs into this box here, which is a complete transfer switch at the main meter.
 

jimbo913

Active member
280
33
28
Location
Maryland
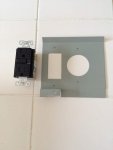
IMG_3975.jpg
Parts are starting to trickle in. This is the face plate for the 60A outside panel box. Here you can see I milled out for a 120V receptacle which will be used to power a 24v trickle charger when the generator is in standby.


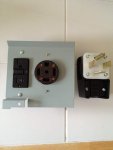
IMG_3976.jpg
Here I have the 120V and 120v/240v plugs mounted with the mating 60A connector on the side.


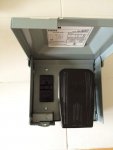
IMG_3977.jpg
Here the 60A plug is inserted.


I already purchased 6' of 12/2 (w/ground) and 6' of 6/3 (w/ground) to go from the service panel to this outside connection box, and I expect the 20' 4/4 stranded power cord for the generator to arrive later today. I should be operational very soon.

For the short term I will keep the generator on the trailer until I get around to pouring a slab for it. I have some minor grading to do and I need some gravel, etc. so that project is likely to be on my late summer/early fall to-do list.
 

jimbo913

Active member
280
33
28
Location
Maryland
Someone pointed out that this could be a dangerous setup since the connector from the generator is male, and I agree it could be dangerous. I am basically only using the generator when connected to the outlet so the issue of live male terminals is not really a big concern for me but I figured I would pass the concern along so it is considered before anyone would copy the setup. This is likely a temporary setup for me because if I am happy with the unit I will probably buy the auto start kit and have an auto transfer switch professionally installed.
 

jimbo913

Active member
280
33
28
Location
Maryland
I think that I will 3D print an insulative plug cover with eyelet for fixed connection to the cable. May also add a laminated tag with caution note stating to install plug end cap whenever disconnected from electrical panel box. All this should serve as a reminder and provided the end cap is in place it should be safe and protect the prongs from corrosion.
 

jimbo913

Active member
280
33
28
Location
Maryland
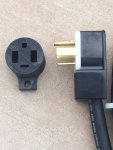
IMG_4012.jpg
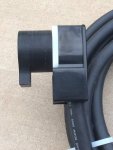
Here is the 3D printed plug cover, which will be installed whenever disconnected from the inlet box.

IMG_4011.jpg
And here it is attached. It fits perfect and only locates on the ground and neutral for added safety even though it is non-conductive.

I am still looking around for a nice lanyard, as I know I have one somewhere.
 

Chainbreaker

Well-known member
1,750
1,845
113
Location
Oregon
Nice job with the 3D printed plug. Just out of curiosity...what printer did you use and what material?

The more items I see printed the more inclined I am to invest in one. I just may have to put a 3D printer on my Christmas wish list :D
 

jimbo913

Active member
280
33
28
Location
Maryland
I had a friend print is using a rather expensive commercial grade printer which is a few years old, but you could likely print the same quality with some of the newer homeowner printers on the market <3k. Don't forget that you need to model the part in 3D before printing..

In my case I made a 2D dimensional drawing of what I wanted and my friend transferred it to 3D. There are companies who will print items at a reasonable cost if you can supply the 3D model. The material is ABS.
 
Top