• Steel Soldiers now has a few new forums, read more about it at: New Munitions Forums!

  • Microsoft MSN, Live, Hotmail, Outlook email users may not be receiving emails. We are working to resolve this issue. Please add support@steelsoldiers.com to your trusted contacts.


MEP802A Rollin Coal - Needs Stator

428gearhead

Member
15
52
13
Location
Martinsburg WV
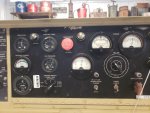
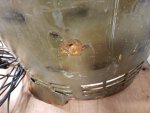
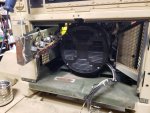
I have been working on a 2002 MEP802A purchased from the GovPlanet auction. Original symptom was no generator output with the engine running. I dug into the exciter circuit, and found the crankshaft sensor was backed out of adjustment. After adjusting to spec, the generator "excites" and immediately bogs down the engine to the point of almost stalling. I removed all stator wires from TB3 to isolate between the generator and any downstream problems but the problem persists. I can start the engine without exciting the generator and it runs fine.

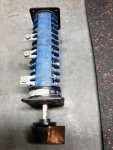
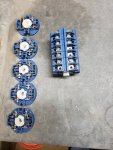
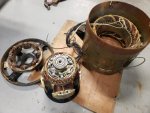
I have continuity between the correct pairs of stator leads, and no continuity between any others or any lead to ground. However, I definitely have a stator problem...
20221201_113440.jpg20221201_113537.jpg

Has anyone had a stator repaired, or does anyone know where to source one at a fair price?

I'm sure there is more to this story, but this is the headliner for now.

Thanks
 

Ray70

Well-known member
2,375
5,081
113
Location
West greenwich/RI
Forget trying to have it repaired, probably cheaper to buy a spare generator!
I have a used stator I could sell you.
Looks like you have insufficient posts to be able to send a private message yet, so speak up if interested and I will contact you.
Before you buy anything you should pull it apart and inspect the rotor as well. ( I have both if needed. )
And at a min. find out what caused the problem.
 

428gearhead

Member
15
52
13
Location
Martinsburg WV
Something I forgot to mention - wires #6 and #9 were reversed on TB3. Maybe the culprit?

I will dig deeper and update. So far the stator is top of the shopping list. Unit is clean, has 300 hours and a reman engine, so it will probably be a good one to repair.

Ray, yes, please reach out with more information.

Thanks
 

kloppk

Well-known member
Steel Soldiers Supporter
1,966
3,060
113
Location
Pepperell, Massachusetts
Having wires 6 and 9 reversed would cause the windings in the stator to be incorrectly configured.

All that current would have passed thru the contacts of S8 the phase voltage switch possibly welding some of its contacts together. It's tedious but you'll want to test S8 to verify all contacts in it open and close properly before firing it up with a replacement stator installed.
 
Last edited:

428gearhead

Member
15
52
13
Location
Martinsburg WV
Well, I finally had a little time to work on the 802A. I was able to secure a pair of complete generator units from GovPlanet. I found out after the fact that both have green unservicable tags (thanks GP for not including pictures of them in the auction) Fortunately, one of the units is very clean and tests OK. It took a round in the outer case, so I would guess thats why it was removed and sent to the repair depot. The other has a burned stator, so now I have two like that.

I was able to replace the stator and rotor through the end of the case without too much trouble. I will post an update when I get it back together and check S8.
 

Attachments

428gearhead

Member
15
52
13
Location
Martinsburg WV
They were crated, so I would have given them a pass. Fortunately it was only a flesh wound lol.

My issue was the fact that there were unserv tags in the bottom of each crate. The pictures of the contents were taken at an angle that did not show the tags, though they were in plain view when you looked inside. I did let them know that I felt it was unethical in not disclosing the relevent information on those tags.

Lesson learned - thoroughly inspect your purchase and let the loading employee know if there is an issue before you leave the premises.
 

428gearhead

Member
15
52
13
Location
Martinsburg WV
I decided to disassemble S8 to inspect and clean its contacts. These switches are rebuildable, but its best to avoid distraction while doing so. There are several different cam and contact configurations to contend with. Hold on to your "bad" switches as they are a potential source of parts to repair another.

Fortunately, only one set of contacts were mildly burned, and I was able to file them smooth. Another option would have been to borrow parts from one of the unused contacts. After reassembly, I tested continuity in all switch positions per the TM schematic.

Is was more trouble to R and R the switch than it was to repair it.
 

Attachments

428gearhead

Member
15
52
13
Location
Martinsburg WV
Stator replacement was successful and we are now making power. All modes of operation show good on the guages and my meter agrees, with one exception.

I have to disclose that I incorrectly installed a jumper between position 25 and 29 on S8. The gremlin revealed itself when I switched to single phase mode, so I caught it quickly and shut the unit down. The only consequence was a small puff of smoke from one of the resistors and L3 - L0 does not show voltage on the guage when S6 is set in that position. A small price to pay...

Now to button things up and load test.

I have an old air handler with an electric heating coil laying around, but it will draw too much current. I haven't opened it up yet and was wondering if anyone has "sectioned" a coil to provide switchable lower power options?
 

Attachments

robertsears1

Active member
255
118
43
Location
Near Apex/NC
Do you have any techniques to pass along on assembling that switch in post #11? I have only fixed a four level switch and that was after a bunch of yelling and throwing things! I still have another four stack switch in a jar in pieces that I gave up on. I even tried fixing pieces in place with some grease and that didn’t work for me.

I
 

428gearhead

Member
15
52
13
Location
Martinsburg WV
Do you have any techniques to pass along on assembling that switch in post #11? I have only fixed a four level switch and that was after a bunch of yelling and throwing things! I still have another four stack switch in a jar in pieces that I gave up on. I even tried fixing pieces in place with some grease and that didn’t work for me.

I
What you do during DISASSEMBLY will determine your success when assembling an unfamiliar device. If you are working with small parts, do your work in an area where dropped items can't hide from view. (I once rebuilt a carburetor in a garage with a gravel floor - bad choice).

Before I started, I took plenty of pictures, and marked a line down the entire top of the switch before taking it apart. Then I numbered and set each section in the order and orientation it was removed (like in the picture). An old baking tray or shallow box is helpful.

I did have a couple of springs jump at me, but figured out that if I removed the cam (marked to show position), the contacts would stay in place.

I had no issues during reassembly because my markings and orientation of parts made it assy to remember how it came apart. There is a knack to installing each section, as the cam needs to snap back into place to open the contacts, but it only takes one or two tries to figure it out.

Again, proper documentation and organized disassembly before you dig in, go a long way toward getting it back together right.
 

428gearhead

Member
15
52
13
Location
Martinsburg WV
I got things back together and load tested for 45 minutes at 90%. There was a light haze of smoke under load, but exhaust was nice and hot. Freq dropped about 2Hz drop that I adjusted up. Electrical and engine guage readings remained steady once things warmed up.

I wanted to keep debris out of the radiator, so I made an aluminum cover that opens and closes in unison with the exhaust flap. Orientation is such that it deflects air away from the exhaust, so it no longer blows in my face when I'm at the control panel.

If you are wondering about the test load, I will provide details in another post.

Thanks again to all who advised on this project.
 

Attachments

Ray70

Well-known member
2,375
5,081
113
Location
West greenwich/RI
" I wanted to keep debris out of the radiator, so I made an aluminum cover that opens and closes in unison with the exhaust flap. Orientation is such that it deflects air away from the exhaust, so it no longer blows in my face when I'm at the control panel."

Great idea with the automatic radiator cover. The radiator inlets tend to fill up with leaves acorns and pine needles around my neck of the woods.
 
Top
AdBlock Detected

We get it, advertisements are annoying!

Sure, ad-blocking software does a great job at blocking ads, but it also blocks useful features of our website like our supporting vendors. Their ads help keep Steel Soldiers going. Please consider disabling your ad blockers for the site. Thanks!

I've Disabled AdBlock
No Thanks