Vintage iron
Active member
- 1,123
- 14
- 38
- Location
- Falmouth Ma.
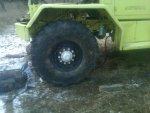
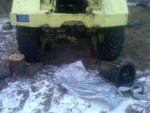
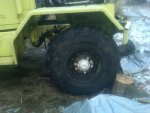
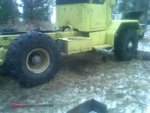
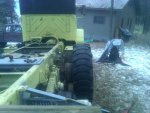
I have started this thread to show how I mounted my Super Singles. I have included some tips that I think will help others mount their tires. I haven't numbered the pictures but put them in order and included as many as I could.
I bought 8 two piece 5 ton rims and 8 1600R20 new Michelin XZL's from Kublos Surplus. I had the rims sandblasted, epoxy primed and painted Satin black. While I was at Kublos I picked up 8 new O rings for the rims too.
A local shop did the rims for me. I left the wheel half nuts at the end of the threads to protect the ends of the studs during the blasting prcedure and the blaster taped off the rest of the threads before paint. So the rims are better than new.
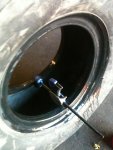
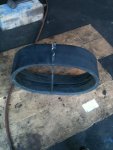
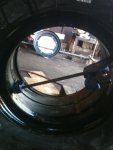
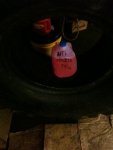
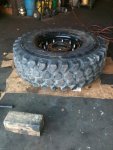
This is how I put my wheels together. First I clean out the inside of the tire of debris and wash the tire bead surfaces. I then put blue tire goo on the tire beads inside and out. I then clean the rubber bead locks and sit on them to flatten it out. I use a short bungee cord to hold it in a bean shape. The tire stands up pretty good on it's own. I use a vise quick grip to spread the beads apart and I stuff the flattened bead lock in. Put you foot inside the lower section of the bead lock and kick it down into the tire. Once it is in, remove the bungee cord, hold the tire and put a 3 foot tire spoon through the bead lock center and pull. This will twist it into the right orientation. I use the quick grip to push the bead lock around in the tire and use the tire spoons to help get it positioned and round again. Once the bead lock is round and in place. I position the vent hole down and added half a gallon of 50/50 antifreeze for balance. Don't worry it doesn't come out during mounting. The hard part is done.
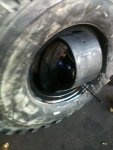
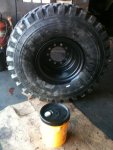
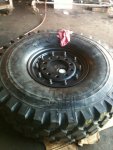
Now! I had my rims blasted and painted so this part is easy. If you didn't you should make sure that you bead areas, O ring area and wheel half threads are clean. Clean bead and O ring seats will help keep leaks from happening. New O rings too! lay the tire on blocks of wood, so the rim has a place to fall in to. Center the bead lock and blue tire goo the bead area and the bead lock. I put a yellow chalk line to locate the channel for the valve stem. Make sure the your valve stem is fully seated and tight. Now place the rim in the tire. If you put it in straight it should go right in. Once it is in most of the way I stand in it and use the spoon to help the valve stem butt slide through the bead into the channel and jump on it to seat it. Once it is seated stand the tire up, spin it around, remove the blocks and put a 5 gallon bucket down with the lid on. Lay the tire rim side down, on top of the bucket, this is where the cleaning comes into play. If you have kept the area and surfaces clean, you won't need to worry about dirt in your O ring seat, but check for dirt or foreign objects. Put your O ring in, center your bead lock, blue goo and plenty of anti seize on the wheel half studs. Put the second section into the tire and make sure it is lined up good. DON'T FORGET THE VALVE STEM! Use a rubber mallet to bump the rim half down evenly. Put your nuts on and tighten a little at a time. I start off going back and forth like tightening lug nuts and then when it gets tough I do short bursts with the impact gun and go around and around like a clock till they are all tight. New O rings will seat better and stay tight to the rims.
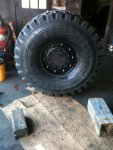
They look great all mounted up. I highly recommend having a friend help. I did these by myself and IT WAS LIKE SUMO WRESTLING FOR HOURS! I can mount one a hour by myself. The quick grip, 3' tire spoons and the blue tire goo make things so much easier. Hope this helps someone
I bought 8 two piece 5 ton rims and 8 1600R20 new Michelin XZL's from Kublos Surplus. I had the rims sandblasted, epoxy primed and painted Satin black. While I was at Kublos I picked up 8 new O rings for the rims too.
A local shop did the rims for me. I left the wheel half nuts at the end of the threads to protect the ends of the studs during the blasting prcedure and the blaster taped off the rest of the threads before paint. So the rims are better than new.
This is how I put my wheels together. First I clean out the inside of the tire of debris and wash the tire bead surfaces. I then put blue tire goo on the tire beads inside and out. I then clean the rubber bead locks and sit on them to flatten it out. I use a short bungee cord to hold it in a bean shape. The tire stands up pretty good on it's own. I use a vise quick grip to spread the beads apart and I stuff the flattened bead lock in. Put you foot inside the lower section of the bead lock and kick it down into the tire. Once it is in, remove the bungee cord, hold the tire and put a 3 foot tire spoon through the bead lock center and pull. This will twist it into the right orientation. I use the quick grip to push the bead lock around in the tire and use the tire spoons to help get it positioned and round again. Once the bead lock is round and in place. I position the vent hole down and added half a gallon of 50/50 antifreeze for balance. Don't worry it doesn't come out during mounting. The hard part is done.
Now! I had my rims blasted and painted so this part is easy. If you didn't you should make sure that you bead areas, O ring area and wheel half threads are clean. Clean bead and O ring seats will help keep leaks from happening. New O rings too! lay the tire on blocks of wood, so the rim has a place to fall in to. Center the bead lock and blue tire goo the bead area and the bead lock. I put a yellow chalk line to locate the channel for the valve stem. Make sure the your valve stem is fully seated and tight. Now place the rim in the tire. If you put it in straight it should go right in. Once it is in most of the way I stand in it and use the spoon to help the valve stem butt slide through the bead into the channel and jump on it to seat it. Once it is seated stand the tire up, spin it around, remove the blocks and put a 5 gallon bucket down with the lid on. Lay the tire rim side down, on top of the bucket, this is where the cleaning comes into play. If you have kept the area and surfaces clean, you won't need to worry about dirt in your O ring seat, but check for dirt or foreign objects. Put your O ring in, center your bead lock, blue goo and plenty of anti seize on the wheel half studs. Put the second section into the tire and make sure it is lined up good. DON'T FORGET THE VALVE STEM! Use a rubber mallet to bump the rim half down evenly. Put your nuts on and tighten a little at a time. I start off going back and forth like tightening lug nuts and then when it gets tough I do short bursts with the impact gun and go around and around like a clock till they are all tight. New O rings will seat better and stay tight to the rims.
They look great all mounted up. I highly recommend having a friend help. I did these by myself and IT WAS LIKE SUMO WRESTLING FOR HOURS! I can mount one a hour by myself. The quick grip, 3' tire spoons and the blue tire goo make things so much easier. Hope this helps someone
Attachments
-
 61 KB Views: 270
 -
 57.1 KB Views: 275
 -
 56.1 KB Views: 271
 -
 44.5 KB Views: 276
 -
 39.1 KB Views: 275
 -
 67.5 KB Views: 291
 -
 62.8 KB Views: 257
 -
 69.9 KB Views: 254
 -
 65.5 KB Views: 273
Last edited: