MrM4
Member
- 136
- 21
- 18
- Location
- Wall, South Dakota
(You can read this some post at the link below and the pictures show up so you dont have to click the links.)
http://1919a4.com/showthread.php?40197-Bobbed-m35-Duece-and-1-2/page2&highlight=m35a2
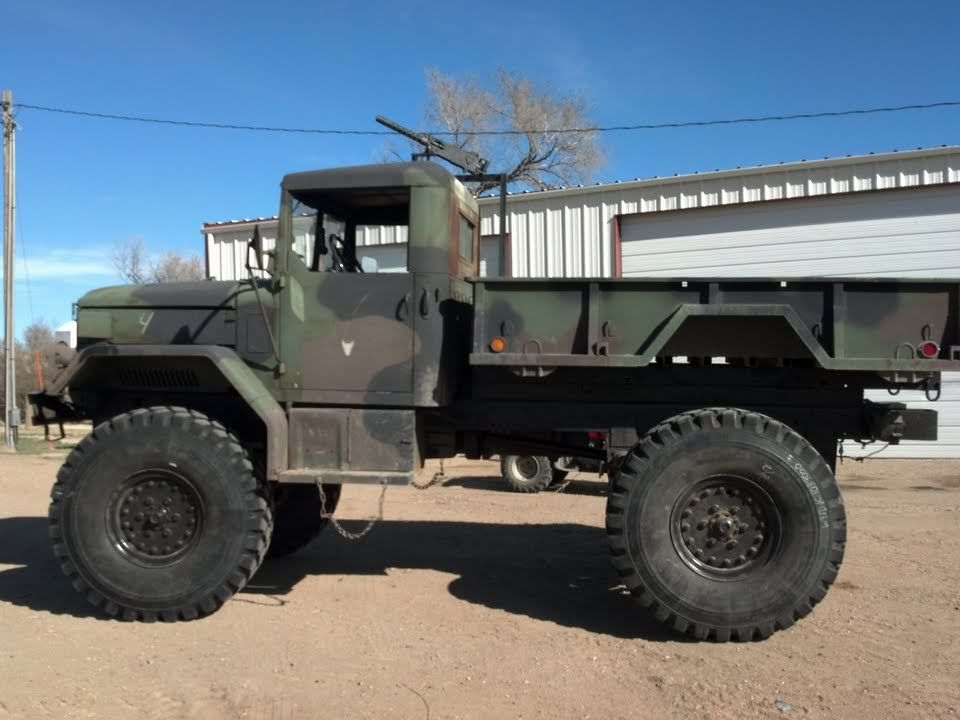
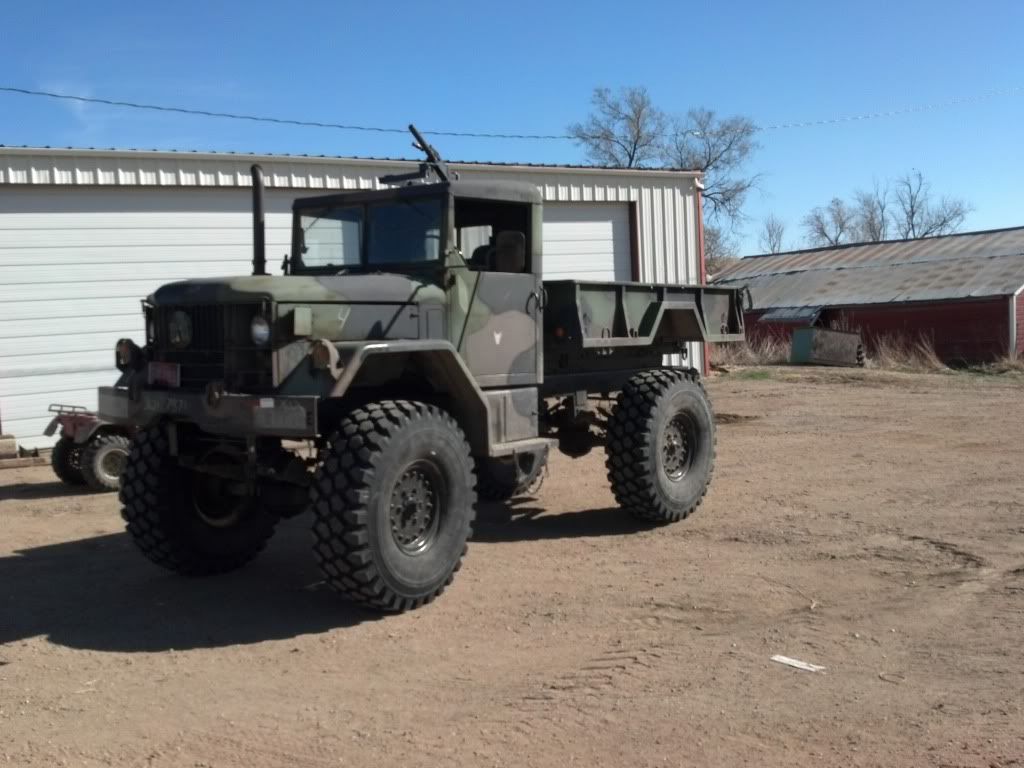
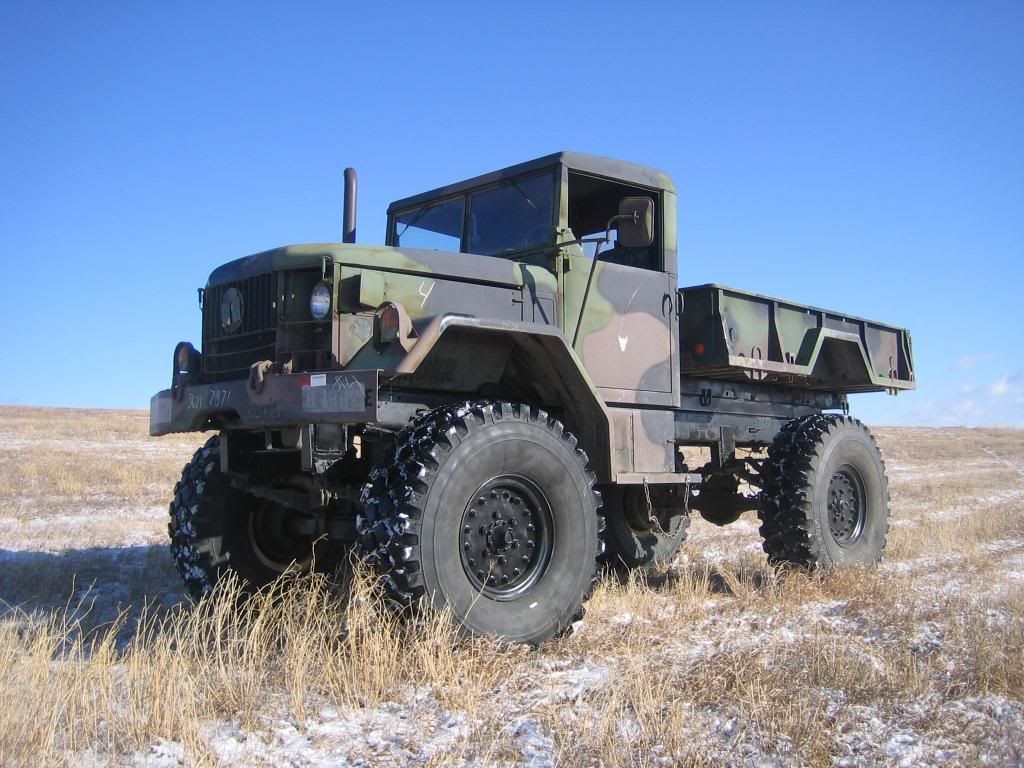
I couple months back a stumbled across a few pictures of a bobbed M35a2 on the net, with in seconds I knew my check book was going to suffer due to me clicking the link. So I started looking for a truck and after about 10 weeks of night time work, alot of swearing, and alot of nights of reading up on the site at 2:00 AM the Bobber is up and rolling. I documented the build and here are some pictures.
The truck started out as a M109A3, according to the paperwork in the truck the thing had been used by a Chopper support unit. I struck a deal with a local guy who had it and I managed to trade the box back to him. ( Its now headed to another member on the forum. ) Also included was a M105 with Racks.

The hardest part of the whole job was getting the rear axle out of the thing.


Chopping the frame was easy, measure, measure and measure then cut. I wanted my bumperetts to sit perfectly so I could keep them and still have my tailgate hang strait down, which it does.


I used the M105 Springs for my rear axle. I had Inland Truck Parts stretch my driveshaft. They did a good job but their bill was about $100 over the quote so we had a few heated words, in the end they made it right and honored the quote.


I had the local CNC shop run me a 9inch lift kit. I started in the back end with it when I reinstalled the rear axle. Kind of a funny looking think but fun to drive around a little. I managed to find some bolts threw Fastenal that were supposed to be super strong stuff used on Ag equipment to mount up the trailer springs to the truck, pricey but the extra strength makes me feel better.
http://i247.photobucket.com/albums/gg158/MrM4/M35A3/IMG_4338.jpg


Finally I got the front end on, its amazing how heavy the front 1/2 of the truck is. Im waiting on the UPS guy to bring my new Steering arm made by Steve6x6x6. ( I'm using a temp I built to drive around the ranch for now)

The Wife had a hand in the build as well, my Drivers seat was shot so she re did the whole thing in a new Digital Camo.

As Im writing this all out I see that I don't really have much for pictures of the lift kit install or hub flip but basically it is a 9 inch drop block kit with lateral bracing much like the Blackrock Idea. Installed with Grade 8 Bolts and then some of the bracing is welded in addition to Bolted. I've got a good friend who is professional welder that help advise on the project. I will check the camera for more pictures of that part
I used an adaptor plate on HEMMTT Rims and had a local shop make me a set of plates out of 1/2 steel I don't know the exact grade but it was explained to me as twice as strong as A36. Total cost per plate was around $130. I managed to tear a gasket so I had about a week of down tiem between the front and rear tires but Clinton out in PA help me out with and couple extras and I finally could get the truck leveled out and. In the mean time my wife and I set the trailer frame and a 4 inch tall chunk of tubing on the frame and then installed box on the truck After alittle starting fluid and a match we managed to get the new XZL 16.00-20 mounted up at alittle over 520lbs. Per tire it was a chore just getting them on.

.

After alittle rattle can to hold me over until next spring when the weather warm enough to paint and she was ready for the first test drive.

After 10 weeks of work here is the Before and After.
Before
After

I just wanted to extend a Thank You to everyone who has answer questions and refered me to the info I need.
http://1919a4.com/showthread.php?40197-Bobbed-m35-Duece-and-1-2/page2&highlight=m35a2
I couple months back a stumbled across a few pictures of a bobbed M35a2 on the net, with in seconds I knew my check book was going to suffer due to me clicking the link. So I started looking for a truck and after about 10 weeks of night time work, alot of swearing, and alot of nights of reading up on the site at 2:00 AM the Bobber is up and rolling. I documented the build and here are some pictures.
The truck started out as a M109A3, according to the paperwork in the truck the thing had been used by a Chopper support unit. I struck a deal with a local guy who had it and I managed to trade the box back to him. ( Its now headed to another member on the forum. ) Also included was a M105 with Racks.
The hardest part of the whole job was getting the rear axle out of the thing.
Chopping the frame was easy, measure, measure and measure then cut. I wanted my bumperetts to sit perfectly so I could keep them and still have my tailgate hang strait down, which it does.
I used the M105 Springs for my rear axle. I had Inland Truck Parts stretch my driveshaft. They did a good job but their bill was about $100 over the quote so we had a few heated words, in the end they made it right and honored the quote.
I had the local CNC shop run me a 9inch lift kit. I started in the back end with it when I reinstalled the rear axle. Kind of a funny looking think but fun to drive around a little. I managed to find some bolts threw Fastenal that were supposed to be super strong stuff used on Ag equipment to mount up the trailer springs to the truck, pricey but the extra strength makes me feel better.
http://i247.photobucket.com/albums/gg158/MrM4/M35A3/IMG_4338.jpg
Finally I got the front end on, its amazing how heavy the front 1/2 of the truck is. Im waiting on the UPS guy to bring my new Steering arm made by Steve6x6x6. ( I'm using a temp I built to drive around the ranch for now)
The Wife had a hand in the build as well, my Drivers seat was shot so she re did the whole thing in a new Digital Camo.
As Im writing this all out I see that I don't really have much for pictures of the lift kit install or hub flip but basically it is a 9 inch drop block kit with lateral bracing much like the Blackrock Idea. Installed with Grade 8 Bolts and then some of the bracing is welded in addition to Bolted. I've got a good friend who is professional welder that help advise on the project. I will check the camera for more pictures of that part
I used an adaptor plate on HEMMTT Rims and had a local shop make me a set of plates out of 1/2 steel I don't know the exact grade but it was explained to me as twice as strong as A36. Total cost per plate was around $130. I managed to tear a gasket so I had about a week of down tiem between the front and rear tires but Clinton out in PA help me out with and couple extras and I finally could get the truck leveled out and. In the mean time my wife and I set the trailer frame and a 4 inch tall chunk of tubing on the frame and then installed box on the truck After alittle starting fluid and a match we managed to get the new XZL 16.00-20 mounted up at alittle over 520lbs. Per tire it was a chore just getting them on.
.
After alittle rattle can to hold me over until next spring when the weather warm enough to paint and she was ready for the first test drive.
After 10 weeks of work here is the Before and After.
Before
After
I just wanted to extend a Thank You to everyone who has answer questions and refered me to the info I need.
Last edited: