• Steel Soldiers now has a few new forums, read more about it at: New Munitions Forums!

  • Microsoft MSN, Live, Hotmail, Outlook email users may not be receiving emails. We are working to resolve this issue. Please add support@steelsoldiers.com to your trusted contacts.


my first spare tire change

builder77sDad

Member
Steel Soldiers Supporter
71
2
8
Location
Eastham, Massachusetts
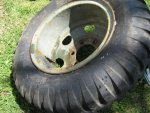
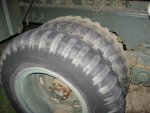
One of the inner rear tires on Ethan's deuce is almost bald, but I do have a decent spare. It is time to get some experience changing a flat tire. In fact, I was advised only last week by SS member Daniel (dm22630) to do this at home before having to do it at the side of some road.

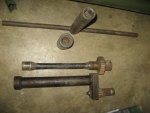
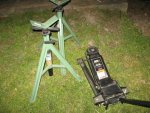
Here are the tools Ethan gathered that seem to me to be related to the job. The deuce is on flat clayish dirt, but I will put some plywood down so small wheels will work. I have a deuce manual and will read about this before Saturday, but am wondering if the equipment I have is sufficient from your experience. The axle stands are rated at 2000 lbs, the hydraulic jack at 3.5 ton. I am uncertain how to use the geared lug wrench, but as the handle of the square drive t-wrench fits the hole, I assume this is what to use for leverage.

If anyone wants to assist (or supervise) Saturday starting at tennish, you are welcome. I have a few chairs for supervisors, and we will have burgers to grill. If you want directions to Ethan's house in Richmond, VA (just off 95), send a PM. If anyone would like to share some advice concerning changing tires, this would be appreciated. Helpful advice would include problems or ways to support the axle, remove lug nuts, and handle heavy wheels.
 

Attachments

gimpyrobb

dumpsterlandingfromorbit!
27,785
747
113
Location
Cincy Ohio
Yup, what you have there is perfect for the job. The geared lug wrench will do things pneumatic impacts will not. I agree, the time to do a swap is while at home. It might not even hurt to loosen all the lugnuts and thimbles so that if you get caught with a flat later, and don't have the geared lug wrench, you know you can get the nuts off. It really sucks to have the nut siezed to the thimble. That will ruin a stud REAL quick.
 

doghead

4 Star General /Moderator
Staff member
Super Moderator
Steel Soldiers Supporter
26,247
1,168
113
Location
NY
Those stands are pipe stands, not vehicle jack stands. They are not suitable for holding a vehicle up.
 

Kohburn

New member
655
6
0
Location
SOMD
might be pushing the 3.5 ton jack a little. when that close to to its rated limit the seals tend to die faster.

would go with an 8-12 ton bottle jack.

I picked up 6 ton jack stands and a 12 ton bottle jack for about 70$
 
Last edited:

builder77sDad

Member
Steel Soldiers Supporter
71
2
8
Location
Eastham, Massachusetts
Thank you for your advice, which may have prevented damage. The front of Ethan's Jeep frame/engine/tranny was being held up by two 4-ton jack stands, so it is losing these to the deuce. I'm sure that two 2000lb jack stands can hold up the front of the Jeep as it is now. I will also use a 6-ton bottle jack, which has a 10" lift.

I'm a bit confused about the 7000lb lift being marginal. Since the deuce weighs a bit over 13000lbs, the lift could theoretically raise half of the deuce in the air. But all I need to do is lift one side of one axle. Wouldn't it take only one or two thousand pounds of force to lift the tires high enough to change them?
 

doghead

4 Star General /Moderator
Staff member
Super Moderator
Steel Soldiers Supporter
26,247
1,168
113
Location
NY
The standard issued "bottle jack" for the M35a2, is an 8 ton jack.

If I had to guess, the lift force needed to lift one side of a rear axle, nearest to the tires, would be about 4-5000 lbs.

The force needed to lift really depends where along the axle, you are lifting.

Be sure to chock the wheels, when jacking it up.
 

LanceRobson

Well-known member
1,638
206
63
Location
Pinnacle, Stokes County, NC
It's not just the weight of the axle you are working against but the resistance of the springs and torque rods trying to do their job in keeping all four rears pressed down onto the ground. A 3-1/2 ton jack will work fine as long as the ground is level. Most don't have enough stiffness in the side plates to tolerate loads at any kind of side angles. There will be room near the differential for the stand. Put plywood or other blocking under the stands too or they will cut into the ground as soon as weight hits them. I like a piece of 2x? lumber that will sit between the nubby little leg extensions. They are less likely to slide on them than a hunk of plywood.

Save yourself some work by removing four outer nuts (remember the left hand threads if it's the left side) and loosen the other two nuts. Put a block of wood a couple inches high in front of the inner tire and drive up onto it so the outer just clears the ground. Now pull the outer wheel/tire and loosen the inner studs. Chock the other side rears front and rear.

Jack the axle up until the tire clears the ground and place the stand. Pull the inner wheel/tire. If you have a couple of long pry bars or a couple of 3-4' pieces of pipe you can position them to slide the tires on. They will slide sideways easily without having to pick them up or wrestle them. Fine tune the height of the hub with the jack to line up the studs with the wheel and slide the new inner on. Piece of cake.

Keep a wood block in the truck for changing the outer wheel/tires. At least on pavement or hard ground you won't need the jack for them.

Lance
 

builder77sDad

Member
Steel Soldiers Supporter
71
2
8
Location
Eastham, Massachusetts
Thanks for the advice. I will get my tools together now Unfortunately, the deuce is not yet operational (no alternator). I did get batteries for it. Can I use the starter motor to move it a few feet like I can with my car?

Rob
 

Castle Bravo

Hundredaire Socialite
Steel Soldiers Supporter
1,958
218
63
Location
Arizona
I think it is worthwhile to take them all off and put them back on while at home so that you're sure they'll come off when you're on the side of the road. You can also put them back on. This also gives you the opportunity to inspect the studs and apply anti-seize compound if you wanted to.

I have one of the torque multiplying wrenches and I only use it to take the lugs off, never to put them on. That way I hopefully won't run into a situation where I can't get them off when I don't have it with me.

I need to do it to my M818 and M127 trailer. I'm NOT looking forward to removing and reinstalling 180 lug nuts. :)
 

rattlecan6104

New member
357
6
0
Location
Oak Harbor, WA
I picked up an air impact gun the other day to do mine, and even at a rated 650 ft-lbs, it essentially failed at its job, lucky for you that you have the torque multiplying lug wrench
 

Varyag

Member
927
2
16
Location
Garfield, Washington
I just picked up a 12 ton bottle jack to toss in the BII box. It was a little pricey but pretty worth it for these jobs. I have a large 3.5 ton jack like that and bent one of the wheels slightlly using it with a loner jack lifting the front of my fj40 to put new springs on it. I don't trust them much for really heavy lifting.
 

LanceRobson

Well-known member
1,638
206
63
Location
Pinnacle, Stokes County, NC
I picked up an air impact gun the other day to do mine, and even at a rated 650 ft-lbs, it essentially failed at its job, lucky for you that you have the torque multiplying lug wrench
What are the rated CFM and at what pressure for your compressor and the tool? What diameter and length of hose?

At the risk of preaching to the choir....

Many folks don't understand is the rating of tools as opposed to the sizing of compressors and hoses. If you look at the tool specs and the rating for CFM consumption at a given pressure you need to look at the compressor and hose and see if they can deliver it. If the compressor will not outperform the tool's air consumption, the pressure in the reservoir will fall from the moment you pull the trigger. At the point in time that the air pressure drops below the rated pressure for the max output of the tool, the tool will no longer make it's rated torque. On a small compressor that can be in just a second or two.

Most 1/2" or 3/4" impacts need more air to hit to continuously maintain their rated output than homeowner or even some smaller commercial compressors can compress and most folks run too small a hose diameter when length is figured in.

The hose run results in a significant drop in available air pressure since the hose is acting as the reservoir due to the lag in air flow. Many 1/2" guns want a 3/8" hose no longer than 50'. 3/4" guns usually want a 1/2" hose. They will work with less but won't develop full torque for more than a moment. Screw a pressure gauge onto the back of the tool once and it will really give you an appreciation of he hose.pressure lag. Also, most hose fittings are a size smaller than the hose internal diameter. For example, fittings for 3/8" hose typically have 1/4" inner diameters. It pays to get full bore fittings. They can be a PITA to find but without them the connectors wil not let the hose live up to it's rating.

If your compressor doesn't have a big reservoir or a big output no 1/2" or bigger impact wrench is going to put out max power for long. If you can run the gun flat out for the duration of the task at it's highest torque setting without the reservoir dropping below the rated pressure for the tool, everything is fine. Otherwise the gun may never have had a chance to do the job.

Lance
 

tigger

Medic.
In Memorial
2,177
50
0
Location
Butler TN.
What are the rated CFM and at what pressure for your compressor and the tool? What diameter and length of hose?

At the risk of preaching to the choir....

Many folks don't understand is the rating of tools as opposed to the sizing of compressors and hoses. If you look at the tool specs and the rating for CFM consumption at a given pressure you need to look at the compressor and hose and see if they can deliver it. If the compressor will not outperform the tool's air consumption, the pressure in the reservoir will fall from the moment you pull the trigger. At the point in time that the air pressure drops below the rated pressure for the max output of the tool, the tool will no longer make it's rated torque. On a small compressor that can be in just a second or two.

Most 1/2" or 3/4" impacts need more air to hit to continuously maintain their rated output than homeowner or even some smaller commercial compressors can compress and most folks run too small a hose diameter when length is figured in.

The hose run results in a significant drop in available air pressure since the hose is acting as the reservoir due to the lag in air flow. Many 1/2" guns want a 3/8" hose no longer than 50'. 3/4" guns usually want a 1/2" hose. They will work with less but won't develop full torque for more than a moment. Screw a pressure gauge onto the back of the tool once and it will really give you an appreciation of he hose.pressure lag. Also, most hose fittings are a size smaller than the hose internal diameter. For example, fittings for 3/8" hose typically have 1/4" inner diameters. It pays to get full bore fittings. They can be a PITA to find but without them the connectors wil not let the hose live up to it's rating.

If your compressor doesn't have a big reservoir or a big output no 1/2" or bigger impact wrench is going to put out max power for long. If you can run the gun flat out for the duration of the task at it's highest torque setting without the reservoir dropping below the rated pressure for the tool, everything is fine. Otherwise the gun may never have had a chance to do the job.

Lance
:ditto:
 

Stretch44875

Super Jr. Moderator
Super Moderator
Steel Soldiers Supporter
2,958
28
48
Location
Tiro, Ohio
To get even further off topic, most home style compressors use 1/4 fittings and regulator that restrict the air flow. I've replumed a couple to have 3/4 fittings to 1/2 connector. That with a 1/2 hose will get your air tools to run much better.
 

builder77sDad

Member
Steel Soldiers Supporter
71
2
8
Location
Eastham, Massachusetts
Thanks to help and training from SS Rick Sutton (watson76), the inner tire was successfully removed. We used a 6"x6" post as a base for the bottle jack . I was suprised how few inches of lift were needed to raise the tire enough to remove it. The lug nut torque multiplier worked great for the outer nuts, and now Rick wants one. I found that Ethan's deuce is missing the tire changing tool kit, and Rick used his to remove the inner (square) lug. The breaker bar and foot power was needed to both remove and install the inner lug. I will of course look for a tire changing kit.

We wheeled the spare to my garage to fill with air, and heard water sloshing. When air was added, water was forced out onto the ground. Rain water had filled space allowed by a deflated inner tube. I can now say that this is a bad sign. We tilted the tire so that the water between the tube and tire would run downhill and then out (see photo). Most of the water was forced out, but we found that the tube leaks. And so I will take the rim and tire to a local truck tire place to have them install a new tube. They are not happy about mounting split rims, but will do it for $30 which seems worth paying.

I am now less concerned about wheel changing (once I get the proper kit) having seen it done. And I will get more practice, as I will be shuffling tires. Ethan bought a M103 trailer, which looks identical to a M105 frame. It has great tires, and I will be replacing the deuce's front tires with the trailer tires. After the tire shop changes the tube, Ethan's deuce will have a full set of decent stock tires.

Now to install the alternator. The former one was removed the quick and dirty way by snipping the lead wires - grrrr! And then install the driveshaft mounted parking brake, put a new terminal on the main positive wire and hook up the new group 27 batteries, replace the mirrors and some gauges, door handles, etc. My goal is to make it to Aberdeen, and the deadline will help motivate me in getting the deuce roadworthy. Oh yes, get it insured and registered as an antique.

The bottom line is that changing tires is not all that difficult, but it is necessary to carry the proper tools and to remember that the lugs on the left side have left handed threads.
 

Attachments

gimpyrobb

dumpsterlandingfromorbit!
27,785
747
113
Location
Cincy Ohio
The geared lugnut tool is all you really need, I see no need to look for more tooling. Wish I were closer to help.
 
Top
AdBlock Detected

We get it, advertisements are annoying!

Sure, ad-blocking software does a great job at blocking ads, but it also blocks useful features of our website like our supporting vendors. Their ads help keep Steel Soldiers going. Please consider disabling your ad blockers for the site. Thanks!

I've Disabled AdBlock
No Thanks