• Steel Soldiers now has a few new forums, read more about it at: New Munitions Forums!

  • Microsoft MSN, Live, Hotmail, Outlook email users may not be receiving emails. We are working to resolve this issue. Please add support@steelsoldiers.com to your trusted contacts.

My GMC, a little update

hendersond

Well-known member
Steel Soldiers Supporter
1,171
29
48
Location
Galesville, WI
Glad to see you are making progress. Where did you find wheel cylinder kits? How about some pics of that carpet job?
 

m1010plowboy

Well-known member
Steel Soldiers Supporter
3,813
2,392
83
Location
Edmonton, Canada
Loaded again

Good progress Gunfreak, I must get under my auto 3ton for linkage pictures this weekend so slow down. I also need to hurry and catch up to you......because I am the leader.:shock:

I'm loaded again. This time I know I'm not leaving until next week and of course it's
going to -19c tonight. It would be nice to be there now however very soon It'll be
comforting not driving or landing on ice everyday.

Here's a better shot of the hard top. We may need to give it some sass to get it
perfect again, but it's close. Hope it works.

The mirrors on the donor trucks are not worth bringing down. We'll need to solve this once I get the old boys into their storage trailers this spring. I'm hoping it
gives me an excuse for another trip down so no soup for you......yet.

Loaded with:

Air tank (valve working)
12 wheel cylinders
Hard top c/w many bolts
Master cylinder.....and a new master cylinder kit I had holding a shelf down.
Hose Reel
Dobro and a 12 string
Bongo


.....and I can only bring 24 beer..........who goes camping with 24 beer unless it's an over nighter or a company party......:D

Remember, so nothing else pooches the plan, there is no plan and we don't celebrate
until I'm in the yard.

Yee haw
 

Attachments

Gunfreak25

Well-known member
1,561
620
113
Location
Yuma, AZ
Dave it was 81 degrees today and it is around 69 tonight. Just gorgeous weather man. I've cleaned up the backyard, chopped the wood and the pit is ready for laughter, bullsh8t, bent elbows and the beat of the bongo. Like you said no cork is popping until the parts here. :beer:

No sweat on the linkage pictures, I have figured it all out in my big head. This stuff has become rather natural for me anymore. That top is in beautiful shape compared to any I have seen, which is not many! The light bar is an awesome feature, it's the small stuff that makes these trucks so badass looking. Roof damage will be some easy work.

The hardest part will be to refrain from putting the top on right away! I want to tear it down, rust proof, repair and carpet before installing. Patience is key.........

On a another note. 2 days ago this evening my great uncle passed away. He fought the hard fight but is finally at peace. I wanted to get the truck finished in time for him to drive, like he did back in the 1950's in the AZ national guard. But I know he is out there with me when I am turning wrenches.

The M211 will now officially be in memory of Arthur Garcia.
 

Attachments

Last edited:

Gunfreak25

Well-known member
1,561
620
113
Location
Yuma, AZ
The floorplate is not finished, needs more carpeting and the bolt holes punched out. Firewall will also be carpeted as will the hard top, cab back and cab sides. The doors may or may not be carpeted, I am leaning toward the later. Dash will be olive drab semi gloss of course. I completely gutted the cab floor for the carpet so that all the part fit ontop/over the carpet instead of making cutouts for parts. I thought it would look cleaner.

You can get roll of this material already made to go at home depot. I have a little left over from a 6x8 roll that cost $18. I can already feel the reduction in vibration from just working in and around the cab.
 

Gunfreak25

Well-known member
1,561
620
113
Location
Yuma, AZ
Found this on craigslist tonight. 7.3 Powerstroke fuel filter assembly. Complete with fuel restriction sensor, fuel filter heater (for better filtering) and water sensor. $30!
Sure beats the $125 I was going to pay for a new Racor unit.
 

Attachments

Last edited:

Seatyger

Member
138
0
16
Location
Ontario
Carpeted....

Whats going on Kid? I get sidetracked with work and other day to day crap, only to come back to this Thread and what happens??

The Deuce is being turned into a 1973 Chevy 'Shaggin Wagon' Van. I suppose I could get used to 3" purple shag carpet covering the entire interior..... but where will it stop? A Conan the Barbarian mural painted over every square in of exterior sheet metal?

I did see some Kid's Tuner the other day with a Psycho-Delic Spongebob Squarepants on it........nah, he likely suffers from perpetual brainfreeze, your probably just out in the sun too long without a hat!

But when you can buy Canadian Beer, bottled in Canada for 14.75 a case (24) at a US based WalMart compared to our Government dispensed identical product a 42.50 I guess it doesnt matter if you get a bit of sunstroke lol!! :beer:

Nice to see you still plugging away at it!!
 

Seatyger

Member
138
0
16
Location
Ontario
I didn't read back far enough initially. A toast young man to Mr. Arthur Garcia. A man who obviously had a positive influence on you in shaping your imagination, drive and passion for life and all things mechanical.

May he ride with you in grace and style.
 

Gunfreak25

Well-known member
1,561
620
113
Location
Yuma, AZ
M1010Plowboy's trip down was probably the most fun i've had in my life. Yeah, I don't get out much. :lol: Got to see a lot of cool things and i'm proud to say I've made one good friend that will be around for many years to come. I am very humbled to say the least, even days after he has left it still has not sunk in yet how much Dave has done for me.

18 hours into the top between disassembly, dent removal, insulation removal and reassembly.

Still lots to do but it's lots closer than it was a month ago.
 

Attachments

Last edited:

m1010plowboy

Well-known member
Steel Soldiers Supporter
3,813
2,392
83
Location
Edmonton, Canada
Ruff on Rain ooot

Awwwwww.......You say the nicest things.:mrgreen: Thanks T,

I'd take a 3 day drive to hang out with your family anytime. Gained 5 pounds eating
with ya but you guys sure know how to make a man feel at home...burp.

I really can't believe you got it stripped and on already, crazy. When you look back at
the progress with the budgets and size of the elephant you're eating, you should be
very proud at what you've accomplished.

One more step forward brother.

You also flipped the bolts so the nuts are on the inside. I think that's a great idea,
inadvertent or not it protects your nuts and keeps the back of the cab clean.....good
call.

Onward
 

dabtl

Active member
2,053
7
38
Location
Denton, Texas
I have gotten in some original winch control parts for the M135/M211 and will be at the fabricator this morning for some estimates on reproduction costs. This is the in cab lever and the below the cab brace and j-bolt.

I have ready to look at the prototype pillow bearing bracket and shield this morning. I have not seen them yet.

My plan is to make up about ten levers, under cab braces, pillow bearing brackets and shields assuming they can be made at a reasonable price.

With the u-joints all being commercially available, drive shafts available cheaply, new control cables available, along with pillow bearings the only things left to worry about would be the winch mounts.

If anyone wants a winch M135/M211 it might now be possible without paying a huge amount.

I will see.
 

Seatyger

Member
138
0
16
Location
Ontario
The Truck is really starting to acquire some character and take shape! Great job! Hopefully in a month and a bit it will be warm enough outdoors here to begin to do the same!
 

Gunfreak25

Well-known member
1,561
620
113
Location
Yuma, AZ
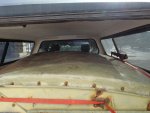
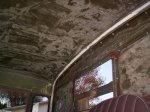
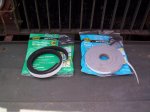
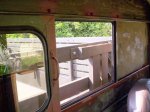
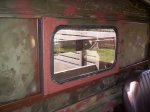
Upon reinstalling the original glass into the rear sliding window I broke it in 2. So I cut a new one out of some free tinted plate glass my neighbor had. I wouldn't dare use plate for a windshield or door window, though. For that you really should use safety glass. Anyway, it came out great, even cut the corners. Never cut glass before in my life! Pictured below are 2 packages of foam weatherstripping you can get at home depot or online. The black rubber tape is 3/8x3/4" and the white is 1/4x1/2".

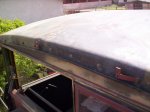
This info is for the Canadian hard tops with sliding rear windows. The original weatherstripping consists of thin metal strips with felt. Over time, the felt wears out, water then rots out the metal strips, the window frame, frame track, etc.

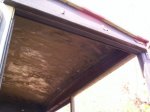
The fix is simple. Drill out the rivets holding on the old weatherstripping, then fill the rivet holes with bondo or another filler. Cut the black foam tape to the proper length and simply stick it in place. The white foam tape goes around the window frame to replace the old felt strips. The result is a window that has a 100% watertight and air tight seal. It will be very snug for a few days but the foam eventually "settles in" and conforms to the window frame making it easier to slide. The black foam tape also works great to replace your door glass weatherstripping where it meets with the roof panels and around the door itself. And it also works great to replace the windshield weatherstripping, just be sure to apply the foam tape far enough forward of the windshield lip or else it "oversquishes" it and pulls it up. Can add a picture later of where to put it.

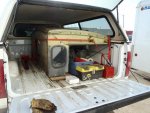
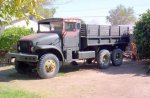
I also made 2 brackets to secure the unique Canadian light bar to the front of the hard top instead of directly on the roof which is not a great idea on a 8' tall truck. The original conical lens covers looked super goofy, like there's a big pair of orange titties hanging off the roof of the truck. So I am working to replace them with flatter bulb covers off a honda motorcycle's turn signals. LED semi truck style running lights will also be added to the top of roof and additional running lights will also be added around the bed. A spot light will be mounted on the cab, as will door operated light switches that illuminate the ground below the running boards for stepping out at night with the grandparents. A light will go under the hood for nighttime maintenance, the inside of the toolbox, 4 lights under the cargo bed, light on the rear of the hard top for bed illumination and of course parking lights.

I have this "thing" about being able to SEE at night. I've worked with drop cords and flashlights in my mouth for too long.

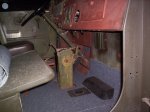
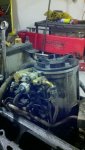
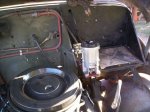
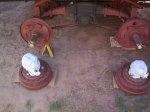
Yesterday and today I finished degreasing, derusting and sealing up the two drums I have taken off. The bearings have been washed, repacked, foiled, newspapered and labeled for future installation. I'm taking the extra time and money to replace all 6 of the inner hub seal sleeves that you ball peen off the end of the axle housings. Mine were all worn! All inner and outer hub seals will also be replaced. I have plans to do little offroading in an area where there is a 1' deep river crossing and I don't want water in my bearings.

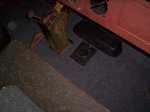
I am STILL waiting for the air compressor I paid for to be shipped so I can mount it on the 6.2 and make mounts for 2 members here. I also finished modding the 7.3 fuel filter and will add it to the engine bay when I pickup some extra steel in a few day's. I'll also be making my "granny" steps for the running boards, front bumper step and rear tailgate steps.

I love making stuff and I love a truck with lots of goodies all over it.
 

Attachments

wardepartment

New member
11
0
0
Location
Battle Creek, Mi
Great job with the progress. I especially like the Canadian hard top. Very informative write up as well. I was able to visualize everything that you described...
I just got hung up on the "big pair of orange titties hanging off the roof of the truck". What is the problem, is it that they are orange?
Keep up the good work. [thumbzup]
 

Gunfreak25

Well-known member
1,561
620
113
Location
Yuma, AZ
Yesterday I made a set of tailgate steps since my old ones were gone. They came out very nice and I made them 7" tall instead of OEM 4". So stepping into the bed is VERY easy from the tailgate. Today I finally made the bracket to secure the powerstroke fuel filter to the firewall. The bracket sits on the drivers side battery box compartment and filter changing will be quick and easy for future maintenance.

Pics tomorrow of course.

These day's I seem to have "2 modes" in my life. Truck mode, and gun mode. I have been working as fast as I can getting stuff done outside, and I have made a lot of headway since M1010Plowboy's departure from Yuma. I am simply out of "procrastination" time and today was my last day outside for awhile. It's time to flip the switch into "gun mode" so I can concentrate on getting back to work indoors and expanding my business in any way I can.
 

Gunfreak25

Well-known member
1,561
620
113
Location
Yuma, AZ
I managed to squeeze in a little painting a few days ago. Still about a gallon left to go. You can barely see the front bumper step I made, the tailgate pic shows the tailgate steps I also made.
Also, the under hood shot of the 7.3 IDI fuel bowl bracket I made up. I also spent a couple day's building a much larger workbench for my gun work and today just installed a proper parrot vice for all the woodwork I do. Best money spent in a long time on everything!
 

Attachments

Last edited:

m1010plowboy

Well-known member
Steel Soldiers Supporter
3,813
2,392
83
Location
Edmonton, Canada
M211 ag

I found a master cylinder. PM me the address for a third time and I'll send it.

There's over 326 square feet of real estate to paint on that thing so take your time. It's lookin' real good.
Your Yuma easybake oven will help when you get the "STOCKSMITHING" done.
Paint in the morning and it'll be baked by lunch.

Onward
 

nattieleather

Well-known member
1,884
134
63
Location
Cleveland, OH
Truck is looking good there GF. Take your time and it will be rolling before you know it. As a small business man myself I know having the right tools for the job makes a big difference. Kep up the good work!
 
Top