

Perkman87
Member
- 65
- 1
- 6
- Location
- Fort Lauderdale FL
First off I would like to thank all of the members who have made threads for me to follow throughout the build, this is my first post, but I have been behind the scenes reading a ton on here!
I decided it was time to do something with one of the 7 Humvee's we Purchased. This thread will cover 60% of the build, I lost a vast majority of the finalization process when my harddrive took dump, but you will be able to see the final photos and get an idea of how it all went together. The build out took 6 months and around 700 hours. Thankfully I have a great friend and co worker that is a Mechanical wizard. (JD) I could not have done it without him.
Here is the Humvee When we purchased it from the Gov Liquidation Site:


As you can imagine It came to us as a mess, we made a LARGE list and the costs were rising fairly quickly. First thing we did was make sure it was mechanically sound, we started with a full service of all wear components including Motor / Trans / suspension / All CV Joints replaced / All Brakes Serviced / Coolant Flush and coolant system serviced / all Front Tie Rods steering arms (basically anything with a bushing or moving part that looked bad was replaced) We replaced every sensor under the moon as well. None of that "My truck runs at 220 degrees bull**** going on here."
Now the Fun Part Disassembly for Paint and Rebuild! Some of the videos were created just for Instagram so bear with the short clips.
https://vimeo.com/148726191
Some Remnants:

Parts Slowly Arriving:

We took everything off that would be reused and or would benefit us for another build, We decided to leave the side markers on as we purchased a brand new set!
Note: we swapped out paint and Line X colors at the last minute we went with the 2004 Ford Lightning Grey with tons of metallic, and a lighter Grey high grit Line X on the inside.
Video below:
https://vimeo.com/148726194
We had our Master Fabricator make new mounting plates for the Rear seats, along with cut out compartment holes so we can mount our stereo amplifiers/subwoofers easily. He also Used the existing adjustment seat bracket for the front seat, adding steel beams across the area for mounting the seat safely.

Prior to Paint Photos:


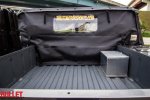
She comes out of Paint Looking Fantastic! We Send her straight to the Line X shop to finalize the interior and rear Bed:

Arriving back to the shop! looks like new! We put it on the lift and disassemble the suspension parts and finalize paint and rebuild.

We ordered all new components and only used non corrosive materials for the rebuild. All stainless with non corrosive insulation was used for final assembly:
She is starting to come together! We Opted to keep both the 24 volt setup and run a 12 volt setup for accessories and stereo equipment.


Not sure how many of you have tried to drive on the wheels and tires the gov liquidation Humvees come with but it is just outright dangerous, talk about vibrations and shaking! We fix that with a set of new old stock 37.5"BFGs that were mounted on the 24 bolt wheels (which I prefer), along with removal of the Runflat ring (30lbs of unsprung weight!!!)
Video of Removal of the Runflats:
https://vimeo.com/148726192
No shops locally would mount or touch our wheels so we ordered new gaskets for the rings and mounted them ourselves. Then we sent them to get balanced afterwards.
Video of Mounting them ( I should probably blow out the fire )
https://vimeo.com/148726193
I decided it was time to do something with one of the 7 Humvee's we Purchased. This thread will cover 60% of the build, I lost a vast majority of the finalization process when my harddrive took dump, but you will be able to see the final photos and get an idea of how it all went together. The build out took 6 months and around 700 hours. Thankfully I have a great friend and co worker that is a Mechanical wizard. (JD) I could not have done it without him.
Here is the Humvee When we purchased it from the Gov Liquidation Site:
As you can imagine It came to us as a mess, we made a LARGE list and the costs were rising fairly quickly. First thing we did was make sure it was mechanically sound, we started with a full service of all wear components including Motor / Trans / suspension / All CV Joints replaced / All Brakes Serviced / Coolant Flush and coolant system serviced / all Front Tie Rods steering arms (basically anything with a bushing or moving part that looked bad was replaced) We replaced every sensor under the moon as well. None of that "My truck runs at 220 degrees bull**** going on here."
Now the Fun Part Disassembly for Paint and Rebuild! Some of the videos were created just for Instagram so bear with the short clips.
https://vimeo.com/148726191
Some Remnants:
Parts Slowly Arriving:
We took everything off that would be reused and or would benefit us for another build, We decided to leave the side markers on as we purchased a brand new set!
Note: we swapped out paint and Line X colors at the last minute we went with the 2004 Ford Lightning Grey with tons of metallic, and a lighter Grey high grit Line X on the inside.
Video below:
https://vimeo.com/148726194
We had our Master Fabricator make new mounting plates for the Rear seats, along with cut out compartment holes so we can mount our stereo amplifiers/subwoofers easily. He also Used the existing adjustment seat bracket for the front seat, adding steel beams across the area for mounting the seat safely.
Prior to Paint Photos:
She comes out of Paint Looking Fantastic! We Send her straight to the Line X shop to finalize the interior and rear Bed:
Arriving back to the shop! looks like new! We put it on the lift and disassemble the suspension parts and finalize paint and rebuild.
We ordered all new components and only used non corrosive materials for the rebuild. All stainless with non corrosive insulation was used for final assembly:
She is starting to come together! We Opted to keep both the 24 volt setup and run a 12 volt setup for accessories and stereo equipment.
Not sure how many of you have tried to drive on the wheels and tires the gov liquidation Humvees come with but it is just outright dangerous, talk about vibrations and shaking! We fix that with a set of new old stock 37.5"BFGs that were mounted on the 24 bolt wheels (which I prefer), along with removal of the Runflat ring (30lbs of unsprung weight!!!)
Video of Removal of the Runflats:
https://vimeo.com/148726192
No shops locally would mount or touch our wheels so we ordered new gaskets for the rings and mounted them ourselves. Then we sent them to get balanced afterwards.
Video of Mounting them ( I should probably blow out the fire )
https://vimeo.com/148726193
Attachments
-
 50.3 KB Views: 135
Last edited:


")


