• Steel Soldiers now has a few new forums, read more about it at: New Munitions Forums!

  • Microsoft MSN, Live, Hotmail, Outlook email users may not be receiving emails. We are working to resolve this issue. Please add support@steelsoldiers.com to your trusted contacts.


My new 1992 M998 Avenger

TOBASH

Father, Surgeon, Cantankerous Grouch
Steel Soldiers Supporter
3,259
2,991
113
Location
Brooklyn, NY
Don’t forget that you can always use a GPS program like Waze on your cell phone as a speedometer so you do not need a working speedometer in the vehicle if you have a good cell phone.
 

springer1981

Well-known member
844
1,148
93
Location
Maine
Don’t forget that you can always use a GPS program like Waze on your cell phone as a speedometer so you do not need a working speedometer in the vehicle if you have a good cell phone.
Actually I have a 80 mph electric HMMWV speedometer to install. I already put in the sending unit and the wiring while doing the transmission swap. I have to fix the bezel then paint it before I install it. That said, the rear view camera I am installing also has a GPS/dash cam etc., built in. And I am mounting the TCU so I can see the display and it also displays the speed.
 

Mogman

Moderator
Staff member
Moderator
Steel Soldiers Supporter
5,908
8,231
113
Location
Papalote, TX
Actually I have a 80 mph electric HMMWV speedometer to install. I already put in the sending unit and the wiring while doing the transmission swap. I have to fix the bezel then paint it before I install it. That said, the rear view camera I am installing also has a GPS/dash cam etc., built in. And I am mounting the TCU so I can see the display and it also displays the speed.
There are many GPS speedometers available that fit right into the dash (3 3/8"/ 85MM) and most can run on 24V, they are very accurate and care not about the gearing, tires etc. one of the first mods I have done on both of my M998s
 

springer1981

Well-known member
844
1,148
93
Location
Maine
There are many GPS speedometers available that fit right into the dash (3 3/8"/ 85MM) and most can run on 24V, they are very accurate and care not about the gearing, tires etc. one of the first mods I have done on both of my M998s
Thanks for the info but I am not really concerned about the overall accuracy of the speedometer but I suspect it will be pretty close. More important to me is the look of originality even though it isn't original it will appear to belong more than a GPS digital readout style.
 

Mogman

Moderator
Staff member
Moderator
Steel Soldiers Supporter
5,908
8,231
113
Location
Papalote, TX
Thanks for the info but I am not really concerned about the overall accuracy of the speedometer but I suspect it will be pretty close. More important to me is the look of originality even though it isn't original it will appear to belong more than a GPS digital readout style.
I never considered a digital readout, all mine are analog.
IMG_20210307_112954904_HDR.jpg
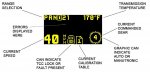
I picked this one for the Duramax conversion because it had the turn signal and high beam indicators in it.
 
Last edited:

springer1981

Well-known member
844
1,148
93
Location
Maine
I am curious if the 4 speed will make it noticeable quieter in the cab. I do not have a need for the performance of a 4 speed, but I would consider it if the noise reduction is substantial. I underestimated how much louder my truck would become when I replaced the soft doors and top with X Doors and an armored roof (it was the cheapest route at the time).
I drove it home from the shop where I did the transmission swap and I will say it is quieter in the cab. As Action said, it is quieter due to the lower RPM of the engine.
 

springer1981

Well-known member
844
1,148
93
Location
Maine
On the drive home I was able to cruise at about 60 mph and that is a HUGE improvement. I am very happy with the TCU I picked, the US Shift QuickShift 4. It came pre-programmed for my application and though I might give it a few tweaks it is good to go as delivered. The cost was less than $700 and compared to some of the kits on ebay for $1200, it is much better. In fact some of the kits use the QuickShift 2 version, the 4 being the better of the them. It has other features I will probably enable at a later date. I'll go over the TCU in a separate post.

The TCU info screen gives Transmission temp and MPH and I used both of those for the drive home. Transmission temp hit about 132 which is about expected considering the outside temp.
 

springer1981

Well-known member
844
1,148
93
Location
Maine
This isn't an ad for the QuickShift 4, it's just my personal experience using the product 1 time.

I ordered it from their website and it asked me questions about my application. First what the transmission is and of course I went with 4L80 then it had specific questions about the year as earlier models require other upgrades, mine didn't. I did opt for the slit loom kit and I'm glad I did. It worked out well. It even asked if I wanted to order a pin removal tool for the connector to feed wires through a small hole. I did not opt for that. My total before tax and shipping was $735.

At some point during checkout I answered additional questions about the application. Here is the information I gave them.

Vehicle: 1992 HMMWV
Transmission: 2004 4L80E
Engine: 6.5 GEP NA Diesel
Horsepower: 160-180hp
Fuel System: Mechanical Diesel
Desired WOT RPM: 3,400
Message: Primary use is a regular on road
driver. 4WD all the time, will have 4WD LO
alternate tune.

With the above information the TCU came pre-programmed and was plug and play.

The wiring was very simple. The primary harness from the transmission to the ECU completely assembled and just needed to be put in the wire loom. The front and rear transmission speed sensors are also plug and play and I just added them to the main harness wire loom. Last there is a "Vehicle" connector and this is where you'll actually need to figure out what to hook up and what options you wish to use. There are only 2 requirements on this connector, Power and TPS. The TPS is a simple 3 wire connection and the manual gives you all the information you need to figure out what pins are what. Very easy. Power is 12vdc and there are several ways this can be done, I choose to use a 24v to 12v DC to DC converter. Unlike the factory TCU this kit doesn't need an Engine Speed Sensor or the brake switch.

Optional features include a secondary tune table that can be enabled with a simple switch. I plan on using this for low range. I just have to fabricate a switch mount on the transfer case shifter to know when it is in low range. Another feature that could be handy while off roading is "paddle" shift. Or likely in this case a couple of buttons. When enabled you can use up and down buttons to manually shift without taking your hands off the wheel. There is a Tach input and Speedometer output that can be used for additional tuning. it is capable of adjusting the speedometer signal to correct speed display. There is also a torque management output if you want to control torque during a shift.

There is a small display on the TCU that has some good info on it. I am mounting the TCU screen in view on the dash, pictures of that to come.

Here are some (edited by me) picture from the manual to illustrate some of what i described above.
 

Attachments

Mogman

Moderator
Staff member
Moderator
Steel Soldiers Supporter
5,908
8,231
113
Location
Papalote, TX
Sounds great, the operation and options, dual tune, paddle shifting etc. are almost identical to the Zero Gravity controller I am using on the 6L80 even though they are vastly different transmissions, my temp is also low and I am thinking of adding a flow control thermostat.

Sure is much more relaxing when you're not waiting for a rod to escape the crankcase!!
 

springer1981

Well-known member
844
1,148
93
Location
Maine
Mounted the TCU behind the dash today. Used some good double sided tape. Next I have to make a Data plate type cover that will cover the old hole and and leave just the display showing. For now it serves its purpose.

TCU2.jpg


TCU1.jpg
 

springer1981

Well-known member
844
1,148
93
Location
Maine
Besides mounting the TCU I also worked on the rear view camera display mount today. After playing with a number of ideas I decided to mount the display on the inside of the visor. This isn't just a rear view camera though. It is intended to mount over a regular rear view mirror in a car and add a number of features. It is actually a mirror as well however I don't have a rear window so that is irreverent to the application here. Some other features include a Dash Cam and GPS.

In Picture 1 I cut out the vinyl for the Dash Cam hole in the visor. Picture 2 I used a hole saw to remove the internal layers of foam, cardboard and a compressed wood? layer.
cam30.jpg


After cutting out the hole I removed the foam and cardboard layer on the inside part of the visor. The I inserted some double sided tape (picture 1) and used a socket to press it down firmly (Picture 2), the end result is picture 3. Then I cut the vinyl and sprayed some adhesive and pulled the vinyl through (Picture 4).
cam31.jpg


After pulling the vinyl through I used a socket to form the hole nicely. Then I found a socket to hold everything down while it dries (Picture 1). Picture 2 shows the finished outside view.
cam32.jpg


The Display isn't fully mounted yet but here is the Dash Cam side (Picture 1). Picture 2 shows the inside display side. To finish the mount I think I will be using 4 trim screws through the visor to screw the display on. So there may be 4 screw heads showing on the camera side in the near future.
cam33.jpg
 

springer1981

Well-known member
844
1,148
93
Location
Maine
I finished the Visor today and mounted it. I used 4 trim screws to mount the display.

Side note, someone previously mentioned the wipers stopped on the wrong side of the window. If anyone knows how to make them stop on the other side feel free to post up as i would like them on the other side.

Visor1.jpg


Visor2.jpg
 

springer1981

Well-known member
844
1,148
93
Location
Maine
I have replaced the windshield washer tank and pump with a new one I bought on epay back in Feb 2021 and today I wanted to test the spray nozzles to see if I should replace them. I put some fluid in it and they did not spray well. In fact it seemed to spray from the line where it connected to the pump. It's a 30 year old line so I investigated the leak. Turns out the brand new pump fitting is split down the length. This is a manufacturing defect and leaks bad. I contacted the seller to see if he would make good on it but it was 10 months ago so who knows.

tank1.jpg

I have a pick pointing to the crack. It goes the entire length of the tube.

tank2.jpg
 

springer1981

Well-known member
844
1,148
93
Location
Maine
I also worked on more of the wiring today. I wired the electronic speedometer, hooked up the reverse lights, installed the TC Lock light and a few other things.

I thought I would show how I am tying in the wires. For example the reverse lights needed a power source and I only wanted them to work when the normal lights functioned. I decided to tap the power side of the brake light switch on the pedal. This way the reverse lights would work anytime the brake lights were available to work.

I start with a 6 inch piece of wire. I attach a male end to it. Then a couple inches away I use my strippers and break the jacket. I use the next size up on the wire strippers so it doesn't damage the strands inside. Example, if I am using 16 ga wire I used 14 ga stripper. After I break the jacket I move about 3/8" away from it and do it again. Then I use wire cutters and cut that piece of the jacket away leaving a bare section of the wire. Then I take the wire I want to hook up, in this case the reverse light wire, and wrap it around the bare part (Picture 1). Pay attention to the direction to wrap it. In this case I wanted the split to head towards the male plug end. Then I solder the wire in place (Picture 2) and put on a 1" piece of shrink tubing and shrink it (Picture 3). Then I put a 2" piece of shrink tubing on and shrink it (Picture 4). Last I put the female plug on and if desired cut the length down before crimping the terminal on.

When done you can pick an appropriate existing wire and just plug this in line. I found the 28vdc feed to the brake light switch and plugged this in and now I have reverse lights.

Splice.jpg
 

Action

Well-known member
3,581
1,551
113
Location
East Tennessee
Wipers.....
Remove bolts holding wiper motor to w/s frame.
Pull out as much as you can.
Remove nut holding linkage to the motor.
Turn wipers by hand to other side of w/s.
Put linkage back on motor with nut.
Put motor back on w/s frame.

The linkage only fits on motor in 2 positions, 180 degrees apart.
If you have tach on w/s frame, it will be easier to remove it.
 

TOBASH

Father, Surgeon, Cantankerous Grouch
Steel Soldiers Supporter
3,259
2,991
113
Location
Brooklyn, NY
Springer…

That pipe, unless it is made of Aluminum, should be easy to solder.

The water pump itself, can be repaired with aftermarket 24 V pumps as per Juanprado
 

Coug

Well-known member
Steel Soldiers Supporter
2,835
4,051
113
Location
Olympia/WA
For the wipers, mine started out on that side, then I switched it. After a few months I switched it back.
For me, having it parked on the driver's side helped keep the water running straight down the windshield out of my line of sight slightly longer due to the amount of Rain-X I use. That and parking it on the passenger side put it in line with the passenger side mirror.

But as was saig, unbolt the wiper motor, remove the nut holding the arm to the shaft, reverse the arm 180 around the shaft, reinstall nut, reinstall wiper motor. A couple minutes job if nothing breaks.
 

springer1981

Well-known member
844
1,148
93
Location
Maine
Wipers.....
Remove bolts holding wiper motor to w/s frame.
Pull out as much as you can.
Remove nut holding linkage to the motor.
Turn wipers by hand to other side of w/s.
Put linkage back on motor with nut.
Put motor back on w/s frame.

The linkage only fits on motor in 2 positions, 180 degrees apart.
If you have tach on w/s frame, it will be easier to remove it.
Thanks for the information, I will give it a shot.


For the wipers, mine started out on that side, then I switched it. After a few months I switched it back.
For me, having it parked on the driver's side helped keep the water running straight down the windshield out of my line of sight slightly longer due to the amount of Rain-X I use. That and parking it on the passenger side put it in line with the passenger side mirror.
The wiper on the driver side is almost in front of the dash cam and in my view more than I like so I am going to try it the other way. I will note the pass side mirror after i try it however I have added the rear view camera to act like a rear view mirror so I am hoping to use the pass side mirror less.
 

springer1981

Well-known member
844
1,148
93
Location
Maine
Springer…

That pipe, unless it is made of Aluminum, should be easy to solder.

The water pump itself, can be repaired with aftermarket 24 V pumps as per Juanprado
Not even going to try to fix that brass tube that is split. It is epoxied into the pump and is not right. I will replace it one way or the other to fix it.
 
Top
AdBlock Detected

We get it, advertisements are annoying!

Sure, ad-blocking software does a great job at blocking ads, but it also blocks useful features of our website like our supporting vendors. Their ads help keep Steel Soldiers going. Please consider disabling your ad blockers for the site. Thanks!

I've Disabled AdBlock
No Thanks