• Steel Soldiers now has a few new forums, read more about it at: New Munitions Forums!

  • Microsoft MSN, Live, Hotmail, Outlook email users may not be receiving emails. We are working to resolve this issue. Please add support@steelsoldiers.com to your trusted contacts.


My new M220 soon to be camper

hendersond

Well-known member
Steel Soldiers Supporter
1,171
29
48
Location
Galesville, WI
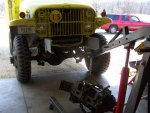
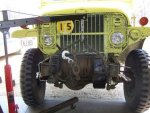
Whoo Hoo! the pickup is loaded up for the third time. Heading out in 45 minutes. Truck is in Freemont MN this time. Taking the wife and kids on theis leg of the recovery. Has been relatively cheep so far, sleeping in trucks, eating out of a cooler and begging food from Maccus. I suspect this leg will cost more than all put together since the family needs fast food, a bed and a pool. The plan is to drop me at the truck, I replace the fuel pump and meet them at the motel. Then eat, swim, sleep and get up and head out by 0800. Should be home by noon.

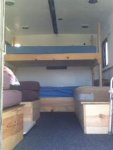
Hopefully Saturday night I can sleep in it at home. :beer:
 

hendersond

Well-known member
Steel Soldiers Supporter
1,171
29
48
Location
Galesville, WI
Making some progress again. Goal is to repaint the interior by Sunday. I had to do some body work in the wire chase and a interior panel. Seems that someone went wild with a prybar while trying to run some wires. Unbelievable how many screws had to come out. We all know 50% are not going to line up again. :( 
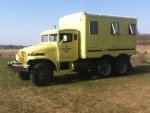
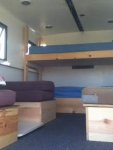
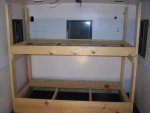
I'm going to move the breaker boxes to the rear, add light switches by the door, and update a bunch of electrical stuff. May even add a exterior motion light for the campground. I love the interior can lights, they are staying. I just neet to find some 6.5" lenses.
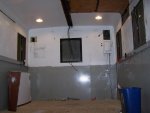
More pics in the morning

Oh yea, I'm going to upgrade to anything other than slot head machine screws.
 

Attachments

hendersond

Well-known member
Steel Soldiers Supporter
1,171
29
48
Location
Galesville, WI
Painting the inside is done. Had to try out the bunk beds to see how much room we have. Should be 24" above mattresses. Feels OK. I wanted some space for storage of not so frequently used items like 4pr snowshoes, rain ponchos, extra blankets, cold weather clothing, and other things.

I have to do some hole patching on the walls next. I put the temporary horizontal 2x4s in so I could assemble it myself. I think I will bevel the ends and keep them. May be good to hang backpacks on.
 

Attachments

hendersond

Well-known member
Steel Soldiers Supporter
1,171
29
48
Location
Galesville, WI
Got the bottom side of the tank sanded and painted today. I'll rebuild the pump tonight and paint the topside in the morning before work. Should be in bu Wednesday!
 

Attachments

hendersond

Well-known member
Steel Soldiers Supporter
1,171
29
48
Location
Galesville, WI
Bitchin black. Good heavens that glossy. :beer:
And it sloughs right off when you spill gas on it.

I've slept in it better than 20 times this summer. That is where I'm going tonight. The breeze goes throught when you open all the windows. It got down to 28 F the other night and I had to turn on my electric heater. Got so hot I had to open a window. Have not really left the yard since the 700 mile trip home. Gave her 2 new batteries today and removed all the non-original wiring. She hardly rolls over before she fires. I see a test run in the morning.
 

Section8

Member
503
6
18
Location
Little Fort, B.C., Canada
Man is that a tight looking truck and camper conversion!
Call me weird but I like some gloss in my paint. Otherwise it just fades in the background. Got to make the truck have that pop for added look at that and what he did there to that truck effect!
I am super curious about how the four door M135 is coming!
When do we get to read up on that!! I will need the pointers for when I find a donor cab!!
Keep it man! Looks awesome.
 

hendersond

Well-known member
Steel Soldiers Supporter
1,171
29
48
Location
Galesville, WI
First test run did not go so good. I have been struggling with fuel delivery issues ever since I got it. The ONLY way it runs good is off a boat gas tank in the front seat and an electric inline fuel pump.
I've had the pump out of the tank probably 30 times. She still runs out of gas with a factory set up. I feel like I've replaced or bypassed everything. Good flow, low pressure. Book says 3psi. I find it hard to believe. Even ran in-line pumps.
Ordered a new aftermarket electric in-line pump today. Plugged the bleed back hole and it still did not work. About ready to light it on fire. Finally got desperate and installed the assembly without the stone filters and outer portion and put it back into the tank. I pulled the pump and carrier with it running. Gas spraying all over. It turns out there is a bleedback hole on the fitting that screws into the pump foot and a bleedback hole on the fitting at the top of the unit. No wonder I did not have much pressure, two 1/8" holes. It is hard to measure 3 psi with anything I have.
Last run was good. Plenty of fuel. No starving. Chuggs at idle and loads up, blowin' black smoke all over. Hummmm........ I see a regulator and return line in my future.
 

Attachments

Last edited:

Gunfreak25

Well-known member
1,561
620
113
Location
Yuma, AZ
Edit, I see you posted pics. Awesome, what the heck is the bleedback hole for anyway? To let fuel return back to the tank after shut down? Any draw back to plugging them you think?
 
Last edited:

hendersond

Well-known member
Steel Soldiers Supporter
1,171
29
48
Location
Galesville, WI
I just took another one apart. Obvious differences in bleed back hole sizes. I assume this is the problem. The screw heads were buggered up on the bad one. This leads me to think someone was in here and did some work on the pump. I did see there is an early and a late fuel shutoff. I seem to have both as well as the "improvised fuel shutoff cock protector plate" suggested in the TM. I cannot find any detailed fuel pump rebuild info in the TMs I have. I wonder if there was an early and late bleed back hole location and I got one that was "fixed" or updated parts added. Maybe someone just plain drilled them out for better cooling or to recirculate the fuel. And yes, they are 1/8" all the way thru.

I'm unsure if the function of the hole(s) I'm guessing here but maybe they are for pump cooling or to prevent cavitation or to allow fuel to flow back into the tank when the truck is not running or to prevent expansion and subsequent flooding. Maybe the hole size reduces the operationg pressure to 3psi????

I would like to know for sure.

By the way, I got VOLUME now. I assume I have a lot of pressure too. Fuel really flows out of the line now! I may be getting the drill out or going ahead with the regulator/return line.
 
Last edited:

Gunfreak25

Well-known member
1,561
620
113
Location
Yuma, AZ
Based on the rest of the simplistic engineering on these vehicles Dan, I would say you hit the nail on the head in regards to the hole size and fuel pressure. Nothing is simpler than regulating fuel flow/pressure by drilling a hole in the pickup or in this case "push up" tube.

While you have the pump out, plug those holes with something real quick and get your fuel pressure gauge out. I'd love to see exactly what kind of difference plugging the holes makes.

The fuel pump screens are obviously really dense. I will be removing mine since my tank is filled with diesel and the pump can use all the help it can get. Will check mine for the holes too and report back when I can.

Tonight it's faster pussycat and Ratt.

Edit: Another theory came to mind. Army likes redundancy under all conditions, including sub arctic conditions. Allowing the fuel to drain from the chassis line after shut down would prevent ruptured lines in the form of freezing fuel. The holes are there to allow fuel to drain back after shut off and consequently control pressure too.
 
Last edited:

Stan Leschert

New member
1,662
90
0
Location
North Vancouver, BC, Canada
You just had the lesson that we learned. There is a "Bleed Back" tube, which is an over preasure relief built in to the in tank pump. If you are going to run an inline pump, either re-plumb the original pick up ( I can try to fing ne needed part numbers, or just get a new pick up, which is meant for suction. a preassure reducer is also mandatory.

If our job had not been done by one of our operators, the bill for the mods, not including the 24V pump that I put in, would have been $1200.oo

New lesson learned.

Than God that it was at a big discount.
Had I known what to look for, I could have done the whole thing myself, for sweet tweet!
 

hndrsonj

Senior Chief/Moderator
Super Moderator
Steel Soldiers Supporter
7,583
358
83
Location
Cheyenne, WY
IMG_0118 (2).jpgSince you aren't updating this thread; are these what you need?
 
Last edited:

hendersond

Well-known member
Steel Soldiers Supporter
1,171
29
48
Location
Galesville, WI
I will have to paint the camper to mach the blackout covers. I will be able to sleep all day. Thank you Jim!
Nice M37 tire by the way.
 

hendersond

Well-known member
Steel Soldiers Supporter
1,171
29
48
Location
Galesville, WI
It was the second day over 60 degrees so far this year. Got up to 75 today so I began mounting the Garwood winch from the parts truck on to the camper. Went very smooth. I have to fight the urge to stick my fingers in the holes to line things up. Alignment punches are a much better option with this heavy stuff. I have another set of clevice mounts that I trimmed up and mounted to the bottom of the bumper just like on a M35a3.

Also threw in some shots of the inside. Not done yet, but the boys and I are sleeping inside it tonight.
 

Attachments

Last edited:
Top
AdBlock Detected

We get it, advertisements are annoying!

Sure, ad-blocking software does a great job at blocking ads, but it also blocks useful features of our website like our supporting vendors. Their ads help keep Steel Soldiers going. Please consider disabling your ad blockers for the site. Thanks!

I've Disabled AdBlock
No Thanks