russ132
Member
- 149
- 2
- 18
- Location
- Kelleys Island OH
Hi there gentleman,
Gimpy brought this thread to my attention and I would like to throw my setup into the mix. My setup is configured to work with a centrifuge but could easily work with a filter setup. I will do a posting for each component in order of the process. Most of the components should be available at the local scrap yard and some welding is required.
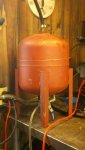
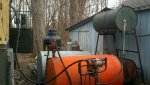
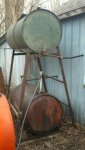
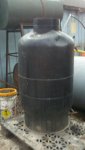
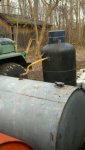
First of all is the Pre-filter and water separator. I picked up a large water pressurization tank for a well water system and a party sized helium tank from the scrap yard. I cut a round hole in the top sized to slide the helium tank down inside. I used helium tanks for these projects because they are plentiful and contain no explosive gases (like propane). I then cut out the rubber bladder inside the pressurization tank and thoroughly cleaned the inside. Then the helium tank had it's top off. A one inch hole was cut into the bottom and a length of pipe was welded to the bottom of the helium tank. The length of the pipe was sized to be just short of the bottom of the pressurization tank. Then the helium tank was welded into the top of the pressurization tank. A one inch hole was cut into the upper side portion of the pressurization tank and a 3/4 inch pipe coupler was welded onto the side of the pressurization tank. there is already a pipe fitting in the bottom of the pressurization tank.
Construction is now complete.
I then purchased a filter basket designed to fit in the top of a 5 gallon bucket from Dudadiesel.com. (great website for filtering supplies and one of the cheapest). They sell these baskets in many different micron sizes. They are cheap so I bought a couple and experimented with which one worked best for me. Keep in mind that this is just the pre-filtering step, meant for large chunks.
This basket will fit very nicely inside the helium tank. The helium tank is now designed to work as a huge funnel with a coarse filter inside. When the oil is poured into the funnel it flows through the pipe welded onto the bottom and is fed
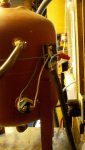
into the bottom of the pressurization tank. Water is heavier than oil so it stays at the bottom of the tank and oil naturally rises to the top. Once your tank is full the oil flows out the pipe coupler welded onto the upper side of the pressurization tank.
The beauty of this setup is the water can be drained out of the bottom without any pumping. I simply put a valve on the pipe fitting on the bottom of the tank and use that to drain water from the bottom of the tank. Because the tank has a rounded bottom the water settles down to the drain quite nicely. I imagine that the bigger the tank you use the more time the water has to settle out. I use no heat in this stage. Just plain old gravity. Remember, Gravity is your friend. My entire setup is constructed to use the most out of gravity.
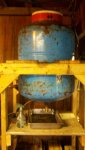
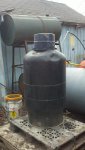
I found an old canning pot that works great as a lid for the helium tank. Looks kinda funny but it was free and it works. The only cost at this stage was the scrap metal and a few plumbing pieces. Also the filter baskets. These can be washed with whatever you choose to use. I have used water, gas, diesel. All worked great.
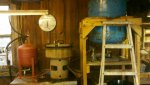
I have the outflow of this separator plumbed into a 300 gallon holding tank. Once this tank is full I pump it up to a high tank for the next stage. It could just as easily be plumbed into a heater for canister filtering. gravity could be used for that as well.
Gimpy brought this thread to my attention and I would like to throw my setup into the mix. My setup is configured to work with a centrifuge but could easily work with a filter setup. I will do a posting for each component in order of the process. Most of the components should be available at the local scrap yard and some welding is required.
First of all is the Pre-filter and water separator. I picked up a large water pressurization tank for a well water system and a party sized helium tank from the scrap yard. I cut a round hole in the top sized to slide the helium tank down inside. I used helium tanks for these projects because they are plentiful and contain no explosive gases (like propane). I then cut out the rubber bladder inside the pressurization tank and thoroughly cleaned the inside. Then the helium tank had it's top off. A one inch hole was cut into the bottom and a length of pipe was welded to the bottom of the helium tank. The length of the pipe was sized to be just short of the bottom of the pressurization tank. Then the helium tank was welded into the top of the pressurization tank. A one inch hole was cut into the upper side portion of the pressurization tank and a 3/4 inch pipe coupler was welded onto the side of the pressurization tank. there is already a pipe fitting in the bottom of the pressurization tank.
Construction is now complete.
I then purchased a filter basket designed to fit in the top of a 5 gallon bucket from Dudadiesel.com. (great website for filtering supplies and one of the cheapest). They sell these baskets in many different micron sizes. They are cheap so I bought a couple and experimented with which one worked best for me. Keep in mind that this is just the pre-filtering step, meant for large chunks.
This basket will fit very nicely inside the helium tank. The helium tank is now designed to work as a huge funnel with a coarse filter inside. When the oil is poured into the funnel it flows through the pipe welded onto the bottom and is fed
into the bottom of the pressurization tank. Water is heavier than oil so it stays at the bottom of the tank and oil naturally rises to the top. Once your tank is full the oil flows out the pipe coupler welded onto the upper side of the pressurization tank.
The beauty of this setup is the water can be drained out of the bottom without any pumping. I simply put a valve on the pipe fitting on the bottom of the tank and use that to drain water from the bottom of the tank. Because the tank has a rounded bottom the water settles down to the drain quite nicely. I imagine that the bigger the tank you use the more time the water has to settle out. I use no heat in this stage. Just plain old gravity. Remember, Gravity is your friend. My entire setup is constructed to use the most out of gravity.
I found an old canning pot that works great as a lid for the helium tank. Looks kinda funny but it was free and it works. The only cost at this stage was the scrap metal and a few plumbing pieces. Also the filter baskets. These can be washed with whatever you choose to use. I have used water, gas, diesel. All worked great.
I have the outflow of this separator plumbed into a 300 gallon holding tank. Once this tank is full I pump it up to a high tank for the next stage. It could just as easily be plumbed into a heater for canister filtering. gravity could be used for that as well.
Attachments
-
 33.5 KB Views: 72
 -
 52.1 KB Views: 66
 -
 31.7 KB Views: 65