• Steel Soldiers now has a few new forums, read more about it at: New Munitions Forums!

  • Microsoft MSN, Live, Hotmail, Outlook email users may not be receiving emails. We are working to resolve this issue. Please add support@steelsoldiers.com to your trusted contacts.

New high back seats???

tigertank

New member
140
0
0
Location
angleton texas
JUST GOT THE NEW SEATS AND ....well the instructions are a little difficult for those of us not so mech inclined the guy at eastern surplus said it was a plain swap and bolt well there seems to drilling and rivets popping! are there any videos of an installation?
 

NDT

Well-known member
Steel Soldiers Supporter
10,184
5,913
113
Location
Camp Wood/LC, TX
No videos I know of. Get a 16" long chisel with a 1" wide cutting tip, give the rivet head a whack using the chisel and a good size hammer.
 

DSO_351

Member
85
0
6
Location
Dayton Metroplex Ohio
Front kit? or Rear kit? Rear Kit uses thicker toolbox lids. Front kit for passenger has plate that fits on top of the fiberglass cover. New holes are drilled using the plate as a guide. Driver's is another story. A center punch, hammer, and drill make rivet removal easier. The instructions are copied, not printed well and maybe hard to read.
 

DatGuyC

Member
537
20
18
Location
Essex, Maryland
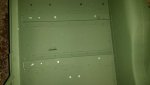
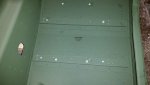
Definetely not just a swap and bolt. The passengers side is easy as you just put the plate on the battery cover, mark your 4 holes, and drill some new ones. You also have to notch the center section of the battery box where the front right bolt will hit it. The drivers side is much more work. You have to remove the stock drivers seat base completely. Then what I found to work is to bolt the two main brackets with all the holes to the bottom of the seat while its out of the truck and to use the fire extinguisher bracket to hold everything together to make sure you get your seat base holes in the right location. Unbolt the brackets from the seat and put the brackets on the floor of the truck kinda like a stencil and drill the new holes in your floor through the holes in the brackets. The directions aren't real clear on where the holes should go but there aren't many places the stencil bracket will fit, remember measure twice and cut/drill once. Once you have your holes drilled then its just a matter of disassembling the brackets, bolting/riveting them to the floor(there is also a bracket that goes underneath the floor pan for support) and installing your seat.
 

tigertank

New member
140
0
0
Location
angleton texas
yes so it seems I wish I cud see a pic of the driver seat installed and then the plate tjhat goes on the battery box I cant tell from instructions which way it goes? any body have a close up pic??
 

TedG

Well-known member
1,133
38
48
Location
MI USA
I can get them for you tomorrow...I have done about 20 and its not hard. Have primer and paint ready to cover the bare aluminum when you remove the old drivers base.
 

TedG

Well-known member
1,133
38
48
Location
MI USA
Front drivers seat is what I am referring to. Either use the original seat and matching seat base or replace it with new style seat and its matching base. Mixing them is not what I would do.
 

nickd

Active member
859
36
28
Location
Newport, Delaware
It has been a while since I put the high back seats in. I drilled out the rivets to remove the drivers seat base. Installing a new drivers seat base is the way to go.
 
Top
AdBlock Detected

We get it, advertisements are annoying!

Sure, ad-blocking software does a great job at blocking ads, but it also blocks useful features of our website like our supporting vendors. Their ads help keep Steel Soldiers going. Please consider disabling your ad blockers for the site. Thanks!

I've Disabled AdBlock
No Thanks