• Steel Soldiers now has a few new forums, read more about it at: New Munitions Forums!

  • Microsoft MSN, Live, Hotmail, Outlook email users may not be receiving emails. We are working to resolve this issue. Please add support@steelsoldiers.com to your trusted contacts.

New M-1083 owner. So, here we go!!

Mullaney

Well-known member
Steel Soldiers Supporter
Supporting Vendor
7,407
19,150
113
Location
Charlotte NC
What a day. I replaced the trailer and park brake valves on the dash today. Uh... There is like no room in there! That had to be one of the most frustrating things I've done so far. Now that those two huge leaks are gone, I killed the engine, released the brakes and heard more hissing. Got out the soapy water and found this. IN 3 different pots! Ugh... Isn't the diaphragm replaceable? It's the larger one leaking. I can still hold 120psi pressure. I also put a kit in the air dryer. It's the original finned unit and works fine.


View attachment 886612
.
There is a pretty good post here that explains what you need to know - along with warnings about what will happen if you release that bolt where the big bubble is in your picture (without the caging bolt in place). This is a 2015 vintage thread, but there is a LOT of good information in it as well as links to the proper manuals on how to do what you want to do - safely.

 
Last edited:

RRaulston

Well-known member
220
541
93
Location
Sahuarita, Arizona
Ronmar, I want to diagnose the pressure switch on the side of the wet tank (the $500 one) to see if that is my CTIS issue. If I unplug its wire and jumper the plug end, can I fool the CTIS into thinking the pressure is correct. My thoughts are If I Jumper'd 2 of the three wires and the CTIS activates, the switch is the issue. Thoughts??
 

Ronmar

Well-known member
3,308
6,681
113
Location
Port angeles wa
Ronmar, I want to diagnose the pressure switch on the side of the wet tank (the $500 one) to see if that is my CTIS issue. If I unplug its wire and jumper the plug end, can I fool the CTIS into thinking the pressure is correct. My thoughts are If I Jumper'd 2 of the three wires and the CTIS activates, the switch is the issue. Thoughts??
Yes you can do that to initiate a pressure check. I don’t think you can operate long term like that as the controller is looking for it to cycle in response to it using air from the wet tank during a fill.

You can also connect a pressure gauge to the wet tank and measure switch resistance. The switch should close when the tank goes over ~117 PSI and open when the tank pressure drops to ~89PSI. This is a good thing to do anyway to confirm your compressor is set correctly. Have troubleshot a few to the simple fact their compressor governor was not filling the tank above 117PSI… it should be set to unload the compressor at 125PSI…

If your sw is bad, You can cook up a cost effective alternative to that switch using a common 90-120PSI compressor control switch and a relay to invert its output. About $20 in parts…

So what exactly is your CTIS doing/indicating On its display?
 

RRaulston

Well-known member
220
541
93
Location
Sahuarita, Arizona
Yes you can do that to initiate a pressure check. I don’t think you can operate long term like that as the controller is looking for it to cycle in response to it using air from the wet tank during a fill.

You can also connect a pressure gauge to the wet tank and measure switch resistance. The switch should close when the tank goes over ~117 PSI and open when the tank pressure drops to ~89PSI. This is a good thing to do anyway to confirm your compressor is set correctly. Have troubleshot a few to the simple fact their compressor governor was not filling the tank above 117PSI… it should be set to unload the compressor at 125PSI…

If your sw is bad, You can cook up a cost effective alternative to that switch using a common 90-120PSI compressor control switch and a relay to invert its output. About $20 in parts…

So what exactly is your CTIS doing/indicating On its display?
The left button, "hwy" I think, blinks all the time. It never goes solid, and I never hear a solenoid from under the passenger dash activate. When I drive around 40mph or so, all 5 lights flash. pressing any of the buttons do nothing. After watching someone on YouTube have a similar issue, it was that pressure switch. I will buy a pressure gauge tomorrow and verify actual tank pressure.
 

RRaulston

Well-known member
220
541
93
Location
Sahuarita, Arizona
Depends on exactly where the air is coming from… Where exactly is the air coming from? All the brake venting should be plumbed outside the cab. The treadle valve vent and the park valve vent are tied together and exit thru a port in the floor right in front of the radiator. If the treadle was bypassing to vent while pressing the pedal(dirty or failing valve), that is where the air should be going…
Finally had a helper to push the brake pedal for me. The pedal connects to the backside of the valve or further most forward part. The leak is directly in line with the pedal connection but furthest aft (closest to driver). There appears to be a large grommet/plastic piece? with a 90-degree fitting in its center. Its leaking out from around the gromet/plastic piece the 90 is screwed into. Not the 90-degree fitting itself... When I come to a stop, I need to put it in neutral and set the brake as the escaping air drains the tank... We will not be driving until this gets sorted. Thanks!!
 

Ronmar

Well-known member
3,308
6,681
113
Location
Port angeles wa
Finally had a helper to push the brake pedal for me. The pedal connects to the backside of the valve or further most forward part. The leak is directly in line with the pedal connection but furthest aft (closest to driver). There appears to be a large grommet/plastic piece? with a 90-degree fitting in its center. Its leaking out from around the gromet/plastic piece the 90 is screwed into. Not the 90-degree fitting itself... When I come to a stop, I need to put it in neutral and set the brake as the escaping air drains the tank... We will not be driving until this gets sorted. Thanks!!
That fitting on the back is the vent port. It usually has a hose attached that runs into the center of the dash to a vent port in the floor up in front of the radiator. Is there not a hose attached to it?

the treadle valve is a manual pressure regulator. It passes tank air from its input ports to its output service ports to feed the brakes. the output pressure(and braking force) is determined by pedal force applied. When you let up on the pedal, the valve vents output pressure out that vent port, but it should only vent while the pedal is being lifted and only until the pedal is fully released. Either something is bad, or sometimes they get crap in the valve that keeps the vent port open even after the pedal is released…
 

RRaulston

Well-known member
220
541
93
Location
Sahuarita, Arizona
That fitting on the back is the vent port. It usually has a hose attached that runs into the center of the dash to a vent port in the floor up in front of the radiator. Is there not a hose attached to it?

the treadle valve is a manual pressure regulator. It passes tank air from its input ports to its output service ports to feed the brakes. the output pressure(and braking force) is determined by pedal force applied. When you let up on the pedal, the valve vents output pressure out that vent port, but it should only vent while the pedal is being lifted and only until the pedal is fully released. Either something is bad, or sometimes they get crap in the valve that keeps the vent port open even after the pedal is released…
There is a hose attached to it and it vents air when released, but when I hold the pedal down enough to hold the truck stopped at a stop light, there is a continuous large leak from the back of the valve. When I bought it, I recall holding the pedal steady to stop the truck and it didn't continually leak, only vent when released. I do have a rebuild kit on order!!
 

tennmogger

Well-known member
Steel Soldiers Supporter
1,576
529
113
Location
Greenback, TN
There is a hose attached to it and it vents air when released, but when I hold the pedal down enough to hold the truck stopped at a stop light, there is a continuous large leak from the back of the valve. When I bought it, I recall holding the pedal steady to stop the truck and it didn't continually leak, only vent when released. I do have a rebuild kit on order!!
Sounds like you have some dirt in one of the two sections of the treadle valve. More details here, and how to test for the failure spot.


Post 7.
 

RRaulston

Well-known member
220
541
93
Location
Sahuarita, Arizona
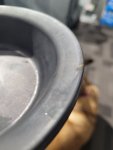
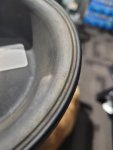
well, yesterday was a sh!t show...I removed the rear leaking park brake assembly and attempted to replace the rubber diaphragm. The safety ears make it extremely difficult to get perfect alignment, but after an hour, I got it. Leaked like hell. Repeat above 5 times, leak like hell. I removed the entire assembly and put it in my press, so gravity wasn't against me, and actually was way easier to align, leaked like hell. Repeat 10 times. At this point, there has to be something wrong. I had 4 new Haldex diaphragms and I tried all 4. Leaked like hell. Flipped the orientation of the clamps. Leaked like hell. 5 hours later the only thing left is a disc issue, so I ordered a new one of a different brand to compare. Well, they are different. The Haldex lip is slightly thinner and has no ridge. The AutoZone lip is thicker and has double ridges on both sides. Its leaking because I can't tighten it enough to create the seal as the clamps bottom out against the safety ears (do to the thinner Haldex lip?). I think I saw a video where someone cut off the ears but I'm not there yet. I will get this installed this morning and report back. FYI, installing the diaphragm in the press allows you to perfectly align it and hold just enough pressure on the cover to Easily install the clamps. BTW, it took a 24" pipe wrench to loosen the lock ring. No spanner would touch that..
20221227_061853.jpg20221227_061842.jpg
 

Mullaney

Well-known member
Steel Soldiers Supporter
Supporting Vendor
7,407
19,150
113
Location
Charlotte NC
well, yesterday was a sh!t show...I removed the rear leaking park brake assembly and attempted to replace the rubber diaphragm. The safety ears make it extremely difficult to get perfect alignment, but after an hour, I got it. Leaked like hell. Repeat above 5 times, leak like hell. I removed the entire assembly and put it in my press, so gravity wasn't against me, and actually was way easier to align, leaked like hell. Repeat 10 times. At this point, there has to be something wrong. I had 4 new Haldex diaphragms and I tried all 4. Leaked like hell. Flipped the orientation of the clamps. Leaked like hell. 5 hours later the only thing left is a disc issue, so I ordered a new one of a different brand to compare. Well, they are different. The Haldex lip is slightly thinner and has no ridge. The AutoZone lip is thicker and has double ridges on both sides. Its leaking because I can't tighten it enough to create the seal as the clamps bottom out against the safety ears (do to the thinner Haldex lip?). I think I saw a video where someone cut off the ears but I'm not there yet. I will get this installed this morning and report back. FYI, installing the diaphragm in the press allows you to perfectly align it and hold just enough pressure on the cover to Easily install the clamps. BTW, it took a 24" pipe wrench to loosen the lock ring. No spanner would touch that..
View attachment 887158View attachment 887159
.
The band clamp that goes around the outside of the pancake shaped holders... It is streached? Are the two ends touching? That band clamp should slide a little to actually clamp the rubber. Might be worth snugging the bolt, then lightly tapping all the way around it, then tighten a little more. Don't kill it, tap lightly and snug it a little more...

Another possibility is that there is "crud" that isn't allowing the rubber to seat correctly. The mating surfaces should be smooth.

Pictures might be useful too.
 

RRaulston

Well-known member
220
541
93
Location
Sahuarita, Arizona
.
The band clamp that goes around the outside of the pancake shaped holders... It is streached? Are the two ends touching? That band clamp should slide a little to actually clamp the rubber. Might be worth snugging the bolt, then lightly tapping all the way around it, then tighten a little more. Don't kill it, tap lightly and snug it a little more...

Another possibility is that there is "crud" that isn't allowing the rubber to seat correctly. The mating surfaces should be smooth.

Pictures might be useful too.
The band clamps are in perfect shape. I'm confident this is the first time they were removed. You cannot tighten it anymore. They are bottomed out against the safety flange. I will get a pic of it today. Also, curious to note, the rubber durometer of the two is different. The Haldex is very soft rubber, and the AutoZone is firmer..... Maybe the softer rubber is allowing the clamps to bottom out. None of the other clamps on the other 7 park brakes are bottomed out... interesting..
 

Wingnut13

Well-known member
Steel Soldiers Supporter
233
560
93
Location
Strafford, NH
Man, that’s terrible. I’ve been there, hard to not start just throwing tools and parts…. When you get it squared away I’m sure there will be a vital piece of information that we will all need at some point sooner or later. Hang in there.
 

RRaulston

Well-known member
220
541
93
Location
Sahuarita, Arizona
ok, so here is the update. Installed the Oreilly diaphragm. NOT AutoZone like I stated above. I shop both so often it all bleeds together. I used the hydraulic press to HOLD the cover in place while I installed the clamps. The same amount of pressure as if you used both hands and pushed the cover in its seat. Once the clamps are on and the bolts are in and snug, I turn the pot sideways and use the same amount of force on the clamps. By squeezing the two clamp halves together, it appeared to center the clamp force equally. Then final tight while squeezing the clamps. 1st try and zero leaks. I ordered 7 more and will do them all.. I will get a video made to show what I did maybe next week. I really think the soft rubber of the Haldex compounded by not being able to tighten the clamps enough due to bottoming out on the safety ears may have been the issue...:shrugs:
 

RRaulston

Well-known member
220
541
93
Location
Sahuarita, Arizona
.
The band clamp that goes around the outside of the pancake shaped holders... It is streached? Are the two ends touching? That band clamp should slide a little to actually clamp the rubber. Might be worth snugging the bolt, then lightly tapping all the way around it, then tighten a little more. Don't kill it, tap lightly and snug it a little more...

Another possibility is that there is "crud" that isn't allowing the rubber to seat correctly. The mating surfaces should be smooth.

Pictures might be useful too.
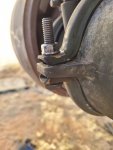
Here is the pic of the band clamps bottoming out on the safety ear. I believe this is happening due to the thinner lip and softer rubber of the Haldex diaphragm. The Oreilly diaphragm solved the whole issue. Your idea of tapping the clamp is spot on. I got the same results by using the press gently on each half. I am going to do a video on this next week. I can save someone a ton of time. Also of interest is the different diameters of the parts being clamped. I'm pretty sure the center section of the unit is a smaller diameter than the cover. I will attempt to show this in the video as well.

20221227_080738.jpg
20221227_071819.jpg
 

coachgeo

Well-known member
5,000
3,355
113
Location
North of Cincy OH
Interesting on what worked what didnt. Was either the not work or worked the same as the ones in the yellow spread sheet at top of this forum as shown below. Looks like what you found worked is type 18... This is spring break correct?


Spring brake diaphragmTruck pro / NapaType 12OreillyRB-D12
Service brake diaphragm Truck Pro / NapaType 9OreillyRB-D09
 

RRaulston

Well-known member
220
541
93
Location
Sahuarita, Arizona
Interesting on what worked what didnt. Was either the not work or worked the same as the ones in the yellow spread sheet at top of this forum as shown below. Looks like what you found worked is type 18... This is spring break correct?


Spring brake diaphragmTruck pro / NapaType 12OreillyRB-D12
Service brake diaphragmTruck Pro / NapaType 9OreillyRB-D09
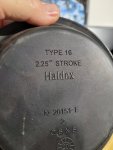
It is a type 16. I have an MTV. The part numbers do not match the spread sheet. Perhaps they are for an LMTV? I originally ordered the type 12 based on the spreadsheet and no bueno. I know the number looks like a type 18, but it's a 16. And all 8 of mine are the same.
 

RRaulston

Well-known member
220
541
93
Location
Sahuarita, Arizona
Interesting on what worked what didnt. Was either the not work or worked the same as the ones in the yellow spread sheet at top of this forum as shown below. Looks like what you found worked is type 18... This is spring break correct?


Spring brake diaphragmTruck pro / NapaType 12OreillyRB-D12
Service brake diaphragmTruck Pro / NapaType 9OreillyRB-D09
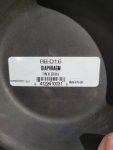
this is the one I would not buy based on my issues..

20221227_071827.jpg
 

coachgeo

Well-known member
5,000
3,355
113
Location
North of Cincy OH
this is the one I would not buy based on my issues..

thanks..

Can anyone verify the LMTV A1 is different or not on these Spring Brake Diaphragms?
Can anyone verify if the LMTV and? or? MTV A0 is different or not on Spring Brake Diaphragms

Anyone's experience show the Yellow spread sheet wrong from A0 LMTV?
 
Top
AdBlock Detected

We get it, advertisements are annoying!

Sure, ad-blocking software does a great job at blocking ads, but it also blocks useful features of our website like our supporting vendors. Their ads help keep Steel Soldiers going. Please consider disabling your ad blockers for the site. Thanks!

I've Disabled AdBlock
No Thanks