

Kenny0
Active member
- 121
- 30
- 28
- Location
- Leland, Iowa
I purchased a MEP 802 on an eBay auction in January of this year. I was looking at GL and eBay for several months. Some info on GL did not make me feel real confident for a one time purchase. Also seemed like it could be a big hassle. This one came up on eBay, bid on it and won. Paid 1625 for it. Seemed like a good deal with a new engine with 43 hours and looked very nice with the usual dings here and there. The generator was in Illinois, 400 miles one way. Got there to pick it up and he went through a lot of things with me, explained a lot, very nice guy. He works full time, but said he buys from GL and resells for a hobby and make a few extra bucks. The inside is all OD green except for the base where the engine mounts. We loaded it up with control panel forward (the heavy end). Got it home and unloaded.


Started looking over everything with a fine tooth comb, everything inside looks just like new, all the hoses look like new, fuel lines and wiring harness all look new. The control panel and inside all looks new, the current shunt inside the control panel did look it's age and the battle short switch cover also looks its age. Seller said he thought it was a reset but couldn't say because it did not have the tag. I would have to agree with him, it looks like a reset to me. According to the engine tag the engine was done in Oregon and left that facility with 15 hours on the hour meter.


The first thing on the agenda was a trailer. The trailer you see started out as a boat trailer. I narrowed it up and cut everything to length and welded it up. The fuel tank started out life as 100 pound LP cylinder. I shortened it up about 11 inches to make it the same width as the generator. I used a short length of 3 inch pipe for a water trap and from there it tapers down to the drain. The fuel pickup sits up from the bottom of the tank 5/8 inch. The piece on top of the tank is a length of four-inch pipe. I put that on the tank to keep the diesel and oxygen contact to a minimum, because it might not be used on a regular basis and could be sitting a lot, also will be using Pri-D. The gallon capacity calculates to about 21 gallons, hard to calculate because the shape of the ends, I subtracted 2 inches from the length for the calculation so I think it should be close. I'll know for sure when I fill it up with fuel. Total fuel capacity of 26 gallons should be enough capacity for a long run without refueling. The way the tank is mounted it is electrically isolated from the trailer so I put a grounding wire on the tank and connected to the frame of the trailer. I also grounded the generator to the frame of the trailer.

The fitting I used on the generator to connect the auxiliary fuel tank is actually a hydraulic fitting. I cut off the outer sleeve which is used to crimp on the hydraulic hose and used heat shrink tubing to overlap the area where I ground the sleeve off to protect it from rust. That fitting is a weatherhead part number 04U–665 for ¼ inch ID hose.
The decals are more for other people than myself, hopefully this will help from gasoline being pumped into the tanks. The generator itself is already marked as diesel but I think the decal brings more contrast and is easier to see. The decals were purchased on eBay. I think I can give the sellers eBay username but first I want to say that I have absolutely no relationship whatsoever with these eBay users other than I purchased a product from them. The yellow decals came from world-graphix and the green decals came from decalbarn . You can always do your own search but if these decals work okay for you, this will save a awful lot of searching. The trailer name plate was also purchased on eBay. The username is dldines. His current price is $21 and that's the plate and engraving both. Just make sure you get the listing with the engraving included. Most eBay sellers wanted $25-$30 just for the engraving, plus you have to buy their plate. I would list the item numbers, but they are always subject to change.


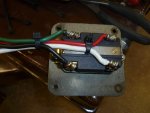
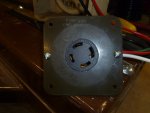
The next things I have done are on the output lugs, I removed those thin wires that were on the lugs, the only thing I can think of why they might be beneficial is they would keep from losing the nut on an unused lug. I replaced those wires with heat shrink tubing, which I think will do the same thing but make it safer. I know that any time the engine is running, that door should be closed, but if you need to do any troubleshooting, the heat shrink tubing will make it safer than having those wires sticking out an inch and a half. I also mounted 2 outlets in the door. They should be GFCI outlets, but I used what I already had and will have to replace them in the future. Each outlet is protected with a 20 amp circuit breaker. One outlet is powered through L1 and the other outlet is powered through L3. The enclosure holding the circuit breakers is custom-made. These are commercially available circuit breakers with screw connections on the input and the output. The part number for the circuit breakers is Square D QOB120VH, these were purchased on eBay. I also mounted a 30 amp receptacle where the connection wires would normally be routed. The plate I used for the receptacle was a solid plate installed between the two rear doors at the bottom. It was the same size and bolt pattern as was needed where I was going to mount the receptacle. I used a hole saw to cut the opening for the receptacle. The plate with a big hole that I removed got mounted back in the same spot where the solid plate came from. The flexible enclosure for the output cables was put in the storage box on the side. The wrench for the lugs was also put in the side box, by the way the nut size on the lugs is 1-5/16. The receptacle hookup is for solid copper only and I was using stranded wire. You might think to just tin the ends of the stranded wire and that would work. But in my experience the connection will become loose after a time. My theory on this is that lead is a soft metal and will compress overtime with pressure, thus the loose connection. You can see my solution in the pictures. I stripped back approximately 1 inch from the main wire I wanted to connect and twisted 12gauge wire around that after I tinned the main wire. Tinning the main wire first made wrapping it with the 12awg easier. After soldering I adjusted to fit and trimmed off the excess. The connections on the outlets and on the circuit breakers I used the insulated crimp on eye connectors, but I removed the insulation then crimped them, soldered them and used heat shrink on the connection. Probably did not need solder, but I used that as extra insurance. The connections on the lugs are stripped copper only.

The wheel chocks were made with 1 ½ inch angle iron, this is the stuff that has the holes and the slots in it and from a farm store. I covered it with heat shrink tubing to give more grip on a hard surface. They fit nicely in the rear storage compartment.

Some of the doors did not latch very tight so I used some heat shrink tubing and that did the trick. After I started browsing this forum, there was a user that used hose and that is also a great idea.


When browsing the posts here, one user was using hardware cloth to rodent and mouse proof his generator. That is a great idea, I can't remember the users name, but I thank you. I used ¼ inch hardware cloth and mounted mine on the inside underneath the air deflector, this was a cosmetic reason only. The piece I used was cut to 10.25” x 16.5”, if I had it to do over again I would make that piece 10.25” x 16.25” that would make it a little bit easier to install. The bolts with a circle around them need to be removed and the bolts with the arrows need to be loosened way up without removal. When installing the hardware cloth push it up to the bolts that were left in and reinstall all the other bolts. Some bolt holes will have part of the wire mesh in them. I used a small wire cutter to snip the wire and pushed it out of the way so the bolts would go back in. Also used several small zip ties to give the wire more support. I have the other side and the top to do yet. Also, there is a rectangular hole under the engine that will need hardware cloth. If you are mouse proofing there's also a three-quarter inch hole in the side of the base that I plugged with a 5/16 inch bolt and 2 flat washers. Mice can be very persistent and creative if they want to go someplace. I have seen the damage mice can do many times. The black vertical line towards the right side at the bottom of the picture is the balance point of an 802 with a 1/4 tank of fuel.
I have been debating whether to use digital volt and amp gauges for load balance between legs or just check and correct load balance on a normal load with a clamp on meter and call that good. I would appreciate your input on that. I would also appreciate any input on anything else I should do. Is there any way to find the history on this? There is a great bunch of folks on this site with a vast amount of knowledge to share. Well, this better be enough for now before this turns into a short story.
Started looking over everything with a fine tooth comb, everything inside looks just like new, all the hoses look like new, fuel lines and wiring harness all look new. The control panel and inside all looks new, the current shunt inside the control panel did look it's age and the battle short switch cover also looks its age. Seller said he thought it was a reset but couldn't say because it did not have the tag. I would have to agree with him, it looks like a reset to me. According to the engine tag the engine was done in Oregon and left that facility with 15 hours on the hour meter.
The first thing on the agenda was a trailer. The trailer you see started out as a boat trailer. I narrowed it up and cut everything to length and welded it up. The fuel tank started out life as 100 pound LP cylinder. I shortened it up about 11 inches to make it the same width as the generator. I used a short length of 3 inch pipe for a water trap and from there it tapers down to the drain. The fuel pickup sits up from the bottom of the tank 5/8 inch. The piece on top of the tank is a length of four-inch pipe. I put that on the tank to keep the diesel and oxygen contact to a minimum, because it might not be used on a regular basis and could be sitting a lot, also will be using Pri-D. The gallon capacity calculates to about 21 gallons, hard to calculate because the shape of the ends, I subtracted 2 inches from the length for the calculation so I think it should be close. I'll know for sure when I fill it up with fuel. Total fuel capacity of 26 gallons should be enough capacity for a long run without refueling. The way the tank is mounted it is electrically isolated from the trailer so I put a grounding wire on the tank and connected to the frame of the trailer. I also grounded the generator to the frame of the trailer.
The fitting I used on the generator to connect the auxiliary fuel tank is actually a hydraulic fitting. I cut off the outer sleeve which is used to crimp on the hydraulic hose and used heat shrink tubing to overlap the area where I ground the sleeve off to protect it from rust. That fitting is a weatherhead part number 04U–665 for ¼ inch ID hose.
The decals are more for other people than myself, hopefully this will help from gasoline being pumped into the tanks. The generator itself is already marked as diesel but I think the decal brings more contrast and is easier to see. The decals were purchased on eBay. I think I can give the sellers eBay username but first I want to say that I have absolutely no relationship whatsoever with these eBay users other than I purchased a product from them. The yellow decals came from world-graphix and the green decals came from decalbarn . You can always do your own search but if these decals work okay for you, this will save a awful lot of searching. The trailer name plate was also purchased on eBay. The username is dldines. His current price is $21 and that's the plate and engraving both. Just make sure you get the listing with the engraving included. Most eBay sellers wanted $25-$30 just for the engraving, plus you have to buy their plate. I would list the item numbers, but they are always subject to change.
The next things I have done are on the output lugs, I removed those thin wires that were on the lugs, the only thing I can think of why they might be beneficial is they would keep from losing the nut on an unused lug. I replaced those wires with heat shrink tubing, which I think will do the same thing but make it safer. I know that any time the engine is running, that door should be closed, but if you need to do any troubleshooting, the heat shrink tubing will make it safer than having those wires sticking out an inch and a half. I also mounted 2 outlets in the door. They should be GFCI outlets, but I used what I already had and will have to replace them in the future. Each outlet is protected with a 20 amp circuit breaker. One outlet is powered through L1 and the other outlet is powered through L3. The enclosure holding the circuit breakers is custom-made. These are commercially available circuit breakers with screw connections on the input and the output. The part number for the circuit breakers is Square D QOB120VH, these were purchased on eBay. I also mounted a 30 amp receptacle where the connection wires would normally be routed. The plate I used for the receptacle was a solid plate installed between the two rear doors at the bottom. It was the same size and bolt pattern as was needed where I was going to mount the receptacle. I used a hole saw to cut the opening for the receptacle. The plate with a big hole that I removed got mounted back in the same spot where the solid plate came from. The flexible enclosure for the output cables was put in the storage box on the side. The wrench for the lugs was also put in the side box, by the way the nut size on the lugs is 1-5/16. The receptacle hookup is for solid copper only and I was using stranded wire. You might think to just tin the ends of the stranded wire and that would work. But in my experience the connection will become loose after a time. My theory on this is that lead is a soft metal and will compress overtime with pressure, thus the loose connection. You can see my solution in the pictures. I stripped back approximately 1 inch from the main wire I wanted to connect and twisted 12gauge wire around that after I tinned the main wire. Tinning the main wire first made wrapping it with the 12awg easier. After soldering I adjusted to fit and trimmed off the excess. The connections on the outlets and on the circuit breakers I used the insulated crimp on eye connectors, but I removed the insulation then crimped them, soldered them and used heat shrink on the connection. Probably did not need solder, but I used that as extra insurance. The connections on the lugs are stripped copper only.
The wheel chocks were made with 1 ½ inch angle iron, this is the stuff that has the holes and the slots in it and from a farm store. I covered it with heat shrink tubing to give more grip on a hard surface. They fit nicely in the rear storage compartment.
Some of the doors did not latch very tight so I used some heat shrink tubing and that did the trick. After I started browsing this forum, there was a user that used hose and that is also a great idea.
When browsing the posts here, one user was using hardware cloth to rodent and mouse proof his generator. That is a great idea, I can't remember the users name, but I thank you. I used ¼ inch hardware cloth and mounted mine on the inside underneath the air deflector, this was a cosmetic reason only. The piece I used was cut to 10.25” x 16.5”, if I had it to do over again I would make that piece 10.25” x 16.25” that would make it a little bit easier to install. The bolts with a circle around them need to be removed and the bolts with the arrows need to be loosened way up without removal. When installing the hardware cloth push it up to the bolts that were left in and reinstall all the other bolts. Some bolt holes will have part of the wire mesh in them. I used a small wire cutter to snip the wire and pushed it out of the way so the bolts would go back in. Also used several small zip ties to give the wire more support. I have the other side and the top to do yet. Also, there is a rectangular hole under the engine that will need hardware cloth. If you are mouse proofing there's also a three-quarter inch hole in the side of the base that I plugged with a 5/16 inch bolt and 2 flat washers. Mice can be very persistent and creative if they want to go someplace. I have seen the damage mice can do many times. The black vertical line towards the right side at the bottom of the picture is the balance point of an 802 with a 1/4 tank of fuel.
I have been debating whether to use digital volt and amp gauges for load balance between legs or just check and correct load balance on a normal load with a clamp on meter and call that good. I would appreciate your input on that. I would also appreciate any input on anything else I should do. Is there any way to find the history on this? There is a great bunch of folks on this site with a vast amount of knowledge to share. Well, this better be enough for now before this turns into a short story.
Attachments
-
 61.6 KB Views: 116
 -
 51 KB Views: 108
 -
 52.2 KB Views: 106
 -
 60.1 KB Views: 105