• Steel Soldiers now has a few new forums, read more about it at: New Munitions Forums!

  • Microsoft MSN, Live, Hotmail, Outlook email users may not be receiving emails. We are working to resolve this issue. Please add support@steelsoldiers.com to your trusted contacts.


New Restoration Started on March 1953 M-37/42

snowdad

New member
Yea, I been following that flygirl.
Of all the times I have looked at my pics, I never saw that cat. In one of the pics she is up in the tree that is growing out of the truck. Can't find it at the moment.
Phillip
 

snowdad

New member
Ok folks. Need help identifying the stencils on the front bumper. These letters have been tempting me ever since I bought it about 3 years ago. After stripping some of the heavy blue paint off I discovered a 5 point star and the letters to the right of it. What I have been able to ascertain is ***EG-11. This is the front bumper to the right of the winch (driver's side) Any ideas?
 

Attachments

snowdad

New member
After taking a little time out for my 28th anniversary and repairing the water pump in my Chevrolet I was able to get back to work. Got all the bed and crossmembers cleaned and primed. Only 1 crossmember (#1) was pitted inside the channel. Pictured are some of the items I used to access the rust inside the channels. This has been very time consuming, but I want to make sure as much rust as possible is removed.
 

Attachments

big1096

New member
Steel Soldiers Supporter
338
0
0
Location
Essex, MD
Looks like you are going to have an adventure in restoration as well! I'll be keeping an eye on your progress as we work on ours! Best of luck!

:beer:
 

snowdad

New member
After a little hiatus due to severe weather, I have finally gotten back to the Dodge. Found 5 small pin holes (well 4 pin holes and 1 slightly larger one) and plan on trying to repair those. May take it to the radiator shop and have them boil it out. Will have to wait and see. I finally got the passenger side all prepped and primed except for the wheelwell. Ran out of daylight and will have to finish tomorrow. Note the toolbox door hardware and the name on the latch plate. Also note the yellow reflector that I removed. The bezel is different and when I pulled it off, the reflector stayed on the bed side. When I pried it off, it had no metal backing plate. Just a rubber gasket ring. Is this normal? The mounting flanges are different. Will look for model numbers tomorrow. Too dark. More pics tomorrow.
 

Attachments

1943ht

Active member
478
94
28
Location
Batavia, OH 45103
Had similar issues with my M37 tank .. soldered it up, rinsed a couple timed with the pressure washer and then treated it to a muratic acid bath (Purchase at Home Depot). The insides of that tank cleaned up nice and shiny .. rinsed once with MEK and then sealed the tank with Red-Kote .. End result was very nice .. did a similar rebuild on my Half-track fuel tanks in 07 and have never had a leak.
 

snowdad

New member
What is MEK and Red-Kote and where do you get them? Forgive any misspelling due to all day sanding, grinding, stripping, and priming. My eyes are a little blurry right now.
How do you give the muratic bath? Pour it inside and slosh it around and rinse it out?
Phillip
 

T. Highway

Well-known member
Steel Soldiers Supporter
1,232
52
48
Location
S.E. WI & S.E. TN, USA - Earth
MEK = Methyl Ethyl Ketone

You thought your eyes got blurry from a little sanding and primering wait to you open up a jug of this stuff. Please use caution because the flash point is only 25* F.

Take great care not to mix this with acids, you will not enjoy the end results.

Bert
 

1943ht

Active member
478
94
28
Location
Batavia, OH 45103
Words of caution are warranted .. but like anything a little common sense goes a long ways .. Here's my project process:

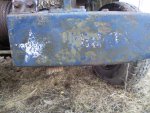
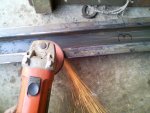
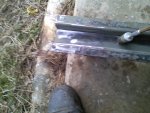
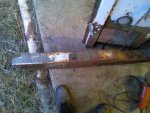
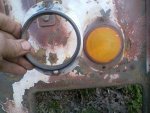
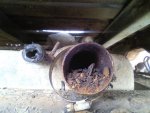
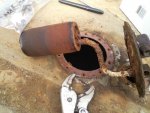
You will need to pull the sending unit and the pick up unit from the tank .. Cut the Acid with a little water (I use a stronger mixture as my tank was nasty) ..USE GOOD VENTILATION FOR ALL OF THESE STEPS!!! Pour it in and let it set a while and work on the metal .. it will smell and there are going be some fumes.. I used saw horses and a piece of ply wood for a table with a couple of wood blocks to support the tank when t was on its sides etc, (What ever you have laying around in the shop should work) .. you will need to rotate the tank so that the acid bath can get at the sides ... For the top of the tank, I rolled my tank over so that the acid/water mixture went was right to the edge of the sender unit and pick up unit holes or you could plug them I suppose.... I plugged up the fill pipe and return pipe during the acid bath ..

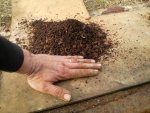
Dump your acid (Use caution ... proper disposal instruction will be on the container) Rinse the tank out after the acid bath with water and let it drain. Next step, use the MEK to absorb the water and rinse the tank .. Again you'll have to rotate the tank .. Lots of muscle work involved in the process but well worth the effort .. I always have more time than money myself .. Plus I trust my own work :)

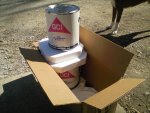
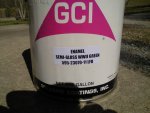
Gas tank sealer will be next step !... Pour in your sealer (2 quarts will work well) and rotate the tank to coat the interior .. use caution so that you get the side and the baffles coated during the process. I plugged my fill pipe and return line during the coating but removed the plug after coating and wiped out the little bit of sealer that had puddled in the filler neck after each coat.

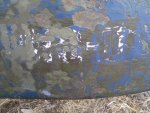
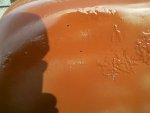
I used my gas tank drain hole to drain the sealer into their original containers for reuse for the subsequent coats that I did. I coated my tank 4 times .. did a coat each day and used a small fan on low setting to circulate air thru the tank between coats to help with the drying process after draining the sealer .. You'll know that the tank has dried as the sealer smell inside the tank is almost gone .. don't let the sealer puddle inside the tank .. that can be the tricky part .. and then let the tank sit and dry after your final coat before installing your tank goodies .. the results will be a glass smooth sealed tank interior.

If you don't want the hassle, some commercial radiator shops offer sealing services for tanks .. it will be a bit spendy but there is that possibility. Truck Stops are a good source for info on those vendors
 

snowdad

New member
1943ht-Thanks for those pointers. I already have all articles removed from the tank. I had already primed the tank before finding the holes. It made them really stand out. I plan on cleaning the inside of the corner areas and outside before using the Liquid Steel. I can actually reach inside the tank in most areas. One advantage to being a small fellow. Emailed the Red-Kote company and got a real nice reply when inquiring about the use of this product in radiator tanks. (It will not work for this application). Amy was who responded and she has an affinity for military vehicles. I have included some pics of the process I had begun a month ago before I started posting on this site. It was amazing what I got out of this tank.
 

Attachments

Tanner

Active member
1,013
11
38
Location
Raleigh, NC
The tank strainer obviously wasn't effective at keeping the cat out of the tank? :grin:

Lots of crap in that tank; I hate to think of what's in my '37's tank...

Good luck!

'Tanner'
 

snowdad

New member
I am suprised that there weren't any more holes than 5. The strainer actually did a pretty good job at keeping crud out of the system as shown in this pic. This paper towel is located at the fuel pump shut-off valve. I disconnected the line there and blew air through the fuel line from the tank. This is all that came out. By the way, the cat is the shift foreman.
 

Attachments

Storm 51

Just a Grunt
Steel Soldiers Supporter
888
9
0
Location
Seattle, WA
I'm glad to see the cat made it safely out of the tree.

Good to see the cat is around to supervise you and make sure you put this M-37 back together correctly. That cat is going to need a nice warm hood to sleep on, so pay attention to what you are doing. :grin:
 

snowdad

New member
Yea, that cat really likes hoods. It is actually a different one that was in the tree and on the tire under the right front fender. He is a breed called 'Maine Coon Cat'. My daughter brought him home from work as an orphan cold, wet and a hungry kitten. Never knew he would get this big. Look for other 'supervisors, shop foremen, and project managers' in my other pics.
 

Storm 51

Just a Grunt
Steel Soldiers Supporter
888
9
0
Location
Seattle, WA
Well, it's reassuring to know that there appears to be the proper ratio of supervision to actual workers on this project. You can never have too many layers of supervision. :wink: :popcorn:
 
Top
AdBlock Detected

We get it, advertisements are annoying!

Sure, ad-blocking software does a great job at blocking ads, but it also blocks useful features of our website like our supporting vendors. Their ads help keep Steel Soldiers going. Please consider disabling your ad blockers for the site. Thanks!

I've Disabled AdBlock
No Thanks