• Steel Soldiers now has a few new forums, read more about it at: New Munitions Forums!

  • Microsoft MSN, Live, Hotmail, Outlook email users may not be receiving emails. We are working to resolve this issue. Please add support@steelsoldiers.com to your trusted contacts.


New to me - MEP-003A

Mr4btTahoe

Active member
121
65
28
Location
Indiana
Now I'm experiencing a "no-crank" situation. The start switch isn't functioning as it should. Every position does what it is supposed to do other than the "Start" position.

I can jump the solenoid on the starter and it cranks no problem. Are there any fuses between the trigger wire at the starter and the start switch or am I looking at a bad switch?

Thanks!
 

Guyfang

Moderator
Staff member
Moderator
15,910
22,201
113
Location
Burgkunstadt, Germany
Go back to post #16 and#18. What I wrote then, is what you need to start looking at.

What do you mean by, " every position does what it's supposed to do but the start position". Have you looked at the schematic and measured the start circuit, from the S1, to see if you have 24 volt coming out of the S1? Look at the schematic. It shows you the path. No, there is no fuse. If you can't read the schematic, say so. I will write out a point for point list of what you need to check. But I need the to know if that's what you want, or if you have done it at some point in time after post 16 & 18 or not. You haven't ever said if you made the checks or not. Help me, help you.
 

Mr4btTahoe

Active member
121
65
28
Location
Indiana
Go back to post #16 and#18. What I wrote then, is what you need to start looking at.

What do you mean by, " every position does what it's supposed to do but the start position". Have you looked at the schematic and measured the start circuit, from the S1, to see if you have 24 volt coming out of the S1? Look at the schematic. It shows you the path. No, there is no fuse. If you can't read the schematic, say so. I will write out a point for point list of what you need to check. But I need the to know if that's what you want, or if you have done it at some point in time after post 16 & 18 or not. You haven't ever said if you made the checks or not. Help me, help you.
The pre-heat engages the solenoid that powers the glow plugs, the aux prime and main prime positions run their fuel pumps.. and actually, the start position triggers the fuel solenoid at the IP.. but not the starter.

I didn't go through the wiring when I was having issues with the fuel solenoid because once I took a closer look, I found that it was a mechanical issue (throttle lever frozen) and not electrical. When I got the lever freed up, the fuel solenoid functioned as it should.

Right now, everything is functioning other than the starter. The starter can be jumped but the switch isn't triggering the starter. I have a feeling it's a wiring issue at the starter itself. I need to clean the contact points and see if it helps.

To be honest, I am having issues with the diagrams I've found for this unit. They are very jumbled which I'm not used to. I'm used to individual systems being broken down with individual diagrams.. but haven't found anything of the sort for this unit. If you want to take the time to give me a point-point, I'd be grateful.

Thanks
 

jamawieb

Well-known member
1,412
512
113
Location
Ripley/TN
Look at the very large electrical schematic, in the -34 manual on page 38. The right side will deal with the DC side and the left mainly deals with the AC side. I would check S7 which is the starter lockout. If that is not adjusted correctly, you will have all the symptoms you describe. The starter lockout is mounted to the right of the IP. It has a metal cover that is held in place with a wing nut usually. You usually have to manipulate the throttle linkage to get the cover off. It's a point system so if its out of adjustment the 2 contacts will not touch. To adjust for your situation you need to back the 1/4 stud counter-clockwise to make the points touch.
 

Chainbreaker

Well-known member
1,749
1,839
113
Location
Oregon

Guyfang

Moderator
Staff member
Moderator
15,910
22,201
113
Location
Burgkunstadt, Germany
OK, I guess we start with S7. I think its a likely candidate also, but we are starting in the middle of the circuit. Its easy to check. Both links above get you started, but don't teach you how to use the schematics. The one kinda misleading thing about these two links is, you jump to conclusions. People tend to read the posts, assume the S7 is bad, and rub their hands together and take the S7 out, and apart, to "fix" it. When, all you really know is that it wont start. First PROVE its the S7, then you can get out that tool kit. Not before. You can fix this set to death, if you don't watch out. Never assume anything. Prove it.

1. Find S7 on the schematics. As you can see, its in series with K3 coil. K3 is the crank relay. That's the baby we need to energize to turn the starter.
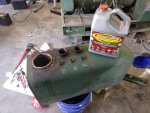
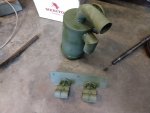
2. As you can see, the 24 volts goes in on J16A, through the S7, and out J16B, to energize the K3 Coil. The J16 is the canon plug near the oil filter.
3. Unscrew the J16. We can do three tests here.
A. Take your multi meter and set it for ohms. Measure for continuity on the two wires, (P59B16 and P55F16) that run down to the S7. You should get continuity, as the S7 is in a normally closed condition when the engine is not powered up, and when the engine spools down to a certain RPM. So, no continuity, S7 is not working right.
B. Second check, and the one done most often, is simply hold the J16 in your hand, look at the face of the plug, and find holes A&B. Take a paper clip, (he is your good friend from now on) bend it straight, then into a U shape. Stick your new friend into holes A&B. Walk around to the control panel, and turn the S1 to the start position. If the motor turns over, the problem is in the S7.
C. Set your meter up for DC voltage. It helps to have a friend with this one. You poke one lead into hole A, of J16. The other lead goes to a GOOD ground. Your friend turns S1 to the start position, and you should read 24 VDC. If not, the problem is in the control panel. So try this stuff, and let us know what happens.
 
Last edited:

Mr4btTahoe

Active member
121
65
28
Location
Indiana
Wow... been a long time.

The generator has been sitting in my shop untouched until now.

I finally got around to installing the new glow plugs and intake heaters... re-wiring the glow plugs (which still aren't getting juice.. more work to be done there).. and re-installing the repaired injection pump.

I also found my starting issue. Not sure what it's called, but the switch next to the oil filter isn't making contact. I can bypass that switch and it turns over without issue.

And now it's alive and making power!

Keep in mind, this thing hasn't been fired in over a decade.

Finally got it to hit and run for few seconds... shut down to check for fuel and oil leaks. Before starting, I had cranked it over until it built oil pressure.

Hazing pretty consistently...

I shut it down after getting fuel firing through the injectors and such... let it sit for 15-20 minutes. The fuel in the tank has a heavy dose of additive. Fired it back up and let it run for 5 minutes or so and the hazing is already better.

Oil pressure is great.. the 110v receptical is producing power... no odd noises, etc.. . no leaks. Now to service everything.. install the new gov cable.. get fresh batteries... and possibly track down a fuel tank or have mine boiled out. We'll see.
 

Ray70

Well-known member
2,379
5,100
113
Location
West greenwich/RI
Looking good! Remember, don't run it too long with the covers off or you will overheat it.
I'd say go ahead and clean out the fuel tank yourself, it's a very simple process that many people have well documented here already.
The old air cooled's are great, they can sit a LONG time with little to no issues, as long as you take you time to prep them properly before attempting to restart!
 

Guyfang

Moderator
Staff member
Moderator
15,910
22,201
113
Location
Burgkunstadt, Germany
I also found my starting issue. Not sure what it's called, but the switch next to the oil filter isn't making contact. I can bypass that switch and it turns over without issue.

Refer back to post #46.
 

Mr4btTahoe

Active member
121
65
28
Location
Indiana
I also found my starting issue. Not sure what it's called, but the switch next to the oil filter isn't making contact. I can bypass that switch and it turns over without issue.

Refer back to post #46.
Yes indeed. Going to attempt to adjust it. The cover was damaged on it. Looked like it had been hit by something. If I cant get it adjusted, is there anyone making replacements or will it be something to bypass?
 

Ray70

Well-known member
2,379
5,100
113
Location
West greenwich/RI
You might be able to find a used one, which is very simple to swap out, but no one makes a new replacement.
You really can't bypass it without making other electrical modifications to compensate for it because you need to hold S1 after the unit starts for several reasons. With that switch bypassed your starter will not disengage automatically, it will engage the bendix as long as you are holding the switch. That will quickly destroy your starter.
Try to fix yours, if not, get a used one from someone stripping a motor, ie Ebay, delks, Green Mountain and several other sources.
 

Mr4btTahoe

Active member
121
65
28
Location
Indiana
You might be able to find a used one, which is very simple to swap out, but no one makes a new replacement.
You really can't bypass it without making other electrical modifications to compensate for it because you need to hold S1 after the unit starts for several reasons. With that switch bypassed your starter will not disengage automatically, it will engage the bendix as long as you are holding the switch. That will quickly destroy your starter.
Try to fix yours, if not, get a used one from someone stripping a motor, ie Ebay, delks, Green Mountain and several other sources.
I'll take a look tonight and see if I can get it working.

Thanks
 

Mr4btTahoe

Active member
121
65
28
Location
Indiana
Got home and wanted to see how it starts after being ran last night. Fired up easily with no haze.

I think I found my glow plugs issue. The plugs are seeing 24+v with the switch on but only when the meter is grounded to the battery. Grounded to the engine, they are seeing under 5v. I'll reinforce the main engine ground before running it anymore.

Sent from my moto x4 using Tapatalk
 

Chainbreaker

Well-known member
1,749
1,839
113
Location
Oregon
Something to consider...if ever you take the glow plugs out to replace them, or inspect them, put them back in using copper antiseize compound.

One thing to watch is to replace them before the tips swell/rust with age. There have been issues reported with the tips swelling larger than the bore diameter of the threaded hole they come out of and the tips breaking off or jamming up against the hole when attempting to remove. There are several old threads from members like "Rustystud", etc. describing their issues and some tips for removal when they don't want to come out.

Also, sometimes the copper washers have been found to be missing or when someone replaced the glow plugs the old copper washers did not come out and they erroneously assumed that they were missing and inadvertently ended up installing a 2nd one in hole.

I had some washers that were badly deformed (overtightened?) to the glow plug's bevel angle and were stuck in hole and not easy to remove. I ended up making a "DIY copper washer removal tool" by taking one of those silver metal paint can openers (the style with narrow tab on one end and what looks like a bottle opener on other end that becomes a finger hole to pull with) and grinding down the narrow end to fit in hole so I could snag the old copper washer to extract it and replace with new copper washer.

Also, use plenty of PB Blaster over a few days before you ever attempt to remove glow plugs on older engines. You don't want to Gorilla wrench it to the point of snapping off in the threaded hole.
 
Last edited:

Mr4btTahoe

Active member
121
65
28
Location
Indiana
Something to consider...if ever you take the glow plugs out to replace them, or inspect them, put them back in using copper antiseize compound.

One thing to watch is to replace them before the tips swell/rust with age. There have been issues reported with the tips swelling larger than the bore diameter of the threaded hole they come out of and the tips breaking off or jamming up against the hole when attempting to remove. There are several old threads from members like "Rustystud", etc. describing their issues and some tips for removal when they don't want to come out.

Also, sometimes the copper washers have been found to be missing or when someone replaced the glow plugs the old copper washers did not come out and they erroneously assumed that they were missing and inadvertently ended up installing a 2nd one in hole.

I had some washers that were badly deformed (overtightened?) to the glow plug's bevel angle and were stuck in hole and not easy to remove. I ended up making a "DIY copper washer removal tool" by taking one of those silver metal paint can openers (the style with narrow tab on one end and what looks like a bottle opener on other end that becomes a finger hole to pull with) and grinding down the narrow end to fit in hole so I could snag the old copper washer to extract it and replace with new copper washer.

Also, use plenty of PB Blaster over a few days before you ever attempt to remove glow plugs on older engines. You don't want to Gorilla wrench it to the point of snapping off in the threaded hole.
I've already replaced the plugs. Runs good and no signs of compression leaks around the plugs. 2 of the 4 had broken tips but from the looks of them, they'd been gone for quite some time. They all came out fairly easy.

The tips are either blown to bits and gone or rattling around in the prechambers. Only way to know would be to tear it down but it runs too good for that. Maybe when it's due for some top end work, I'll look further into it.
 

Mr4btTahoe

Active member
121
65
28
Location
Indiana
Ordered a bunch of goodies to get the unit serviced out. Already had oil filters and such for it... but decided to upgrade the fuel filtration. Already had the filter heads sitting in the shop.. just waiting for filters to show up tomorrow. Will be using a Baldwin BF-957D pre-filter/water separator and a BF7633 primary filter (5mic absolute - 2mic nominal). Also ordered an air filter and a few lugs to finish up the battery change. I'll be running a pair of stud type group 31s with a custom battery tray.

My throttle cable will be here today so I will get that setup as well.

I ordered some 4500w 240 water heater elements to build a load bank for testing. They should be here Tuesday.

Going to try and locate a spot for the generator to be mounted permanently. I'll pour a small pad big enough for the unit and a couple fuel drums... set 4 posts and put a small roof over it to protect it. May re-paint it... we'll see.
 

Ray70

Well-known member
2,379
5,100
113
Location
West greenwich/RI
Back up to your 5V on the glow plug issue, that's a classic sign of the braided ground strap on the right side engine mount ( near batteries) being rotted away. Sounds like you already know it's an engine ground issue but wanted to confirm for you.
First time I had that issue it drove me nuts until I realized I was moving from control panel ground to engine block ground as I was working on it.
 

Guyfang

Moderator
Staff member
Moderator
15,910
22,201
113
Location
Burgkunstadt, Germany
If your going to fix a ground, do as many as you can find. There are several. Another place ground can make you crazy is the fuel pumps. They are supposed to have serrated washers, to improve the ground. If there are no serrated washers on the mounting bolts, and both sides, then replace them.
 

Mr4btTahoe

Active member
121
65
28
Location
Indiana
Progress is slow.... But good. Fuel tank is clean and drying. Flushed it out with vinegar and a pound of 3/8 nuts. Then Evaporust... Then flushed with water. After it dries, it'll get lined.

Also made up the new fuel filter setup.

Lots of cleaning and painting. Paint is still wet in the pictures.. hopefully the stripes will go away after it cures.

More to come.
 

Attachments

Top
AdBlock Detected

We get it, advertisements are annoying!

Sure, ad-blocking software does a great job at blocking ads, but it also blocks useful features of our website like our supporting vendors. Their ads help keep Steel Soldiers going. Please consider disabling your ad blockers for the site. Thanks!

I've Disabled AdBlock
No Thanks