Firstly I want to give a huge thanks to the moderators and this whole community. The community here is a prime example of what the internet should be; and was made for. Sharing knowledge, power and wisdom! Each and every one of you here working on these machines are the best part of this dang country, and probably are last hope when SHTF.
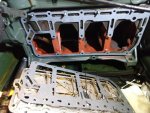
Anyways, continuing my escapade in resurecting my beautiiful 803-a. I Unstuck, disassebled, honed, 1 new pison, all pistons new rings. Put it all back together with new injector but not injector pumps and..
First Crank no start. After the golden info in other pages i pulled the injector pumps and behold,, they were frozed as others had described.
Soo I cleaned, disassebled top of injector pumps. cleaned in there and had to BEAT THE SH*t out of the metering arms with big ass hammers until the metering arms rotated freely. than after more bathing in PB blaster i manually can hand pump the injector pumps and they seem right. lol. The price of new pumps being near 300$ i decided to try to renew the old ones no matter how.
It is now obvious the fuel governer rail is stuck so It seems im going to pull the front gear cover next and try to just unstick that and than i should be good to go.
I'm extrmemely lucky my fuel govenor rail was stuck closed or else i would have shot 20 year old nastyness from the old injector pumps into my new injectors.. So im kinda glad first start attempt was a fail. Now i better understand the fuel delivery and the nature of the IP's,
(Pictured is worst of the Injector pump bottom end) this is because i bathed the inside of the engine with practiclly everything oily to unstick the seized condition first off so it all sank to the lowest points..


 146.4 KB Views: 30
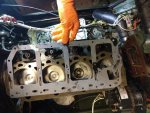 158.9 KB Views: 30
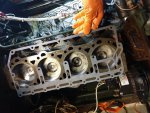 172.2 KB Views: 29
![796306226780323746[9065].jpg](/data/attachments/673/673735-4ddd5998a7296c7618655442442853ec.jpg)
 I"m possible seeing the light at the end the tunnel, no pun intended. Rack and injectors seem to be in-line and rotating properly. I finished late this evening and got a few cranks in to try to start it. No start after three, 5 -7 seconds long cranking. Cracked upper inector lines and began to see small amounts of fuel.. I assume its gona need to rebuild pressure a bit before it fires.. Would anyone recommend any type of accellerant into the intake to initaially get things a pumpin and help build up fuel pressure without so much strain on the starter?? I know that considered a Big NO NO . but i don't like to crank and crank. I did start to see some oil push up the pushrod tubes toward the gen head, also from reading the manual Im assuming after torqing the rocker arms to 25lbft and letting the lifter bleed down the manual says there self adjusting and the oil pump will build up pressure to "ajust them upon running" keeping in mind I never removed the crankshaft or camshaft.