


niferous
Member
- 715
- 6
- 18
- Location
- Houston, TX
First off let me state that I have never ever worked on a vehicle's AC system. I know very little about them. However one of the things I vowed to do with all these old trucks is learn how to work on all aspects of a vehicle. So today as a Christmas present to myself I went and picked up my AC system from mkcoen (Mark). The system is an OD Iron kit and is brand new in the box. Apparently Mark bought it for an M1009 that is now sold so I lucked out and he sold it to me. Just so everyone knows Mark was a good guy to work with and I look forward to working with him again.
First the bad news. As a novice I find the instructions pretty darn vague. I will be typing up this post and I expect it to be very detailed and long as I will be learning as I go. I may mention some stuff that many of you think is just a given but if I'm mentioning it should probably be taken as something that is not a given to a novice. The second problem I noticed right off the bat was the bracket used to hold the compressor. The welds were very messy and nothing was ground down flat. Now I work around machinists and welders and my company is the largest manufacturer of oilfield equipment in the world so my view is probably prejudiced. However looking at this bracket I think I'm going to have one of our welders go over it with a grinder and clean it up a bit. Then I'll just powder coat it. I'm sure none of this effects functionality but for a $1000 system I think it should come with a profesionally assembled bracket.
ANYway the first thing I did was take off my dash pad, glove box, instrument bezel, and instrument cluster. I've done it before and it's super simple. Four screws on the front of the pad, four screws on the bezel that goes under the steering column, all the screws along the instrument bezel and then the wires and bulb for the volt meter. The instrument cluster has 4 little screws that hold it on and when you pull it away you have to disconnect the wiring harness and the speedometer cable. The glove box just has four screws along the bottom and then you just open it and it comes out. Finally once all these are out the dash pad just comes out by pulling up and out on the driver's side and then walking around and doing the same motion on the passenger side.
Next in the process I had to remove the two bolts on the ride side of the actual dash itself. These came out easy with a 3/8" ratchet. Here is where some vagueness comes in with the instructions. It says to also remove the "bolt securing the center support bracket to the dash." I don't know what that means. I should add here that 4x4 Forever mentioned in chat there is a bracket next to where the radio would go in a civy Blazer. I will have to check that out tomorrow. If anyone can confirm that though it would be appreciated.
OK so now we move along to the engine compartment to drill a 2" hole in the firewall. I only have a 2-1/8" hole saw so drilling will have to wait until tomorrow but we can prep the area. The instruction don't mention at all that you have to remove stuff to get to the firewall and get accurate measurements but you sure do. I removed my rear battery, my fuel filter, and the wiring terminal that is next to the fuel filter. Now the instructions look like they are trying to say that the center of this two inch hole should be 2-1/2" from the center of the wires coming out of the firewall and going to the heater element. Also the instruction say that the hole's center will be 1-1/2" above the center line of the aforementioned wires. Finally the instructions say to drill centered on the dimple in the firewall. This conflicts with the previous instructions on my truck. The dimple is about 2-3/4" from the center of the wires and about 1" up from it's horizontal center line. So which should I go by? The measurements or the dimple?
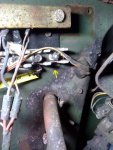
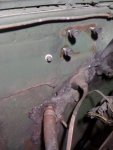
Finally for tonight I should point out that the wiring block I had to remove may be in the way once the hoses are ran. Check out the instructions for the install in the link below and then check out the pictures I snapped. The first is with the wiring installed and the second is with it removed. I should mention to the any other possible novices reading that you need to use tape and a sharpie to label all the wires AND the wiring block so that everything gets hooked back up as it should be. In the first picture you can compare to the second and see where that dimple is and how the wiring block could really be in the way.
Any advice is more than welcome. It's encouraged! Remember this isn't just for me but for others in the future!
OD Iron instructions
First the bad news. As a novice I find the instructions pretty darn vague. I will be typing up this post and I expect it to be very detailed and long as I will be learning as I go. I may mention some stuff that many of you think is just a given but if I'm mentioning it should probably be taken as something that is not a given to a novice. The second problem I noticed right off the bat was the bracket used to hold the compressor. The welds were very messy and nothing was ground down flat. Now I work around machinists and welders and my company is the largest manufacturer of oilfield equipment in the world so my view is probably prejudiced. However looking at this bracket I think I'm going to have one of our welders go over it with a grinder and clean it up a bit. Then I'll just powder coat it. I'm sure none of this effects functionality but for a $1000 system I think it should come with a profesionally assembled bracket.
ANYway the first thing I did was take off my dash pad, glove box, instrument bezel, and instrument cluster. I've done it before and it's super simple. Four screws on the front of the pad, four screws on the bezel that goes under the steering column, all the screws along the instrument bezel and then the wires and bulb for the volt meter. The instrument cluster has 4 little screws that hold it on and when you pull it away you have to disconnect the wiring harness and the speedometer cable. The glove box just has four screws along the bottom and then you just open it and it comes out. Finally once all these are out the dash pad just comes out by pulling up and out on the driver's side and then walking around and doing the same motion on the passenger side.
Next in the process I had to remove the two bolts on the ride side of the actual dash itself. These came out easy with a 3/8" ratchet. Here is where some vagueness comes in with the instructions. It says to also remove the "bolt securing the center support bracket to the dash." I don't know what that means. I should add here that 4x4 Forever mentioned in chat there is a bracket next to where the radio would go in a civy Blazer. I will have to check that out tomorrow. If anyone can confirm that though it would be appreciated.
OK so now we move along to the engine compartment to drill a 2" hole in the firewall. I only have a 2-1/8" hole saw so drilling will have to wait until tomorrow but we can prep the area. The instruction don't mention at all that you have to remove stuff to get to the firewall and get accurate measurements but you sure do. I removed my rear battery, my fuel filter, and the wiring terminal that is next to the fuel filter. Now the instructions look like they are trying to say that the center of this two inch hole should be 2-1/2" from the center of the wires coming out of the firewall and going to the heater element. Also the instruction say that the hole's center will be 1-1/2" above the center line of the aforementioned wires. Finally the instructions say to drill centered on the dimple in the firewall. This conflicts with the previous instructions on my truck. The dimple is about 2-3/4" from the center of the wires and about 1" up from it's horizontal center line. So which should I go by? The measurements or the dimple?
Finally for tonight I should point out that the wiring block I had to remove may be in the way once the hoses are ran. Check out the instructions for the install in the link below and then check out the pictures I snapped. The first is with the wiring installed and the second is with it removed. I should mention to the any other possible novices reading that you need to use tape and a sharpie to label all the wires AND the wiring block so that everything gets hooked back up as it should be. In the first picture you can compare to the second and see where that dimple is and how the wiring block could really be in the way.
Any advice is more than welcome. It's encouraged! Remember this isn't just for me but for others in the future!
OD Iron instructions
Attachments
-
 83.5 KB Views: 166
 -
 56.8 KB Views: 161