• Steel Soldiers now has a few new forums, read more about it at: New Munitions Forums!

  • Microsoft MSN, Live, Hotmail, Outlook email users may not be receiving emails. We are working to resolve this issue. Please add support@steelsoldiers.com to your trusted contacts.


Oil Pan Leak

GUNNY 155

Member
238
4
18
Location
elgin illinois
I am getting a very small oil leak on my engine after being run and it sits over night. I get a drop of oil hanging off of the front of the pan where the filler plate is so it is hard to tell where exactly it is coming from. I have had the pan off twice. The second time I removed the filler plate which was distorted and refaced that and resealed it. Still no help. I'm starting to think it may be the timing cover gasket or the steel plate behind it but cannot be sure. I also cannot figure out where those two little round rubber seals that come with the Fel Pro pan gasket sets go or if they are maybe for another application besides the M37. Anyone out there have any suggestions or have had these same problems? If so I could use some help. Built a lot of engines in my day but never ran into a problem like this before with a leak that will not stop. Appreciate any help from my friends out there.
 

T. Highway

Well-known member
Steel Soldiers Supporter
1,231
49
48
Location
S.E. WI & S.E. TN, USA - Earth
Gunny,

The little round seals go under the front casting that is inside of the oil pan. This casting is the front of the oil pan "sealing surface".

The corners where the oil pan meet this surface need an extra dab of high temp silicone sealant or they will weep. There are also two flat head screws that hold the timing cover backing plate to that small casting, they need to be sealed with thread sealant or they will weep oil between these two parts.

Hope this helps.

Bert
 

GUNNY 155

Member
238
4
18
Location
elgin illinois
Okay guys I have figured this out so read on and store this in your brain housing group for future reference. Since doing the build on my truck the engine only had a couple of hours on it so today I decided I am going to figure this thing out one way or the other. After cleaning every thing off I put it out in the drive way and ran it on high idle for about 2 hours. Then I crawled under it what I found surprised me in a major way. I still had the drip from the front of the pan. I also had a valve cover dripping. Seepage from the timing cover gasket and also some weeping from between the block and the plate that goes between the block and timing cover. Now I am not a wrench bender from the alley, I actually was a Journeyman Mechanic at one time so I was really scratching my head. Also no offense to my brother alley mechanics because I know a lot of good ones. But then the light bulb at last came on. When I started my restoration project I remembered getting a NOS overhaul gasket set for the engine. Not knowing that you can get fresh new Fel Pro gaskets from NAPA for this engine with no problem other than a few days wait for delivery. So there it is old hard gaskets that do not compress properly do not seal. So next week I will be doing something that drives me nuts, doing work over that was not done right the first time. Lesson learned, time and money wasted. Oh well at least being retired I have plenty of time.
 

T. Highway

Well-known member
Steel Soldiers Supporter
1,231
49
48
Location
S.E. WI & S.E. TN, USA - Earth
Gunny,

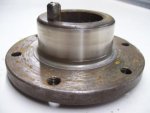
Did you Redi-sleeve the front crank shaft hub when you put this together originally? (See Picture)

Did your engine have the oil slinger still in place on the crankshaft, inside the timing chain cover? This will make a difference on which seal you want to have in the timing chain cover.

Bert
 

Attachments

rosco

Active member
Steel Soldiers Supporter
2,102
27
38
Location
Delta Junction, Alaska
I have had my M37 since the very early 1970's & of course worked on the engine, numerous times, since I logged many hard miles as a daily driver. I last built it, several years ago, and seem to have been lucky with the leaks, but am still holding my breath. The subleties involved in sealing the lower end are numerous - sometimes I get them, and sometimes I don't. I just wonder what they did back in the Old Days, before high temp silicone & speede sleeves? That was an extremely popular engine in its day, but they were more tolerant of leaks back then too.
 

GUNNY 155

Member
238
4
18
Location
elgin illinois
Can anyone tell me the proper placement position for the little round rubber seals that go between the front oil pan seal filler plate and the block? Seems that may be part of my issue. Cannot find any info in the TM's on these little buggers.
 

T. Highway

Well-known member
Steel Soldiers Supporter
1,231
49
48
Location
S.E. WI & S.E. TN, USA - Earth
I don't recall ever seeing a picture in the TM for the placement of these rubber seals.

The placement of the rubber parts is self explanatory when you remove the arched front pan support. There is a groove that these little parts are seated into. Remember to use a good high heat sealant when installing them and the fasteners, or they will leak.

Bert
 

GUNNY 155

Member
238
4
18
Location
elgin illinois
Okay gentleman no more leaks so thanks for your help and suggestions. So here is the out come of all this work and I thought I would share what I learned. Also thanks to John at Midwest Military for his input and help. As I said in the original post my filler plate was distorted and I refaced it by placing it on a flat cast iron machined surface with some sand paper. Another key point here is to check and make sure it is square. So lay a machinist square across the face and over the ears where the two bolts come through from the bottom. The second thing I learned is it appears there are several different filler plates used, possibly 3. The first type is secured with counter sunk screws from the bottom. Since I have no experience with that one that is all the comment I can make on that type. The second one has grooves machined in the ears at an angle where the round rubber seals go which explains why I could not figure out where to put those little seals because that is not the one I have. The last type has no grooves for the seals which is what I have. So here is how I solved my leak problem and it was based on suggestions from John at Midwest Military who was kind enough to call his engine builder and share the info with me. I also applied some of my own ideas. It was recommended to us a Permatex sealant called The Right Stuff item # 25233 on the ears and in the corners of the pan. How you tighten the bolts on the front filler plate is also critical. Now here is what I actually did. First on the top of the filler plate ears on the surface that contacts the engine block I took a hack saw and carefully cut a groove on either side of the bolt hole to give the sealant more surface are to bite into and not squeeze out. Put a thin layer if sealant here and a thin bead on the corner edge. Put the plate in place with the bottom two 1/4 20 bolts after coating the bolts with blue Loctite. For now just tighten them just a quarter turn past finger tight. Put the bolts in from the front, coating them with Loctite high temp thread sealant also install the 5/16 bolt from the rear after coating the thread with blue Loctite. Tighten these bolts and then go back and give the two 1/4 20 bolts a little more torque but no more than a half turn. It seems the trick here is let the sealant do the work and not mechanical force. On the side gaskets for the pan I attached them to the block with Permatex high tack sealer. On the pan I applied a light coat of Right Stuff to the front and rear pan seals and put them in place on the pan. Time to work fast now since the instructions on the can say to do assembly work within 5 minutes of application. I also applied Right Stuff to the corners of the seal areas where the gaskets meet the front and rear pan seals. Okay install the pan making sure that you coat the four corner bolts with high temp Loctite thread sealant. Go around drawing the bolts up a little at a time and for final tightening torque to 10 -12 ft. lbs. of torque. As a last note on this engine their are many places where studs or bolt holes are drilled through into the water jacket or areas where they are exposed to the crankcase oil. All these bolts need to be coated with the Loctite high temp thread sealant or they will leak. I know this was sort of log winded but I hopes it saves someone from all the do over work I went through because do over stuff for me is a major burr under my saddle. Cheers!
 
Top
AdBlock Detected

We get it, advertisements are annoying!

Sure, ad-blocking software does a great job at blocking ads, but it also blocks useful features of our website like our supporting vendors. Their ads help keep Steel Soldiers going. Please consider disabling your ad blockers for the site. Thanks!

I've Disabled AdBlock
No Thanks