• Steel Soldiers now has a few new forums, read more about it at: New Munitions Forums!

  • Microsoft MSN, Live, Hotmail, Outlook email users may not be receiving emails. We are working to resolve this issue. Please add support@steelsoldiers.com to your trusted contacts.


Operation "URGENT RESTORATION"

m38inmaine

Well-known member
2,090
45
48
Location
Maine USA
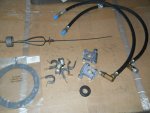
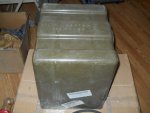
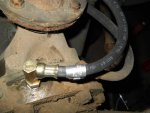
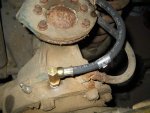
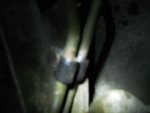
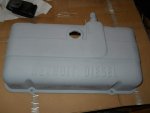
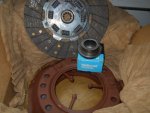
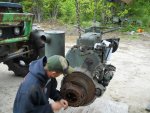
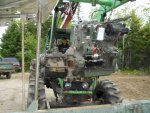
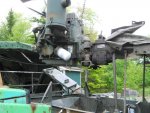
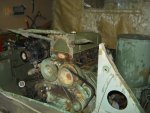
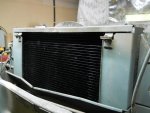
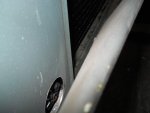
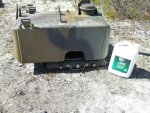
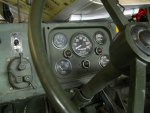
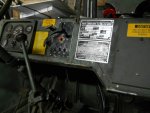
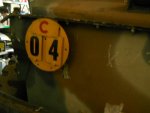
Spent most of the weekend working on the goat, most of the time on cleaning both fuel tanks. These sat for 13+ years with about 5 gallons in each tank, a brown stinky mess. After removing the tanks I mixed up some Marine Clean and then heated it right in the tank on the Coleman stove, what seemed like hours of shaking, rolling and sloshing around paid off with clean tanks. Also got the wiring harness installed back in the tractor cab, of course I am missing some special screws so had to order those on line. Also missing were the panel nuts for the carrier stop light, these are 5/8-24, another specialty item I had to order. Final task for this weekend was to install the bridge plate, had this early little gem stashed away for a while for just such an occasion.
 

Attachments

wsucougarx

Well-known member
6,951
65
48
Location
Washington State
Exactly, I agree! You need to slow her down a bit. My Goat is in a holding pattern right now due to life. All this outstanding progress on your vehicle is making me feel like I need to be out in the garage;-)

Sent from my XT1254 using Tapatalk
 

m38inmaine

Well-known member
2,090
45
48
Location
Maine USA
I appreciate the positive feedback, however on this end it seems as though time is against me. I'm trying to get it rolling for the Weare NH military vehicle show at the end of July. So many unknowns, will the engine run, does the transmission work, diffs work etc etc. Living in the North East makes sourcing things hard as well, all that fine thread hardware is just about impossible to find so I have to order and wait.
 

m38inmaine

Well-known member
2,090
45
48
Location
Maine USA
Received a few parts, NOS battery covers, transfer dipstick, fuel tank gasket, battery terminals, grommet for slave cable and a pair of brake flex hoses. Going to try and install the head on the engine this weekend and replace the front brake flex lines.
 

Attachments

wsucougarx

Well-known member
6,951
65
48
Location
Washington State
Those flex hoses can be a bit of a challenge. You can replace them without removing the springs. It's just a bit tight.

Sent from my XT1254 using Tapatalk
 

m38inmaine

Well-known member
2,090
45
48
Location
Maine USA
I bought some 8' 1 1/2 assembled straps I found NOS on the E and I am going to cut them to length for the battery cover and fuel can. I only had one battery cover and it was shot, at $8 each they were a bargain.
 

m38inmaine

Well-known member
2,090
45
48
Location
Maine USA
Spent a good part of the day installing the two front brake hoses. Started on the passenger side, that was not too bad. The stacked clips that hold the steel lines were both rusted off, those were a bit tricky. Now to the drivers side, I didn't know the lines were in back of the arm jammed in between the spring and body, why it's not the same on both sides is strange. Of course that made it 2x harder to reach, and of course those same two clips were rusted off. I was able to get my hands up through the bottom of the lower arm, did most of the work from there. While getting up from the floor I drove my back quite hard into the end of the front bumper, that will make you pay attention!. The only thing I did that did not fight was to install the directional wand.
 

Attachments

m38inmaine

Well-known member
2,090
45
48
Location
Maine USA
Cleaned and primed the valve cover, installed the air cleaner gage line, replaced the clutch/brake pedal return springs and managed not to hurt myself today.
 

Attachments

m38inmaine

Well-known member
2,090
45
48
Location
Maine USA
I have the head hanging from the chain fall over the block ready to install, going to triple check all the gaskets, this will allow me to lower it in place easy. Installed the rest of the brake assemblies on the hubs, just need to order a new master cylinder now. Found all the parts to a full clutch replacement, these are not easy to get to with the engine installed so I figured I had better do it with the engine out.
 

Attachments

m38inmaine

Well-known member
2,090
45
48
Location
Maine USA
Installed the head, not too bad of a job and adjusted the valves and injector timing. All were off about the same amount. Was installing the rack arm tube and plinko, I dropped a 7/16 lock washer down inside the right rear opening in the head. Manual said to cover these with a rag so not to drop anything in there, go figure. Borrowed a scope and sure enough there it is laying in the bottom of the recess of the balance shaft channel. There are three separate channels and of all to fall in this one is the best, no oil drain hole and lots of clearance, it will fill in with oil and there it will sit. No way to reach in with a magnet or other tool, of course it could not just drop in straight it had to roll in past where you could not reach.
Rolled the goat outside and took the engine out of the back of the carrier and lowered it near the ground. Pulled the transmission and removed the clutch assembly. The clutch was toast, the throw out bearing was dry and really would have screamed, also the pressure plate was quite rusty. To add to all of that the release arm fell off the ball stud. The special spring clip inside had broken one of the two ears off, it's a horseshoe shaped round wire clip that fits in a groove inside the arm. By some miracle the small piece that broke off was lying in the bottom of the bell housing. Not having a clip I welded the broken piece back on and snapped it back in and tapped the arm back on the ball stud, it worked! Next I replaced the 1 7/8 hose tucked in behind the RR motor mount, would be impossible with it in the truck and I could see rust stains where it was leaking. It was a pain but it's replaced. Flushed out the water pump with the hose and now ready to install the engine. The engine actually went in easier than it came out, it just about fell right in where it needed to go, including the universal for the TC.

Tomorrow I'll start to bolt everything back in and continue on, getting closer though.
 

Attachments

m38inmaine

Well-known member
2,090
45
48
Location
Maine USA
Thanks Tom, cleaned and painted it while it was out being repaired. Got a late start today with morning parade duties in my MB transporting Veterans.

Today I installed the new radiator, shroud etc. Took a while cleaning up all the hardware and parts that go to this assembly, lots of parts for just a radiator. While the radiator was being repaired they decided to install a drain in the radiator, didn't ask for it but got one. So I drilled a hole with a hole saw in the LH lower part of the radiator mount for clearance/access to the drain.

This radiator was a return to Saturn Surplus, one of the few new ones they had, UPS dropped it pretty hard and the shop had to eliminate 6 tubes to repair it, looking at it you can't tell. My original core was rotten and they wanted about $400 for a re-core, I have about $200 in this "new" one.
 

Attachments

Top
AdBlock Detected

We get it, advertisements are annoying!

Sure, ad-blocking software does a great job at blocking ads, but it also blocks useful features of our website like our supporting vendors. Their ads help keep Steel Soldiers going. Please consider disabling your ad blockers for the site. Thanks!

I've Disabled AdBlock
No Thanks