Yep, Aluminum… Whats it going to do, void the warranty
")
the Allison part looks like a fiber re-enforced thermoplastic, probably popped out of a injection mold machine run by Chinese slave labor for .50 each…
There is nothing I can find in this design that forces the clutch carrier back against the bushing. I think it only experiences casual intermittent contact…
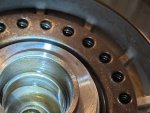
Since the pressure lubricant flows in from the rear, around the end of the center shaft(past its bushing) and out the front of the center tower alongside the center shaft, the new thrust bushing that rests right at the front of the center tower is basically under a waterfall of lube oil. In fact when the center carrier race slides back to contact the bushing, the bushing will basically be pressure lubed as that space where disc carrier race contacts the thrust bushing is the only real way for the pressurized oil to leave the center tower except perhaps along the shaft splines… it will now be forced toward the oil notches/passages to be spread between thrust bushing and disc carrier race.
pretty certain it will last longer than I do
As for dimensions, well Allison was kind enough to provide the new bushing thickness, 8.5mm or .335”, in the second bulletin. Also that it is 4.9mm thicker than the original which was ~3.5mm…. The roller bearing is 1.992ID and 2.862 OD, but I am machining the bush to a slightly larger OD as the races it sets upon appear to be 2.920. so more oil film surface area to spread out the load.
only partial extra points as I can find no alloy stamps on the piece of 1/2” plate I have available… it drills and machines easy enough so it is not one of the harder alloys, but not as soft as plastic… I might be more concerned if there was some active load on this bearing and there wasn’t so much lube available. I do not expect much wear…