• Steel Soldiers now has a few new forums, read more about it at: New Munitions Forums!

  • Microsoft MSN, Live, Hotmail, Outlook email users may not be receiving emails. We are working to resolve this issue. Please add support@steelsoldiers.com to your trusted contacts.


Picked up 6 MEP-802A gensets and will be documenting making them all runners here

pclausen

Well-known member
Steel Soldiers Supporter
452
281
63
Location
Afton, VA
Lol yeah. Mostly GPU mining these days and mostly RTX 3080 and RTX 3090s. In all, the rigs consume about 8,400 Watts 24/7. During the winter I keep them all up in my house as they provide all the heat I need. In the summer, they hang out down in my shop building.

2020 solar production vs. crypto mining consumption (only captures consumption when rigs are in shop building):

solar2020.PNG

2021:

solar2021.PNG

I sold all my GTX 1080Ti rigs back in the fall of 2020. The RTX 3000's are a lot more efficient. In fact, from spring to fall, my 50 kW solar array produces more power that the rigs and house consume, combined. So during those months, I build up a kWh bank on my account with the POCO that I then eat into during the dark winter months. I have a net metering agreement with the POCO.

So back to MEP 802A #1. All the fastening hardware completed their soaking in the Evapo-Rust and came out looking great:

IMG_0259.JPG

Currently soaking the water pump plate and misc other adds and ends along with one side of the injection pumps that had a lot of rust on them:

IMG_0260.JPG

I plan to plow out the pumps with air once done and put them back in the kerosene.

Got the rest of my washers, seals and o-rings sorted out:

IMG_0261.JPG

That's it for today.
 

Attachments

cbisson

Well-known member
155
257
63
Location
NH
Lol yeah. Mostly GPU mining these days and mostly RTX 3080 and RTX 3090s. In all, the rigs consume about 8,400 Watts 24/7. During the winter I keep them all up in my house as they provide all the heat I need. In the summer, they hang out down in my shop building.

2020 solar production vs. crypto mining consumption (only captures consumption when rigs are in shop building):

View attachment 857479

2021:

View attachment 857482

I sold all my GTX 1080Ti rigs back in the fall of 2020. The RTX 3000's are a lot more efficient. In fact, from spring to fall, my 50 kW solar array produces more power that the rigs and house consume, combined. So during those months, I build up a kWh bank on my account with the POCO that I then eat into during the dark winter months. I have a net metering agreement with the POCO.

So back to MEP 802A #1. All the fastening hardware completed their soaking in the Evapo-Rust and came out looking great:

View attachment 857486

Currently soaking the water pump plate and misc other adds and ends along with one side of the injection pumps that had a lot of rust on them:

View attachment 857487

I plan to plow out the pumps with air once done and put them back in the kerosene.

Got the rest of my washers, seals and o-rings sorted out:

View attachment 857488

That's it for today.
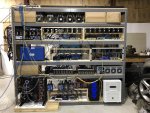
Great thread! Thanks for posting. Will be following.
 

pclausen

Well-known member
Steel Soldiers Supporter
452
281
63
Location
Afton, VA
You got yourself a real fine corner of the world right there, pclausen!

Is that a henhouse there on the back of your shed?
Trust me, I have no plans to ever leave this place!

That's not the henhouse. This is the henhouse: :)

IMG_2299.JPG

That "thing" on the backside of the shop is the intake for air to cool the mining rigs during the summer.

Here's a pic after installing the fan, but before adding the intake filters:

shopintakefan-01.JPG

These guys generate a lot of heat:

shoproom-30.JPG

You can that see poor Lister engine in the back corner to the right of the rack, lol.

Cool air gets sucked in from the North facing wall, and the gets sucked back out from the top:

shoproom-21.JPG

Getting that upper fan installed was fun!

shop-exhaust-14.JPG

Both fans motors are 3 phase, so I can adjust the rpm as needed for cooling depending on how hot it gets in the shop.
 

Attachments

pclausen

Well-known member
Steel Soldiers Supporter
452
281
63
Location
Afton, VA
Was getting ready to time the injection pumps, but realized the battery in my digital calipers was dead, so I ordered up a 20 pack of the small 356 1.5 volt batteries. They should be here Wednesday. I shouldn't run out again anytime soon, lol. I'm setup and ready to go otherwise.

IMG_0276.JPG

I spent some time cleaning the front cover and intake/exhaust manifolds instead:

IMG_0277.JPG

Need to pick up some acetone (Stove Bright specifically states not to prep using paint thinner or mineral spirits) to prep the exhaust manifold and see how close the Stove Bright Forrest Green color matches. If the cap is any indication, it is going to be several shades darker. No Ford Blue on this engine like the last one. :)

Also need to source some low pressure fuel line for the returns. These guys:

IMG_0269.JPG

Anyone happen to have a good source for those? I'd like to get the OEM braided kind if possible. Something that will be a snug fit on the injector pump return ports and those white plastic Tees.
 
Last edited:

pclausen

Well-known member
Steel Soldiers Supporter
452
281
63
Location
Afton, VA
Thanks! Order placed for 5 meters, which should be enough for a couple of units.

I also updated initial thread with a table to better track progress. Updated version here with work completed as of now:

UnitAcquire DateBuild DateHoursCostEngine ID TagInitial ConditionMain Work CompletedNew partsCurrent ConditionStill to be done
MEP 802A #16/201407 20063544$40044020385DN2WA72Water in boresBlock hot tanked, Head rebuild, ringsInjectors, rubber mountsPutting engine back togetherAssemble
MEP 802A #26/201406 20071355$60044006095DN2WA72Water in boresBlock hot tanked, Head rebuild, ringsInjectorsIn piecesAssemble
MEP 802A #36/201408 20092844$1,000081028765DB2WA72Water in boresHead rebuild, ringsInjectorsMakes powerLoad test
MEP 802A #410/201407 20093504$1,200081028775DN2WA72Engine cranksCracked rear bell housingMakes powerLoad test
MEP 802A #510/201408 20087502$800081019635DN2WA72Cracked pistonTBDIn piecesAssemble
MEP 803A #11/202107 20005717$5,0000006800210DN4WA72Makes powerReplaced cracked gaugesMakes powerFuse Mod, load test
 

pclausen

Well-known member
Steel Soldiers Supporter
452
281
63
Location
Afton, VA
I got the 5 802s from a fellow named Dean out of MD. He had them posted on CL. He had purchased a bunch of stuff from auction and realized that he would never get around to fixing all of it, so he sold me the 802s for very close to what he paid for them. He had all kinds of projects going both times I came up there. He's worse than me, lol.

I got the 803 on a M116A3 trailer from a guy in PA. That was through eBay, so he had quite a bit of overhead between their fees and PayPal I'm sure. Other than being the oldest of the bunch as a 2000 model, it functions 100% although I have yet to load test it. Sheet metal is perfect and it is very clean on the inside.
 

kloppk

Well-known member
Steel Soldiers Supporter
1,976
3,069
113
Location
Pepperell, Massachusetts
Nice update... I almost soiled myself when I saw the hours and price of your Mep-803A #1 !
Was that auction of private party sale?
They were certainly cheaper at auction back in 2014. My 1,200 hour 802A that I picked up in 2014 was $715. Picked it up at Ft Meade. Just needed a new S1 and the petcock soldered back on the radiator. Still using it.
 
Last edited:

pclausen

Well-known member
Steel Soldiers Supporter
452
281
63
Location
Afton, VA
The henhouse has power, water and Internet (well Ethernet, but same thing). Power for lights and automatic chicken door. Ethernet for PoE security cameras. So yeah, in a pinch, if the wife puts me in the doghouse, I could go live in the henhouse, or the 1/3 of it that is the storage area. :)

Got the exhaust manifold painted. I like the somewhat darker forest green compared to the oem color:

IMG_0283.JPG

So now I have to paint the whole thing. :)

I went ahead and painted the part of the block that will be obscured by the push rod tubes to ensure good coverage:

IMG_0281.JPG

It's been so long since I last set the injector pump rack and I don't recall if this gap is normal, but I think it is:

IMG_0279.JPG

That pivot piece is pinned through the rack, so it can't be moved.

Different angle:

IMG_0280.JPG

I think I'm all good, but figured I'd run it by the experts here.
 

pclausen

Well-known member
Steel Soldiers Supporter
452
281
63
Location
Afton, VA
Lol, I hear you. Like I said, I think that's the way it it. The picture in the TM looks like it butts right up against it:

pumprackgauge.jpg

But that's probably just variances in exactly where that end piece is punched through the rack.
 

Another Ahab

Well-known member
17,826
4,161
113
Location
Alexandria, VA
Very few folks have the gage. I had one and loaned it to a soldier, and you can compleat the sentence.
Hey, Guyfang, wouldn't you think any good machine shop could mill that up pretty easy and cheap (+/-), if they had all the specs?

It's a block with (2) threaded posts. That's it. Right?
 

pclausen

Well-known member
Steel Soldiers Supporter
452
281
63
Location
Afton, VA
Once I get the batteries in for my calipers, I'll measure my block and post the dimensions here. The 2 holes in it are not threaded, they are just there for the bolts to pass through. The small 2nd piece is threaded though. I'll measure it too although you can make do with just using a zip tie to hold the rack against the inner face of the larger block.
 
Last edited:
Top
AdBlock Detected

We get it, advertisements are annoying!

Sure, ad-blocking software does a great job at blocking ads, but it also blocks useful features of our website like our supporting vendors. Their ads help keep Steel Soldiers going. Please consider disabling your ad blockers for the site. Thanks!

I've Disabled AdBlock
No Thanks