• Steel Soldiers now has a few new forums, read more about it at: New Munitions Forums!

  • Microsoft MSN, Live, Hotmail, Outlook email users may not be receiving emails. We are working to resolve this issue. Please add support@steelsoldiers.com to your trusted contacts.


Picked up a knuckle boom!!

Hooty481

Member
707
4
18
Location
Russell County Kentucky
That's a **** of an idea 73m819. I think I will go that route but I don't think the factory air shift switch will work because I will need air in both directions unless the pto is spring loaded witch I could do that if it is not already.
 

Hooty481

Member
707
4
18
Location
Russell County Kentucky
I picked up a transfer case pto today. We had to go through a few of them to find one that wasn't broke or had problems. The one I went to buy was on an air shift transfer case but the rear cover was broke in 4 places. So we took one off a sprag transfer case. Then we ccould not get the collar off of it so we went back to the one that was broke and the collar came right off. They were both the type that was held in place with a bolt instead of the set screw.

Here is a few pictures
 

Attachments

m16ty

Moderator
Moderator
Steel Soldiers Supporter
9,576
210
63
Location
Dickson,TN
Did you get the oil line with it?

There is also a Tee that goes into the t-case drain hole. I've taken PTOs off that had a check valve in that Tee and others that were just a standard pipe Tee. My PTO just has the standard Tee but I've got a check valve Tee that I've thought about swapping it out with because I wonder if the check valve helps the pump stay primed.

For the air-shift PTO, you just need a two way valve as used on commercial dumptrucks to operate the tailgate. Small air cylinders can be picked up on ebay for near nothing. It also wouldn't be too hard to fab up a factory type lever and linkage. You should be able to get a good pic of it in the TMs.
 

gringeltaube

Staff Member
Super Moderator
Moderator
Steel Soldiers Supporter
6,879
2,254
113
Location
Montevideo/Uruguay
.........................

There is also a Tee that goes into the t-case drain hole. I've taken PTOs off that had a check valve in that Tee and others that were just a standard pipe Tee. My PTO just has the standard Tee but I've got a check valve Tee that I've thought about swapping it out with because I wonder if the check valve helps the pump stay primed.
Ty, I guess you are referring to the 1/4" BSP plug facing to the rear of the TC...? See my post here.
It would be interesting to know if that Tee WITH checkvalve was an upgraded version of the std setup. Normally it simply takes a std elbow fitting, down there, with no check-valve. Then both (spring-loaded ball)valves are located in the valve-body (attached to the PTO on its left side), which of course is above the oil level. So, with the early(??) design I could imagine an issue with initial priming, if for some reason the inlet valve wasn't closing perfectly air-tight.


G.
 

m16ty

Moderator
Moderator
Steel Soldiers Supporter
9,576
210
63
Location
Dickson,TN
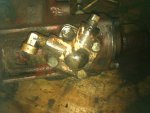
G, yes I misspoke. I meant "elbow" ( don't know why I said "tee" as I do know the difference, I guess it was late last night). Some of them do have a check valve in them though. I think you and I have discussed about this before. I've got one off and I'll post a pic if I can remember.

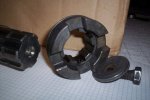
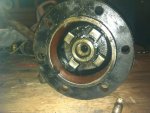
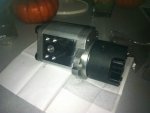
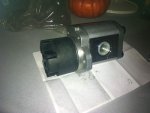
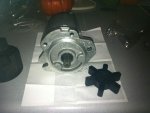
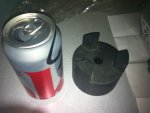
Hooty, It could also be possible to make the pump a direct mount to the pto with the lovejoy. You'd have to figure out a way to attach the other end of the lovejoy to the PTO flange, fab a mount, and get the alignment fairly close ( the lovejoy will give you some leadway but it will still have to be pretty close).
 

Hooty481

Member
707
4
18
Location
Russell County Kentucky
That is what I was actually shooting for. I am going to try to get the bed pulled of in the next day or 2 and see what it looks like. I haven't located a drive shaft or anything that will bolt to my pto flange yet. If I can find a flange and it will line up so that the love joy works I will just weld the flange to the love joy.
 

m16ty

Moderator
Moderator
Steel Soldiers Supporter
9,576
210
63
Location
Dickson,TN
I ended up having to make a flange to bolt to the PTO flange. What I did was cut out piece of 1/4" plate into a circle the same size as the PTO flange, measured the bolt pattern of the PTO flange, and drilled them into my circle. I then welded the homemade flange onto a u-joint I picked up at Tractor Supply.

If you end up having to move one of the air tanks let me know. I have a easy way of doing it with a extra set of tank brackets. I'm thinking you're going to be awfully close to that inner air tank if you do a direct mount.
 
Last edited:

Hooty481

Member
707
4
18
Location
Russell County Kentucky
I just pulled the yoke off the pto so I could replace the seal. Not sure if its bad but don't want to have to remove it later. Is there any secret to changing the seal or is it as simple as pulling the end off with the 4 bolts and knocking it out and then knocking a new one in?

I am going to take the yoke tomorrow to see if I can match something up to it. If not ill do what you did and make a flange.
 

Hooty481

Member
707
4
18
Location
Russell County Kentucky
Went to the parts house today to get a seal. They didn't have a double seal like the one that was in there so I just went with a single seal. Anybody else done that? I don't see that it will be a big problem since I won't be putting it through a rough life like it was intended for.

also didn't have any luck finding a flange to match the one that I have. Guess I will just fab one up.
 

Hooty481

Member
707
4
18
Location
Russell County Kentucky
Pulled the bed off over the weekend and I pulled the cover off the pto shaft. Cut a new gasket out for the pto and I had my Indian head there to coat it.

I stuck the pto coupling up on the shaft and I tried to put the bolt in and all the threads were gone. Well not gone they just weren't there. I read in another thread a guy had the same problem. He said the shaft was hardened and could not be tapped. I wanted to find out for my self and he is right. The tap just skates and won't even think about cutting. So I'm gonna drill and tap a hole on the side of the collar for a set screw. Does anyone now what size the set screw is suppose to be?
 

gringeltaube

Staff Member
Super Moderator
Moderator
Steel Soldiers Supporter
6,879
2,254
113
Location
Montevideo/Uruguay
Nope; splines are recessed, so the retaining ring still has room, with the drive clutch resting against the bearing.


G.
 

Hooty481

Member
707
4
18
Location
Russell County Kentucky
My drive clutch is not recessed. And when I slide it on it rest against the lock ring. I wonder if they are different. The bolt on type would rest against the bearing when it was tight. Not allowing the bearing to move and there would be no need for the lock ring. The new style since it is only being held in place with a set screw would still need the lock ring.

You can see on the last page my first picture that my clutch is not recessed. I hope were on the same page.
 

gringeltaube

Staff Member
Super Moderator
Moderator
Steel Soldiers Supporter
6,879
2,254
113
Location
Montevideo/Uruguay
You are right; not all are... just went through my parts bin and found one (out of 4) that has full-length splines - and no set screw hole.
I wouldn't hesitate for a second to put that part in a lathe, remove Ø54mm x 3.5mm and keep the snap ring in place. Better not rely on that tiny setscrew only...!


G.
 

Attachments

gringeltaube

Staff Member
Super Moderator
Moderator
Steel Soldiers Supporter
6,879
2,254
113
Location
Montevideo/Uruguay
Each one of those belong to a PTO unit. And even if I had one to spare; shipping would be the deal killer, for sure...
Sorry.


G.
 

Hooty481

Member
707
4
18
Location
Russell County Kentucky
I appreciate the info. I see where you are now and I bet it would be a chunk of change to get it up here. I guess I will put it in a lathe and cut it out. I have to wonder why they are different. And if I do cut it out will it still allow the pto clutch to engage far enough like it should. Can you give me a measurement of the total thickness of one with the set screw so I will know for sure before I cut on mine.
 
Top
AdBlock Detected

We get it, advertisements are annoying!

Sure, ad-blocking software does a great job at blocking ads, but it also blocks useful features of our website like our supporting vendors. Their ads help keep Steel Soldiers going. Please consider disabling your ad blockers for the site. Thanks!

I've Disabled AdBlock
No Thanks