asstor
New member
- 35
- 0
- 0
- Location
- Austin, TX
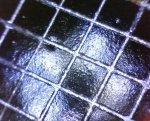
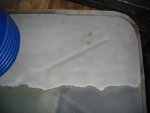
Sanity check!
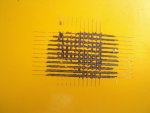
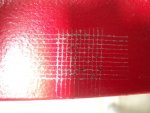
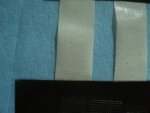
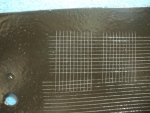
Since the Panel 1 test showed no paint adhesion loss, I wanted to make sure that the test was valid in that it would in fact remove paint from a marginally prepared surface.
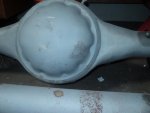
As a sanity check I performed the exact same test on a red trailer I built a couple of years ago. I know that the paint on the trailer chips easily as I did not clean the steel very well before painting. I just wiped down the mill oil with lacquer thinners and lightly sanded prior to painting. I also performed the same test on the side bed panel of my M37. This was painted yellow by the Tennessee forestry department before I bought the truck, and I can tell that it was just sprayed over the old OD green without much surface prep.
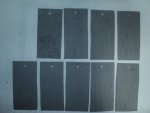
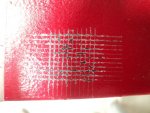
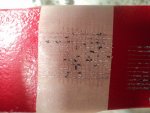
The results verified that the tests are valid as you can see in the pictures below the crosshatch pattern before and after the tests. There is significant paint loss - especially on the yellow paint.
Since the Panel 1 test showed no paint adhesion loss, I wanted to make sure that the test was valid in that it would in fact remove paint from a marginally prepared surface.
As a sanity check I performed the exact same test on a red trailer I built a couple of years ago. I know that the paint on the trailer chips easily as I did not clean the steel very well before painting. I just wiped down the mill oil with lacquer thinners and lightly sanded prior to painting. I also performed the same test on the side bed panel of my M37. This was painted yellow by the Tennessee forestry department before I bought the truck, and I can tell that it was just sprayed over the old OD green without much surface prep.
The results verified that the tests are valid as you can see in the pictures below the crosshatch pattern before and after the tests. There is significant paint loss - especially on the yellow paint.
Attachments
-
 80.9 KB Views: 8
 -
 73.3 KB Views: 9
 -
 34 KB Views: 10
 -
 43 KB Views: 12
 -
 78.2 KB Views: 8
Last edited:


 -- stick to the manufacture guide lines.. are you using spray can TM paint?
 leaves stuff behind,, as we can tell by your test...