• Steel Soldiers now has a few new forums, read more about it at: New Munitions Forums!

  • Microsoft MSN, Live, Hotmail, Outlook email users may not be receiving emails. We are working to resolve this issue. Please add support@steelsoldiers.com to your trusted contacts.


Pressing Torque Rod Ends In/Out

BlizzardX23

Member
302
12
18
Location
California
I know a lot of people have gone to shops to have their bushings pressed...has anyone come up with a system to do it at home?

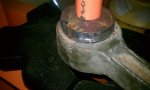
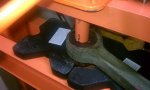
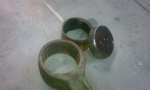
I just purchased a 20 Ton Shop Press and already assembled it in my garage...I wanna start pressing out the old bushings and ordering new ones to press in.

Thanks for any help. I'll post pictures of the process...if we can come up with a process


UPDATED
----------


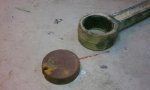
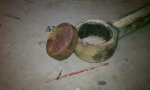
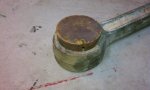
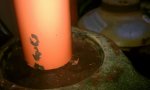
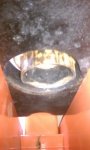
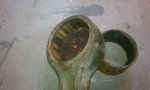
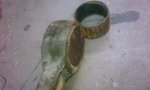
Here is the "slug"...its almost a perfect fit...but it has a taper to it because of the plasma cutter. I'll end up grinding it down to a perfect fit...take more pictures, and post up the process..soon
 

Attachments

Last edited:

NDT

Well-known member
Steel Soldiers Supporter
10,146
5,806
113
Location
Camp Wood/LC, TX
You are halfway there. I ordered a piece of 1/4 wall pipe from McMaster Carr that has a OD just under the bushing's OD. The pipe comes in precut lengths, I think mine is 12" long. Just put the dogbone and the pipe in the press and the bushings press right out with maybe a ton of force.
 

73m819

Rock = older than dirt , GA. MAFIA , Dirty
Steel Soldiers Supporter
In Memorial
12,196
314
0
Location
gainesville, ga.
Do not know about the deuce torque rods, but according to the 211 TMs (54 series ), so this also would apply to the 809 series and I think the 900 5Ts, you ONLY can REMOVE and INSTALL the insert from ONE SIDE, if done from the WRONG side, the insert will be damaged as well as the torque rod.
 

Prankster

New member
92
0
0
Location
Ponca City, Oklahoma
Tapered

Do not know about the deuce torque rods, but according to the 211 TMs (54 series ), so this also would apply to the 809 series and I think the 900 5Ts, you ONLY can REMOVE and INSTALL the insert from ONE SIDE, if done from the WRONG side, the insert will be damaged as well as the torque rod.
What he said!
Bushings, and King Pins are made in a taper so you must press them OUT from the bottom up, or flip them up-side-down.
Don't forget to apply some heat to the section before pressing.
I like to shrink the pin by cooling it just a little before I try to press it.
It may be silly, but I use a spray oil in a jet stream from that little red tube.
Watch out!
The spray oil will flair up, and burst into flame.

Don't forget to flip that section over to press those pins back into its slot.

One more thing!
Whack it from the side with a hammer after you heat it.
The vibration helps a lot!

~~~~~~~~~~~~~~~~~~~

PS. I like to use my sockets for a pressing tool.
Between the metric, and scale, there is always a perfect fit in there somewhere.
 
Last edited:

baxter

New member
355
4
0
Location
salt lake, UT
To save alot of time on the drivers side just cut off the u-bolts and replace them. On the first one we did it was an all day project, we've done 3 more since and can do the whole job including pushing old bushings out and new ones in in under 3 hrs.
 

gringeltaube

Staff Member
Super Moderator
Moderator
Steel Soldiers Supporter
6,879
2,254
113
Location
Montevideo/Uruguay
What he said!
Bushings, and King Pins are made in a taper so you must press them OUT from the bottom up, or flip them up-side-down. ................
Often... yes, good advice....... but please be specific here: the OP was referring to the TORQUE ROD END BUSHINGS... and how to replace them!

FYI the eyes on the Deuce dogbones are perfectly cylindrical, I.D. measuring 3.123" (+/- .0005") and the sleeved ends should be 3.124" to 3.125" O.D., also cylindrical, despite certain minimal deformation.
So 1) they go in and out from either side of the eye! 2) wall thickness of the end sleeves only is 3/32" or less and it may take considerable force (way over 1ton!) especially to press the old ones out, so be prepared by using an adequate tool turned to size. (A piece of std nominal 2-1/2" water pipe for example, which is close to 3.0" (76mm) O.D. simply won't work...!)

G.
 

BlizzardX23

Member
302
12
18
Location
California
Thanks everyone for the advice! Keep it coming!


FYI the eyes on the Deuce dogbones are perfectly cylindrical, I.D. measuring 3.123" (+/- .0005") and the sleeved ends should be 3.124" to 3.125" O.D., also cylindrical, despite certain minimal deformation.
So 1) they go in and out from either side of the eye! 2) wall thickness of the end sleeves only is 3/32" or less and it may take considerable force (way over 1ton!) especially to press the old ones out, so be prepared by using an adequate tool turned to size. (A piece of std nominal 2-1/2" water pipe for example, which is close to 3.0" (76mm) O.D. simply won't work...!)

G.
Awesome!! Thank you! I was curious about this...I put the caliper to the eye and they pretty much measured the same. I haven't seen any threads with information on this when I was doing my search. It seems like most people just have a shop do them.

I'm going to take my dogbone assembly to a place called Blue Collar Supply and see if I can find something to use


If there's anymore information...please share!


Thanks every
 

73m819

Rock = older than dirt , GA. MAFIA , Dirty
Steel Soldiers Supporter
In Memorial
12,196
314
0
Location
gainesville, ga.
Would not use heat to expand the end, that much heat is bad for the new insert and the torque rod
 

BlizzardX23

Member
302
12
18
Location
California
I just picked up a "slug" from a place called S&K Steel

Its a round disc...about 1 inch thick...its been plasma cut from another project (its scrap) but it fits...well, it's tight....might be a little too big...by like 1-2mm so I will file it down a LITTLE...I'll take some pics after I get done cleaning the garage right now. Gimme like an hour or so
 

m16ty

Moderator
Moderator
Steel Soldiers Supporter
9,576
210
63
Location
Dickson,TN
It helps a whole lot to heat the rod and cool the bushing. Don't heat it hot enough to melt the rubber though. Just heat the rod warm to the touch and cool the bushing in dry ice, liquid nitrogen, or something. Leaving them in the freezer overnight helps if that's all you've got. It doesn't take nearly as much force if you do this.

When you go to press them in just make sure you don't press on the center and only press on the outer edge. If you do the heating and cooling as metioned above, you need to press as fast as you can before too much heat transfer between the rod and the bushing. When you cool the bushing it does make the rubber more brittle but if you be careful you should be fine.
 
Last edited:

Prankster

New member
92
0
0
Location
Ponca City, Oklahoma
1) A don't believe a propane torch will not provide enough heat to hurt the metal parts.
2) If there is no taper to the pin, then they will be a bugger to install.
I would apply some sort of rust protection to both side before the instillation.
Moly grease is great if you expect to do this job again in the future.
Aluminum paint works great but it will not be easy to get it apart later.
 

baxter

New member
355
4
0
Location
salt lake, UT
On the 4 trucks we've done lately no heat was needed at all to push the bushings in or out. If memory serves the gauge on the press read 5000lbs of pressure was the highest I saw. They actually were very easily pressed in and out.
 

gimpyrobb

dumpsterlandingfromorbit!
27,785
747
113
Location
Cincy Ohio
1) A don't believe a propane torch will not provide enough heat to hurt the metal parts.
2) If there is no taper to the pin, then they will be a bugger to install.
I would apply some sort of rust protection to both side before the instillation.
Moly grease is great if you expect to do this job again in the future.
Aluminum paint works great but it will not be easy to get it apart later.

Nah, grease is not rubbers friend. I know it will see it in this location, but I wouldn't do it.
Silly-cone maybe.
 

BlizzardX23

Member
302
12
18
Location
California
UPDATE

My process worked, the bushing came out like butter! Step by step process will be posted with higher resolution pictures and a video...but for now, here are my cell phone pics (Posted to the Original Post). I will update this post (step by step) either this Thursday or Friday...probably Thursday (tomorrow) ...sorry it's taken a while...I just finished my finals this week and had my last one today...This quarter was fun..but glad its over!
 

BlizzardX23

Member
302
12
18
Location
California
I can now press the bushings in and out with ease. Takes me about 68 seconds to walk into the garage, place the dogbone in the press...and take out the old bushings...Maybe I can start doing them for people around the area..? maybe not...I donno if the cost would be much different from a real shop...

What have you guys paid to have the bushings pressed out and new ones pressed in?


(not looking to make much money off you guys...just...if I have the capabilities...maybe I can give people a cheaper alternative?)
 
Top
AdBlock Detected

We get it, advertisements are annoying!

Sure, ad-blocking software does a great job at blocking ads, but it also blocks useful features of our website like our supporting vendors. Their ads help keep Steel Soldiers going. Please consider disabling your ad blockers for the site. Thanks!

I've Disabled AdBlock
No Thanks